Flowers as Portraits   

Easter is about a month away and I expect a few readers will be getting flowers from someone or giving flowers to someone. Those flowers will be a great photo-opp.

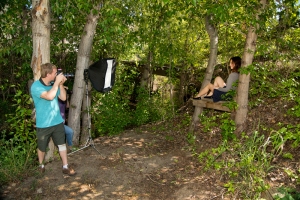
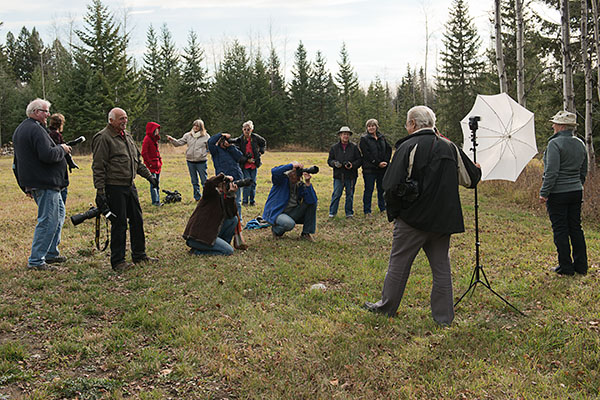
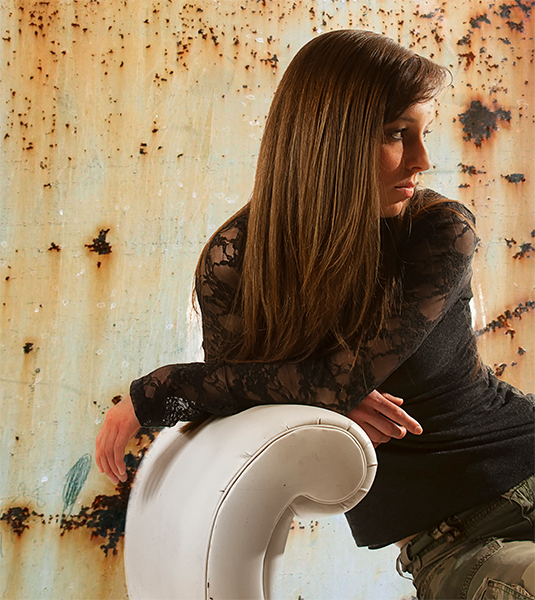
A portrait photographer’s studio set-up usually includes a backdrop and lighting equipment. The lighting, from small, or large flash units, is controlled by an array of modifiers that can include reflectors, umbrellas and softboxes. And the backdrop is chosen not so much because it is a flat surface but because it is a background to flatter the subject seated in the foreground.

The lighting illuminates the subject and separates it from that background as well as creates depth and dimensional form.

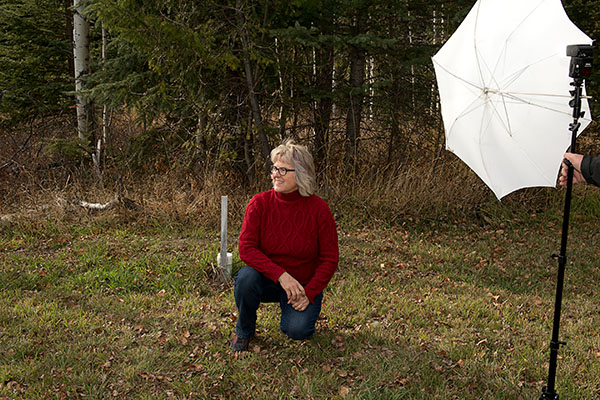
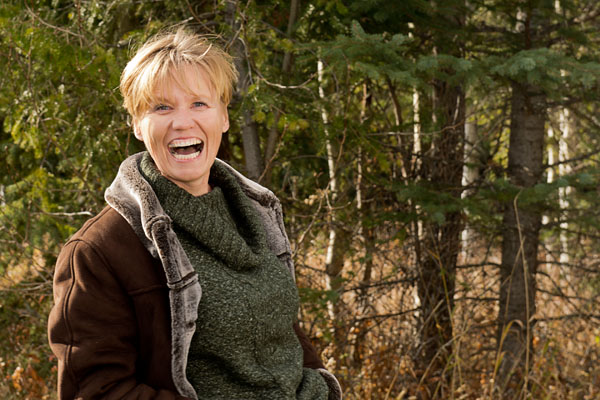
When producing an outdoor portrait most experienced photographers will begin by placing their subject in front of a neutral background or sometimes erect a backdrop and use either flash, or reflectors, to control the light on their subject and create depth and interest.

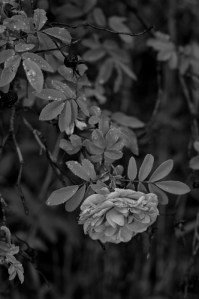
However, if I asked those same photographers to make me a good picture of a plant they would likely just kneel down next to some pretty flower and snap the picture with little thought to background or lighting.

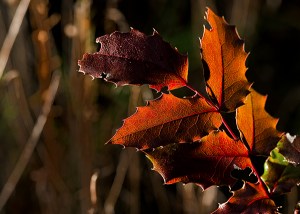
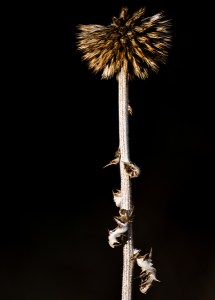
After years of doing just that to lazily document some plant that caught my eye, I decided that I wanted more from my images. I realized that it was the shapes and plant forms that drew me to gardens.

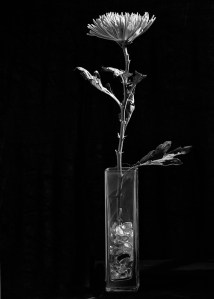
During my quest to make my plant and garden photos more than flat, lifeless documents, I discovered the flower photography of Robert Mapplethorpe. His portraits of flowers are always posed and include the kind of dynamic lighting one would expect in photographs of beautiful people. His spectacular and thoughtful compositions of flowers, like orchids and calla lilies, convey moods that to me reveal more with each viewing.

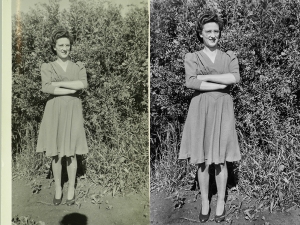
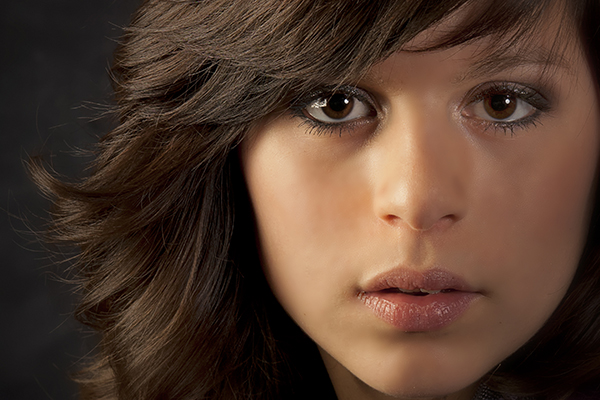
When I photograph people I try to be both creative and flattering with my lighting, remembering that a good portrait should have lasting power. I want future generations to see a portrait of their parent or grandparent and still like it. If one gets too edgy, or trendy, the portrait will not stand the test of time and be discarded when trends change.

I have come to think the same way about photographs of plants. Flowers, of course, are so much easier to photograph than people, especially potted plants. Select a good location, turn the pot until the pose looks good and add light. Plants don’t get tired, nervous or jittery. Maybe that’s why I like photographing flowers, they (almost) always cooperate.

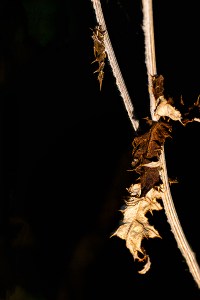
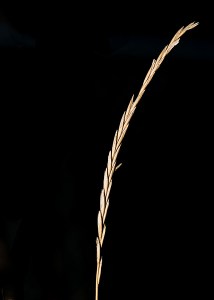
Photographing a plant in the garden or in a pot should be more than quickly pointing a camera at that flower in a garden or a windowsill and releasing the shutter.

Put that boring iPhone away, and take the time to make it more than just a repetitive, unimaginative record. Don’t be in a rush; take time to develop a plan, don’t take the lighting for granted, work with it, and above all, be creative.


Modern TTL Flash    

ttl-flash-camera

Attaching a flash to one’s camera has been, and still is, a hot topic of discussion that was going on long before I got serious about photography in the 1970’s.

I remember being confused, well actually, really confused, and read everything I could find trying to understand how a flash attached to my camera’s hotshoe worked, and how adding light from a flash (on and off camera) could be used to enhance my photography.

Early flashes produced a constant amount of light no matter how close the subject was, and over or under exposures were common. The most frequent way of controlling flash power was to use exotic technology like a white handkerchief, a translucent soap holder, or attaching a white bounce card to the flash.

Later technological development included light measuring sensors in the flash that read the light reflected back from the subject and shut off the flash when a predetermined amount was reached.

Then TTL (through-the-lens) flash came along and small computers in the camera controlled the flash. The reflected light was read by the camera, making the lens focal length, the aperture, and the distance all part of the exposure equation.

Today’s hotshoe connected flash is nothing short of amazing, and there is absolute control over the flash.

Subtracting light intended for the subject no longer needs some translucent material placed over the flash head.

Using devices like white cups, and bounce cards with a TTL flash have become all about softening or diffusing the light instead of only reducing it.

The latest flashes easily control power output, and can be comfortably used with wireless off-camera technology. Alternatively, the flash can also be connected by a dedicated cord and still remain off-camera allowing the photographer to point the flash toward the subject at flattering angles without time consuming calculations.

A photographer can, while shooting, easily select the exposure in camera, or dial the flash power output up or down. It is now so simple to reduce or increase the ambient exposure while maintaining or brightening the subject alone for more natural looking photographs than it was with early flash photography.

When I began using a flash many years ago it changed the quality of my photography. It became just like the image change I gained by using different focal length lenses.

I no longer had to rely on ambient light and I began to notice my subjects had more “pop” than those without the flash and I was pleased at being able to fill unflattering shadows coming from overhead lighting and reduce deep shadows caused by sunlight.

The modern speedlight (hotshoe) flash gives a photographer control over the quality of light and using a flash (or several flash units off-camera) when photographing people is more than just brightening up subjects in a darkened room.


Photographing a Late Fall Garden   

oregon-grape

thistle-2

thistle

grass

thorns

yellow

I try to wander about in our garden with my camera each and every time the season changes; spring, summer, fall and winter.

I have photographed the changing garden throughout the years and, although it always seems very familiar and comforting, I find myself discovering different ways to capture the life that begins, grows, blossoms and then retreats into sleep. There are times when I have constructed elaborate sets with reflectors to capture and control the light. I have built mini studios much like the controlled indoor setups that portrait photographers are familiar with. I’ve lain in the snow and employed umbrellas on rainy days. However, on this particular day I wanted light, and waited all day for sunlight that seemed reluctant to bring me one day of fall warmth I wanted to photograph before the snow that was predicted in a day or two.

When 3pm rolled around I worried that if I didn’t get something done in the quickly dropping light, other than look out the window, I wouldn’t get any pictures at all.

My camera was waiting with a manual 200mm macro, wireless sender and two light stands with a flash and umbrella mounted on each. However, when I finally walked outside (yep, I already said “quickly dropping light) I realised I was doomed to failure if I relied on taking the time to set up that equipment.

Years ago I was asked to give a lecture to the Abbotsford Photo Arts Club. I won’t go into that long discussion, but the title I chose was, “A problem solving approach to photography”. And I realised that this was the time to move into a problem-solving mode.

I removed the 200mm macro from my camera and replaced it with my wife’s 70-180mm macro. I prefer my old manual lens for close up photography, but that Auto focus zoom macro is really easy to use.

I also put aside the light stands and attached a single flash to an eight-foot TTL flash cord. I could have set things up wireless, but I was going for quick and easy and with the TTL cord I just let the flash hang off my shoulder until I wanted it.

I could have used a high ISO, a wide aperture, and just popped a bit of light for a proper exposure. But a high ISO would increase the ambient light and show the lifeless colours of surrounding foliage. A wide aperture would limit my depth of field, and TTL is fast and easy to light, compose and relight a subject.

I under-exposed my exposure by several stops, and let the dedicated TTL flash (with a diffusor cup) do what it was designed for, to deliver just the right amount of light on my subject.   That gave me a dark background that I could later make completely black by adjusting the contrast in Photoshop.

I didn’t have a lot of time before more clouds moved in making an already dark afternoon even darker, but my portable set-up made things easy and even gave me a moment to pause and watch our three legged, feral cat flee as it ran out from the cover of the shrubbery. Gosh, in spite of the damage to her one back leg, she sure can move.

I had been trying for three days to get some pictures, but unpleasant weather and life in general got in the way. However, with a bit of problem solving and the will to finally get out and do something, a person can end up with a few photographs worth keeping.


Home Studio Lighting for Photographers      

Flash Kit 3

I have written about using off-camera flash several times. Nevertheless, with the conversations I had with two separate, aspiring portrait photographers this past week asking my recommendations for setting up a home portrait studio I have decided to revisit that conversation.

In each instance they were troubled by the kinds of lighting equipment other photographers were advising them to purchase.  Both were upset at how much it was going to cost to get large and expensive studio lights other people were suggesting, and complained that they would have to wait until they had the money before a home studio lighting situation could be set up.

With serious searching they might be able to find used studio lights listed on craigslist, or similar online sales, but that will include additional shipping costs. Further, they won’t have experience with the many brands of equipment available, and are taking a chance that the units will arrive in working condition. And, to confuse them even more they will be offered lots of those cheap, and inadequate, Constant Light kits that were purchased by other unsuspecting beginners.

I knew they were both new to portraiture and just want to learn about lighting. My opinion is they don’t really need to go to the bank just yet, and would be better off starting out with smaller, speedlight type flashes. With the money saved by not purchasing the big, studio type lights they can buy a couple of inexpensive light stands, umbrellas, and maybe even add a soft-box, and a backdrop.

Photographers intent on setting up small home studios for portraits and small groups don’t need to go to the expense of the brawny, studio type lights. They can easily, and without much initial cost, set up a studio with what I personally use, and call my “portrait kit”.

I use older hotshoe flashes for my portrait kit, each with it’s own wireless receiver and stand. I can choose a shoot-through umbrella, a reflector umbrella, or a softbox, and much of the time I include a reflector. It is an inexpensive and easily stored or transported “portrait kit” that I would recommend for home studio photographers.

Wireless sender/receivers come in all sorts of inexpensive incarnations, and it is the same with lightstands and flash-to-umbrella mounts. All of this is much less expensive, and a lot easier to store and/or move around than the big studio-type flash units.

I have been using multiple flashes off-camera since the 1980s, and I always choose inexpensive, used units that I can cheaply replace if they get knocked over, or if I wear them out.

Hotshoe type, off-camera speedlights are perfect for the educational process of learning to use flash effectively, and if they are no longer a good fit for one’s creative growth, the choices as to the next step in lighting equipment will be educated decisions instead of emotional.


Off-Camera Flash in Daylight  

Whatcha Got?

Perfect lighting

A little to the left

Teamwork

The right light

Ya gotta get wet

Who cares about the water

Lets see

Flash the Cadillac


This past weekend I lead another workshop for photographers about using off-camera flash when photographing portraits outside in bright light. As with past lighting workshops my goal was to help participants understand how to use flash in different environments during daylight, and gain techniques that I hoped would help them transform the harsh daylight of outdoor portraits into beautiful light.

I was fortunate to have a great rural location where participants began in the morning photographing our model using a speedlight and a diffusion panel in a bright meadow, then moved to a large, well lit, open barn with two-flash lighting using a shoot-through umbrella and softbox until lunchtime.

After a healthy lunch provided by Versatile Studio we set up by a small tree covered stream, getting both our feet and our model’s feet wet. We finally finished the day photographing the model posing beside an old 1970s Cadillac in a nearby field.

I enjoy guiding serious photographers through their first attempts to use flash as a tool to create better photos, I want them to think of the flash being more than an uncontrollable device perched on top of the camera when it’s too dark in a room to take the photo.

I have been offering off-camera flash courses since the early 1980’s, and still believe they are an important segment of a portrait photographer’s education.

So much has changed in photography, and yet here I am 35 years later, still helping photographers learn how to use off-camera flash. Modern cameras are amazing with sensors that are so much better at capturing light than film was. But just as 30 years ago, serious photographers realize how much more flattering off-camera flash is on someone’s face than just harsh daylight.

Off-camera flash gives a photographer the ability to choose the best direction of light.

There are times when I am forced to photograph a person without using a flash. I think “forced” is the best word, because I will always use flash if I can, and as those that have taken my advice have learned, in most instances using flash for portrait photography indoors or outdoors is better than not using a flash.

Those attending last weekend’s workshop began to get comfortable using flash.

David Hobby, lighting guru and founder of the blog, http://strobist.blogspot.ca, wrote,

“Learning how to light is incremental, creative and fun. There is almost no math involved, nor any difficult technical know-how. In fact, good lighting is less like math and more like cooking. It’s like, you taste the soup and if it needs more salt you add some salt. You’ll see that when we learn to balance a flash with the existing, ambient light.”

“Controlling harsh natural light – one of the most important things to know as a shooter is how to use bad light well. Taking hard, nasty daylight and turning it into beautiful light is actually pretty easy.”

Photographing Graffiti in The Tunnel   

Lighting the tunnel

Creek Tunnel

Kast

AWs

Creek tunnel North

There is a little creek that flows into Kamloops, British Columbia via a small waterfall. Petersen Creek is diverted underground for it’s journey through the city until it circulates out and spills into the South Thompson River.

There are several places along its cement banked route where Petersen Creek’s shallow flow is visible to passers-by, but it quickly runs out of sight again when it reaches a city street and is diverted underground.

One would think there isn’t much interest to anyone other than the City Works employees who make sure it isn’t plugged up when there is a larger than normal volume of water coming down from the canyon. However, at the final concrete watercourse everything changes to several block-long tunnels that are 10-12 feet high and just as wide that have gained attention from very creative graffiti artists and, of course, locals that enjoy capturing that creativity with their cameras.

It was there that I climbed down into after parking my car on the street beside the drainage tunnel entrance. I had met a resident photo enthusiast named Shannon who has been smitten with all the graffiti she was seeing on backstreet walls and boxcars that had wandered into the tunnel and she realized that street artists were painting on the walls.

I joined Shannon, and her partner Max, a few weeks ago in the dim tunnels. They and most locals were relying on their camera’s ISO ability, but after ten or fifteen feet the light was gone.

I hadn’t been in those tunnels since I first came to Kamloops back in 1974. At that time I tried going in a bit, but the water was much higher then and other than a few crude messages spray painted at the opening there wasn’t really a reason to slosh into the dark tunnel. However, this time I decided it would be fun to light up more than just one or two paintings.

I returned with four stands with a flash on each and positioned them to cross light the tunnel. Then it was easy to begin by metering the light coming in from the road and balancing the light from each flash to match that.

When I got home it was simple to clone out each flash and use Photoshop’s burn and dodge tool to smooth out the areas where the flash had outlined its light on the floor or where ever there was a different brightness.

I chose to illuminate the street artist’s work as a whole instead of just documenting one section at a time. I know when we see what someone has left on a wall or on a train’s boxcar as it passes by, that we tend to isolate one piece of graffiti art, but as I stepped into the dark winding drainage tunnel I felt more than just a cold breeze and saw more than one bright statement. To me everything – the dark winding tunnel, and the graffiti – was all part of the whole, or one ongoing work of art. And I wanted to photograph that combination of a cold, colourful, wet, chaotic, winding tunnel displaying the work of many artists.


Copying Photographs   


Violet Walch copy

This week I noticed some pictures that were posted on a Facebook page. They were old, family pictures that were low quality, which I thought were more from the poor copying techniques of the person who posted the photos than a problem with Facebook, and I am sure the person that added them to her FB page in spite of the shoddy reproductions thought she couldn’t do better. Seeing those poor quality images reminded me of an article that I wrote about copying old photos some time ago, and wanted to remind readers how to do this.

In the article, I had been asked if I could make quality copies of old photographs that a family wanted to use for a book of genealogy they planned on publishing. They required image files with enough quality for good enlargements, and reproduction, and had tried to copy several images using inexpensive home scanners meant for documents (not photographs), and thus far were only able to produce pictures that lacked detail.

I recall they told me they also tried copying the photographs with their little digicams, but that exercise resulted in bright, white reflection spots from it’s flash that obscured features giving them unacceptable results.  A camera with an on-camera flash will produce glare on reflective surfaces, and inexpensive document scanners rarely produce good facial identification of old family photos that have languished in boxes for years. The result was much the same as those old, family photos I saw on Facebook.

When I copy photographs I lay the photographs flat and mount my camera on a copy stand that I have had for years, (a sturdy tripod would also do nicely) and use a small level to make sure the camera lens and the photographs are parallel. I use two photographic umbrellas to diffuse the flash. If I didn’t have the umbrellas I could also get reasonable results by placing some translucent material in front of the flashes, or by bouncing the light off large, white cards.  Two umbrellas allow me to balance the light. Then I make a test shot to check the exposure for reflection. In any case, the light needs to softly and broadly, not sharply, expose the old photograph’s surface.

The wonder of digital technology is that it allows a photographer to quickly review the image and retake it if needed. I also recommend taking several shots at different apertures.  And, of course using the camera’s Manual Mode. I prefer working with slightly under exposed image files. That way I can bring the detail up in postproduction without loosing the highlights in the original photographs.

If the next question readers ask is, “What kind of camera?” my answer will be that it depends on what is the desired outcome. If the final image is going to be a print, or something that is to be big enough to identify a person in the background, the file needs to be reasonably large. I prefer a DSLR, but for a small website image, a digicam that will accept an off-camera flash will do just fine.

If there isn’t access to an off-camera flash then wait for the opportunity to photograph the picture on a “flat” overcast or cloudy day.

The final step for me is PhotoShop, (there are several other programs that will also work) which I use to colour balance (and change a sometimes faded old photograph), and then go on to use for cropping, increasing contrast, and sharpening.

One could purchase an expensive scanner that takes up more room on the desk. But photographers that have already invested in their camera and have lenses that work perfectly well, (which I think are faster to use than a scanner) are perfectly capable of producing very high quality final images.

Christmas Lights are Here Again         

Street Lights

PalmTree Decor

Tree of Hope

Xmas bear

SKating rink

Beach walk

December is upon us again and the visual presentation of bright, festive lights has begun. Yes, the Christmas holidays are coming. The bright colours, the gaudy decorations, the sentimental music, the silly TV programs, and, for me especially, the Christmas lights in the city.

This past week my wife and I had to journey for a late afternoon meeting to Kelowna, which is two hours south from our home, however, that winding country road can be treacherous on dark, snowy nights and so we decided to stay overnight in Kelowna.

For some that means dinner out and just waiting the night out in a motel, but for me it’s an opportunity to have fun experimenting and photographing the season’s sparkling lights. In anticipation I had packed my camera with a 24-70mm lens and, of course, my tripod.

My preference for evening photography is to select a location before it gets dark, and to begin shooting when the lights are first turned on, when there is still some light in the sky, yet dark enough for the lights to be bright. However, our meeting lasted until after dark and I had lost the light.

I have been fascinated by Christmas lights since before I picked up my first camera, and remember family outings this time of year when my parents would pack us up in the old 1954 Ford station wagon for after dark drives along the high roads above the Salt Lake City valley. We would drink chocolate milk and look down on the colourful city lights. At that time my father was in charge of the awkward, accordion-like Kodak camera, that I doubt ever used anything but black and white film.

In spite of the late hour we drove by the downtown Kelowna lakeshore past the Yacht Club. I was sure the city would have lights along the sidewalk and hoped that some of the boats might be lit up. I had also heard that a public skating rink was opening and I wanted to experiment with a slow shutterspeed.

During the time when ISO ratings were limited, photographers who shot after dark ended up exposing for only the lights, and the resulting photographs would show lots of colours, but didn’t say anything about the location, or environment. Nowadays most modern cameras have no trouble with ISO 800 or 1600, with some even 3200, and don’t show the random speckles, which indicate degraded image quality.

Making some test shots I quickly found that the city lights were bright enough to allow me to use ISO 800. I also tried 1600, but I lost Christmas lights detail, and the buildings and walkways didn’t look like they were photographed after dark.

As usual Kelowna had lit up its tall “Tree of Hope”. I photographed that very tall electric tree last year and knew from experience that the best time to get pictures of it was early in the morning. When I left my hotel room at 6am the next morning I was greeted by a couple inches a fresh wet snow. Perfect. More light reflection.

I shot with my camera set to “aperture” priority. When I use aperture priority for this kind of photography I also employ the camera’s exposure compensation feature. If one just used the aperture priority mode the camera will, as it is programed to do, try to correct the lighting and that makes the sky too bright. This time I think I used -1.7 to darken the sky.

A drive this time of year through any town or city neighbourhood is an exciting visual presentation of bright, festive lights, and an opportunity for at least a few weeks, to have fun experimenting and photographing the season’s sparkling subjects.

Bridge Lake Workshop Wireless Off-Camera Flash              

OffCamera Workshop 1

OffCamera Workshop 2

OffCamera Workshop3

OffCamera Workshop4

OffCamera Workshop5

OffCamera Workshop7

OffCamera Workshop8

OffCamera Workshop9

OffCamera Workshop10

OffCamera Workshop11


Last Sunday saw me making the scenic two-hour drive north to join the Bridge Lake Photography Group. I have been following that creative and talented group of photographers, (www.bridgelakephotogroup.com) since a long time friend, Derek Chambers, got in touch with me about a year ago. On Sunday I led a full day workshop for them about using off-camera speedlights indoors and out-of-doors.

There is so much that I want to tell photographers when they first attempt to use flash as a tool to create better photos instead of the flash being an uncontrollable device photographers perch on the top of the camera when it’s too dark in a room to take a photo.

In my opening presentation I had to hold myself back as I sometimes realize I am talking too fast. But I get excited and I really want to move from lecturing in front of students, and go to the studio setup where the learners, not me, are center stage. That’s where my fun, and, assuredly, the participants’ fun begin.

I always enjoy the enlivened interaction that occurs when a student of flash photography takes that first shot with one of the flash set ups. Usually, no one ever wants to be first. Everything is strange. The flash that usually is attached to their camera is now attached to a softbox or an umbrella. I always have to prod and coax the students to begin, but I can hardly wait for the first “oohs and aahs” that happen when they see the results of their first photos.

My job is to present information on the subject, and keep things going. I don’t like to be a demonstrator on stage and rarely pick up a camera during the workshops I lead. That is left to the participants, and watching them learn is the fun part for me. After everyone crowds around that first volunteer’s camera and sees the picture it is all I can do to hold them back.

Our ever-patient model was overwhelmed as she tried to pose for everyone at the same time. She pleaded, “Where do I look?”   I laughed and loudly said to that excited scrum of photographers, “If you want her to look at you yell, ’Me! Me! Me!’”

We spent the morning shooting in the inside studio. For that session I had the flashes set to manual mode so their output would always have the same power. That is the easiest way. If more light is wanted on the subject move the flash forward. Less? Move the flash away.

After lunch we moved outside and I set up one flash with a shoot-through umbrella, however, this time the flash was set to TTL mode. When using flash in an indoor studio one synchronizes the camera’s shutterspeed to the studio flash, and uses the aperture to determine the exposure of the light reflecting off a subject. Progressing, however, to an out-of-doors situation with TTL a photographer must balance the natural, ambient light with the off-camera flash; and using flash effectively is more about creating and controlling shadows than about filling them.

We walked out into the bright day and our model had barely reached a location in the meadow before 15 excited photographers got down to business. By then they weren’t at all shy about getting shoulder to shoulder in the process of experimenting, exploring, and learning about outdoor lighting.

I just received an email from Chambers saying, “You’ve definitely added a whole new dimension to our photographic adventures. Thanks a lot.” Gosh, a whole new dimension to their photographic adventures. That is one of the best “thank you’s” I have ever received.

Portraiture and the Photographer’s Use of Light

Monica aDemetra 3aMollyStephanie b6. BaileaStephanie a7. MonicaDemetraMonica  a


Photographer and author Frank Criccho states, “ The success of a photographic portrait depends as much on the photographer’s artistic and creative use of lighting techniques as it does on his or her skill with the camera.”

In an opposing remark during a recent conversation, a photographer told me that he didn’t have to worry about getting a flash for portrait photography and doubted he ever would, because he could just use a higher ISO, shoot multiple bursts, and fix everything in PhotoShop.

I don’t think that he is totally wrong, but his statement certainly demonstrates a lack of the basic understanding of how light impacts a subject’s face and how light can make the subject look younger, or older, or more glamorous, or down right unappealing.

I think in the race to purchase the latest hi-tech photographic marvel many photographers tend to forget about how lighting affects their subjects.

In my opinion, the goal for portrait photographers should always be to make the subject look his or her best, and provide an image that is flattering, and allows the person you are photographing to have a photo that impresses viewers.

One could say the responsibility lies with photographers, and not the subject, as to how good they look. Yes, I know in reality that isn’t the truth, but in my experience when one makes a bad photo of someone they will blame you, not themselves, if one makes a good photo they will thank you for capturing reality.

Many photographers just excitedly snap away without examining their subject, or posing them. Relying on luck and their subject’s talent to make that pleasing portrait, and pay little attention to how the light is making that person look.

Light and how a photographer uses it is very important. Too much contrast or side lighting shows lines and blemishes, whereas, on-camera flash, or bright, direct sunlight gives a flat, dimensionless, uninspired look.

To use the words of world-renowned photographer and writer, Joe Marvullo, “It is your ultimate decision, however, to determine what is “real” about that person and how to portray it in the photograph. You must successfully translate a distinct human personality in three-dimensional form into a two dimensional representation. This recorded image must come to life on it’s own. You, as an artist, must capture the “essence” of your subjects – their persona.”

Modern on-camera flashes are excellent if used correctly and creatively. Photographers can diffuse, bounce, and move the light off to the right or left, higher or lower, and modify that light using umbrellas, reflectors or softboxes to soften and control the direction and intensity.

I believe photography is all about the light. The lazy photographer just worries about exposure, where as the imaginative photographer pays attention, experiments, and practices creating portraits using light that are more than just documents of some person.  And as Marvullo suggests it is up to you, the artist, to capture the “essence” of your subject’s personality.