The Autumn Garden for Photographers


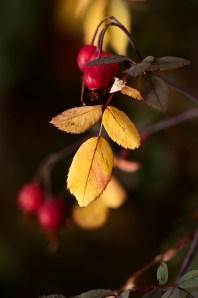
For the past week I have been looking at my wife’s garden as I walk the path from our front door to the car on my way out.  Her garden plants are dry; actually, crackling dry might be a better way to describe the plant life here in British Columbia’s interior after another summer season with very little precipitation.  She explains that she has a “dry garden,” and that she doesn’t water the garden, only for new plants when necessary.  Plants are selected that have the best chance of survival given the conditions. Parts of the garden are crispy dry, or have gone dormant, and offer a unique opportunity for photography before fall rains soften the landscape.

The nights are now getting cooler and the days aren’t as blistering hot as they have been for the past month and the plants that still have leaves that haven’t shriveled and fallen to the ground are beginning to change colour.

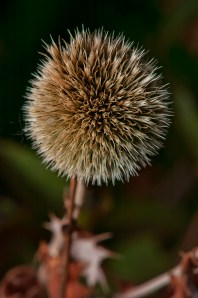
Most of the books that discuss garden photography recommend photographing plants in the morning when everything is fresh. Of course, spring is the most popular season for flower photography; and, I doubt those presenting their photographs to garden or photography clubs include photographs of lifeless plants. However, for this dedicated photographer, the combination of very dry, withered leaves and those with just enough life left to change colour are intriguing. As I have in the past I’ll admit that, unlike my wife, I can name few of the many of the flowers growing in our garden. To me, I look for colour and shape and how they fit in the environment.

My regular readers are already aware that I venture into our garden on rainy days and when it’s snowing. I enjoy photographing our garden in any season, and its dry condition is an invitation not a deterrent. So, this morning when I got up to a bright, clear, 9 degree autumn day, I thought I shouldn’t wait any longer and walked around our garden slowly looking for the flowers I would photograph later when the sun began to drop in the sky.

I waited for what I’ll call the “quiet light” at days end. I like that light that lasts for a very short time before dark when there is still light enough to see details, but not bright enough create highlights. As much as I like to use it, I can’t claim the term “quiet light”. That goes to photographer John Sexton and is described in his wonderful book of black and white photographs titled, “Quiet Light”. A protégé of Ansel Adams, Sexton and his collection of black and white photographs that he calls “an exploration of the natural environment” is inspiring; and it’s him, and photographers like him, that make me want to search out the unusual in the natural environment that would normally be ignored.

I wandered around with my tripod, a stand-mounted wireless flash pushed into a 30-inch diffuser, and a 200mm macro lens on my camera, and worked at picking out interesting shapes to photograph. The subdued light was perfect. I could place the camera on the tripod, focus on some intriguing-shaped plant, then direct the diffused flash from different positions to open up the flat-light conditions.

It’s easy to move the flash closer or further away to change the way the light effects a subject, or release the shutter several times while opening or closing the aperture.  The outcome would be different versions. Some would have shadows depending on the position of the light while others would or wouldn’t have a dark background depending on the exposure.

I didn’t spend a long time because the light didn’t last long, but I released my shutter at least a hundred times photographing different plants, trying to be as creative as possible and get the exposure and the angle just right. I had a good time and expect I’ll be at it again before everything changes again.

I appreciate all your comments, Thanks

My website is at www.enmanscamera.com

Photographing a Waterfall

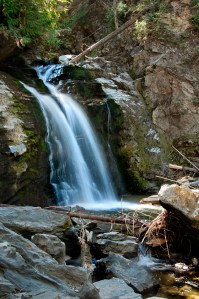
The week had been a busy one for me. Unfortunately none of what occupied me had anything to do with photography.  It is said that life gets in the way of having fun.  So when I finally was able to chisel out some time for myself this last weekend I decided to travel the short distance up the road from my home to a stream with waterfall.  The falls are just off the Trans Canada Highway as it winds past Chase, BC.

I brought along my tripod, selected my versatile 18-200mm lens, a polarizing filter, and a neutral density filter just in case there was lots of bright light, and headed out. When I arrived at the creek and walked along the well-worn path beside the rock-strewn creek up to the waterfall I found there was open shade everywhere. It was just before noon, and the sun’s direction against the large flat rocks that lined the narrow canyon was providing lots of soft, reflective light on the cliffs, the water, and the pile of logs that surrounded the falls left over from the flooding of waterways that occurred in British Columbia this spring. I don’t think I could have asked for better light. There was very little of the harsh sunlight I had anticipated so I didn’t have to use the neutral density filter, and because of all the soft reflected light I didn’t have deep shadows to contend with either.

I climbed down the large rocks to the stream just below the falls, set up my tripod and started shooting. I like the soft look of water that a long shutterspeed creates so I began by putting the polarizer on the lens, which reduced the light by about two stops. Then I set the ISO to 100 and stopped the lens down to F/11. That gave me a shutterspeed of three seconds.

Photographing water is fun. I enjoy waterfalls, but rushing streams or rivers, plant covered ponds, and mountain lakes are just as enticing. I think it’s how the water sculpts everything that surrounds it.

Waterfalls usually demand a wide-angle lens and a tripod. A wide angle allows photographers to capture the landscape that contains a waterfall and the tripod means there won’t be camera shake. The lens doesn’t need to have a wide aperture because in landscape photography, and that include a landscape with a water feature like a waterfall, one should be stopping the aperture down to create as much depth of field as possible. The important thing, if one wants that glowing, soft looking water is a slow shutterspeed.  And when the shutter is slowed the aperture must be closed, and with a smaller aperture comes more depth of field. I will also mention that a cable release is a good idea to reduce camera shake, but I seem to always forget mine, and so I use the camera’s self-timer instead.

For those who live in the British Columbia there is no shortage of waterfalls that are easy to photograph, and for many like me the waterfalls are only minutes away. Small falls like the one I go to certainly don’t match some of the spectacular waterfalls from around the world, but even tiny falls make good pictures if the photographer gets creative enough. I even have a picture hanging on a wall in my home that shows a waterfall of only four feet high. I put my camera on one of those little pocket tripods and got a very wet knee, shoulder, and hair taking that picture, and remember laughing at the contortions I was assuming to keep from getting too wet in that cold water. Now that would have been a good picture. But, as I wrote, water is fun to photograph and getting wet on occasion is worth the final picture I suppose. Someday I might get the chance to travel around British Columbia, or North America to photograph some of the magnificent waterfalls, but until then I’ll just make the ten-minute drive up the road.

And I always appreciate your comments.

My website is at www.enmanscamera.com
Photographing Portraits of Seniors

There was a time in photography when the word “seniors” meant people near or over 50 years in age.  Today photographers refer to senior portraits as high school graduation photos. But it is those in the aging demographic that don’t get much attention during discussions on photography that I want to write about this time.

When one does a search about portrait techniques or checks published books on portraiture I doubt there will be much, if anything at all, about photographing people whose faces are starting to, or have already, aged.  After all, our society is obsessed with youthful beauty and we don’t want to be reminded about aging. Despite that, baby-boomers make up a large segment of our population and they will still want portraits by photographers.

Attend a class, or buy a book, on how-to portrait techniques, and you’ll find it’s all about angles of light with discussions about off camera directional light to create drama and dimension to a subject’s face with highlights and shadow.

Shadow on the smooth face of some 18-year-old can be flattering and sexy, but when a sidelight creates deep shadows on a face that has a few more years of life it is anything but flattering, and certainly won’t be sexy on most.

Lighting manuals instruct us not to use a flash from the camera’s position, and are critical of straight-on flash. However, using a diffused flash straight-on reduces shadows and wrinkles, and a soft, direct light makes it easy to reduce any age lines easily during postproduction.

Retouching, or postproduction as it seems to be called now, has always been part of the process with those that do portrait photography, especially with seniors. I can remember hours with magnifying lenses, fine tipped brushes, mixing dyes and reprinting for final photographs. Now, I have computer programs to remove blemishes, creases, and bags under eyes. I brighten eyes, and sometimes whiten teeth, and always make sure there isn’t loose skin under the chin, or on someone’s neck.

Some of this I have done for years, only now I do it more, and it is a lot easier to retouch with computers and digital cameras. I know there are many photographers that say with misguided pride they do everything in the camera. In my opinion, that’s all right for sports and wildlife photography, but it would never do with a portrait client, they deserve more.

My advice for those photographing seniors is to take the time to choose a flattering perspective that hopefully shows some of their personality, and remember senior portraiture requires direct diffused light, retouching, and more relaxed poses than when they were young. Don’t choose low or awkward angles and tell your subject what you are doing. Remember these senior clients have been having their picture taken for a long time and in my experience are helpful in producing their own photograph.

My website is at www.enmanscamera.com

Camera Manual and the Basics of Photography.

I was photographing an outdoor event on a hot, bright day a short time ago when another photographer walked up to me complaining that most shots were not turning out as hoped. This happened again at a wedding I was photographing last weekend. The guest had a perfectly good camera, but criticized it, and said he wished he had a better one because the backlighted couple we were photographing were being recorded as silhouettes.

Ending up with faulty photographs from time to time isn’t unusual, although not as much nowadays as when film was used. However, I think most faults occur because photographers haven’t taken the time to learn how their cameras work, and have a poor basic understanding of photography and techniques.

With digital technology it’s easy to determine what is going wrong by checking the camera’s LCD and the histogram. I doubt that either of those complaining photographers I talked to used the LCD for anything but reviewing pictures. They probably hadn’t gone through the camera’s menu and set it for the conditions under which they would shoot. Both had selected the auto, or program mode, and to add light to the bright, backlit environment were only using the camera’s tiny pop-up flash. They would have been much more successful if they had a mounted a hotshoe flash on their cameras and selected the “M” mode. I expect they will be relying on their images being saved by technicians at the local photo lab or hoping for some friend with PhotoShop wizardry.

I continually meet photographers that complain about how various big photo labs are failing to make their prints the way they think they should be. They rely on their camera’s preset programs, and I expect are of the belief that if the camera they have been using doesn’t make good pictures then they should change and upgrade to the manufacturer’s latest offering to make it so.

When I arrive at a location to photograph I immediately start making tests. I keep my camera in the manual exposure mode so I can quickly change the ISO, shutter, or the aperture to suit my shooting.  I continue to do that throughout the entire session, checking the histogram frequently, and leaving nothing to chance by lazily relying on the camera’s pre-programmed modes.

I begin by contemplating about the subject and its environment.  What is the background and how will that affect the subject? What is in the foreground that will interfere with that subject?   If one considers depth of field a decision must be made about how much will be “in focus”.  Sometimes in a portrait that includes a landscape, I’ll want everything from the foreground to the far-off distance to be crystal clear, and at other times I’ll want the background to be “out of focus”; whichever I select requires its own aperture setting.

What is the lighting like and will its direction be flattering on the subject? The sun and its direction are always very important when photographing people. I prefer to have it coming from behind my subject and like to use a flash for “fill” lighting to remove shadows and silhouettes.

I can do all this because I have taken the time to learn the basics of photography, and I have also taken the time to learn how my camera works. I don’t think either of those photographers that complained to me had done that. I expect they just got themselves ready for the event, grabbed their camera on the way out the door without reviewing their manual beforehand, recalled that the digital camera has a “P”, or auto mode, and believed the camera would make everything they photographed perfect.

Photographers using film used to say that it was all in the negative; that a properly exposed and developed negative gave the best possibilities of a fine quality print.  I still agree with that principle, only now it isn’t an image about to be developed on the negative, but an image about to be processed on the sensor.

I always appreciate comments, Thanks in advance.

Eulogy for Chuck the Rooster

This past week Chuck the rooster died. I don’t think my neighbors will feel too sad because, if that rooster was anything it was a loud talker. I called it talking and everyone else called it crowing. But, to me he seemed like he had something to say and anyway I am going to miss him and his point of view.

Why would I write a eulogy for a silly bird? It should go something like, “Chuck kept the hens together, crowed lots, and then he died.” Surely a rooster isn’t worth more words of praise than that. He had a good pedigree; he was a Buff Orpington rooster with striking colouring and handsome spurs.

In May I wrote an article titled “Pets make Great Photography Models”.  In that I wrote, “Got a new camera or lens? Want to try out that studio lighting technique? Or just bored and want someone ever ready and able to pose for a photograph? Call the dog, or coax the cat. I can’t even begin to count the pictures I have taken of the horses, dogs, cats, parakeets, hamsters, chickens, fish, and frogs I have taken in my life”.

Those pets never complained when the pictures didn’t work out, and even waited for another blast of the flash without blinking. And I continued saying that Chuck, my rooster that guards the hens, doesn’t seem too interested in standing still for his portrait.

So, other than not having Chuck to keep a bunch of chickens on the straight and narrow, I’ll miss having an ever ready, constantly moving subject to practice my photography on. That rooster never stood still for long. He was always guarding, herding, searching for interesting stuff on the ground, then telling us all about what he found, flapping a lot and was always running around.

Sometimes I would set the lenses I wanted to try out on the rickety old wooden picnic table that sits in the back meadow and then open the gate to the chicken pen so Chuck and the girls could get out. They always want to get out, and eyeing my wife’s flower garden would clumsily run out and across the unmowed field grass with Chuck guarding the perimeter like some soldier on patrol.  I would sit, crouch, and lay in the tall grass, making exposure after exposure until they trundled past and into the overhanging bushes of the garden. In retrospect I should have been more serious about the pictures I took, and now I wish I had kept more of that silly old bird. But I seem to only have one or two stashed on my hard-drive.  Anyway, who wants a picture of a chicken hanging on their wall?

I tested cameras, lenses, flashes, and my ability to light with flash outdoors, stop movement and focus properly on quick moving subjects. I would walk out in the yard, find Chuck and the chickens, try something out, dump the images from my memory card to the computer, check them out, make a decision about what I wanted to try next, then delete them and go out and start again.

I couldn’t have thought of a better photographic test subject. Yep, that rooster never stopped moving and I am going to miss our time together.

My website is www.enmanscamera.com