The Canadian Pacific Railroad Holiday train 


Every year the CPR holiday train chugs its colourful way across Canada from east to      west. The train makes stops at cities along the route where there are crowds of people waiting.

Those of us in rural Canada might miss assembly with all the festivities in the city, but we get to watch and, in my case, photograph that brightly lighted Christmas train as it winds its way through the wooded Canadian countryside.

As I drove from my home down to the river valley to again photograph the Holiday train I passed people waiting in their cars parked in the area between the little Pritchard store and the train tracks just off the highway.

I have tried that location in the past, but it’s so close to the train that the only shots are on an angle. And to make it worse this time, a long freight train was waiting in the perfect position to block the view of the train after only a couple minutes.

My favourite place to photograph the train is from across the river. I drove past my neighbours, crossed the bridge and stopped along the river and walked out on the wide beach to set my tripod up.

I like the long wide view across the Thompson River that even using my 70-200mm lens lets me photograph the whole train at 70mm or just a few cars at 200mm.

That beach location allows me to capture that locomotive and it’s bright boxcars in a scenic view.

The train usually passes through Pritchard when there still is enough light to see the train. I saw a few pictures that were taken after it stopped in Kamloops 30 minutes later, and they only showed neon lights with an empty black background.

I chose an ISO of 800 when I first got there and took a few test shots. I walked around to choose a nice flat place where I didn’t have to stand in the mud. Gosh, mid December and no ice.

I will say that, although I had a better location than those on the other side of the river, I envied the fact that those waiting at the Pritchard store had hills that blocked the unpleasant, cold wind that blew at me across the flat wide river.

I joined by my friends and their children out on the beach. Jo had her stocking hat pulled down over her face and was crouching with her camera trying to get out of the wind.

I covered my ears and set up my tripod as I watched her 3 and 4 year olds running around on the muddy beach, oblivious to the cold, as they excitedly waiting for the train.

They had been to town earlier in the day to meet Santa and now running on the beach and seeing the brightly lite Holiday train was like the icing on the cake.

By the time the train came I had to push my ISO up to 1600. I was using my tripod, but with the all movement I decided the higher ISO would let me keep my shutter at a safer speed.

I think this will be the last photos of Christmas lights for this year. As always, it’s been fun. There isn’t any snow yet, but the snow will come soon I am sure, and I’ll be out again with my camera to make some pictures of that white playground.

I can hardly wait for the snow. But for now I’ll wish a very Merry Christmas and a Happy Holiday to all of you.


Copying Photographs   


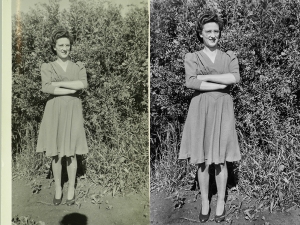
Violet Walch copy

This week I noticed some pictures that were posted on a Facebook page. They were old, family pictures that were low quality, which I thought were more from the poor copying techniques of the person who posted the photos than a problem with Facebook, and I am sure the person that added them to her FB page in spite of the shoddy reproductions thought she couldn’t do better. Seeing those poor quality images reminded me of an article that I wrote about copying old photos some time ago, and wanted to remind readers how to do this.

In the article, I had been asked if I could make quality copies of old photographs that a family wanted to use for a book of genealogy they planned on publishing. They required image files with enough quality for good enlargements, and reproduction, and had tried to copy several images using inexpensive home scanners meant for documents (not photographs), and thus far were only able to produce pictures that lacked detail.

I recall they told me they also tried copying the photographs with their little digicams, but that exercise resulted in bright, white reflection spots from it’s flash that obscured features giving them unacceptable results.  A camera with an on-camera flash will produce glare on reflective surfaces, and inexpensive document scanners rarely produce good facial identification of old family photos that have languished in boxes for years. The result was much the same as those old, family photos I saw on Facebook.

When I copy photographs I lay the photographs flat and mount my camera on a copy stand that I have had for years, (a sturdy tripod would also do nicely) and use a small level to make sure the camera lens and the photographs are parallel. I use two photographic umbrellas to diffuse the flash. If I didn’t have the umbrellas I could also get reasonable results by placing some translucent material in front of the flashes, or by bouncing the light off large, white cards.  Two umbrellas allow me to balance the light. Then I make a test shot to check the exposure for reflection. In any case, the light needs to softly and broadly, not sharply, expose the old photograph’s surface.

The wonder of digital technology is that it allows a photographer to quickly review the image and retake it if needed. I also recommend taking several shots at different apertures.  And, of course using the camera’s Manual Mode. I prefer working with slightly under exposed image files. That way I can bring the detail up in postproduction without loosing the highlights in the original photographs.

If the next question readers ask is, “What kind of camera?” my answer will be that it depends on what is the desired outcome. If the final image is going to be a print, or something that is to be big enough to identify a person in the background, the file needs to be reasonably large. I prefer a DSLR, but for a small website image, a digicam that will accept an off-camera flash will do just fine.

If there isn’t access to an off-camera flash then wait for the opportunity to photograph the picture on a “flat” overcast or cloudy day.

The final step for me is PhotoShop, (there are several other programs that will also work) which I use to colour balance (and change a sometimes faded old photograph), and then go on to use for cropping, increasing contrast, and sharpening.

One could purchase an expensive scanner that takes up more room on the desk. But photographers that have already invested in their camera and have lenses that work perfectly well, (which I think are faster to use than a scanner) are perfectly capable of producing very high quality final images.

Bridge Lake Workshop Wireless Off-Camera Flash              

OffCamera Workshop 1

OffCamera Workshop 2

OffCamera Workshop3

OffCamera Workshop4

OffCamera Workshop5

OffCamera Workshop7

OffCamera Workshop8

OffCamera Workshop9

OffCamera Workshop10

OffCamera Workshop11


Last Sunday saw me making the scenic two-hour drive north to join the Bridge Lake Photography Group. I have been following that creative and talented group of photographers, (www.bridgelakephotogroup.com) since a long time friend, Derek Chambers, got in touch with me about a year ago. On Sunday I led a full day workshop for them about using off-camera speedlights indoors and out-of-doors.

There is so much that I want to tell photographers when they first attempt to use flash as a tool to create better photos instead of the flash being an uncontrollable device photographers perch on the top of the camera when it’s too dark in a room to take a photo.

In my opening presentation I had to hold myself back as I sometimes realize I am talking too fast. But I get excited and I really want to move from lecturing in front of students, and go to the studio setup where the learners, not me, are center stage. That’s where my fun, and, assuredly, the participants’ fun begin.

I always enjoy the enlivened interaction that occurs when a student of flash photography takes that first shot with one of the flash set ups. Usually, no one ever wants to be first. Everything is strange. The flash that usually is attached to their camera is now attached to a softbox or an umbrella. I always have to prod and coax the students to begin, but I can hardly wait for the first “oohs and aahs” that happen when they see the results of their first photos.

My job is to present information on the subject, and keep things going. I don’t like to be a demonstrator on stage and rarely pick up a camera during the workshops I lead. That is left to the participants, and watching them learn is the fun part for me. After everyone crowds around that first volunteer’s camera and sees the picture it is all I can do to hold them back.

Our ever-patient model was overwhelmed as she tried to pose for everyone at the same time. She pleaded, “Where do I look?”   I laughed and loudly said to that excited scrum of photographers, “If you want her to look at you yell, ’Me! Me! Me!’”

We spent the morning shooting in the inside studio. For that session I had the flashes set to manual mode so their output would always have the same power. That is the easiest way. If more light is wanted on the subject move the flash forward. Less? Move the flash away.

After lunch we moved outside and I set up one flash with a shoot-through umbrella, however, this time the flash was set to TTL mode. When using flash in an indoor studio one synchronizes the camera’s shutterspeed to the studio flash, and uses the aperture to determine the exposure of the light reflecting off a subject. Progressing, however, to an out-of-doors situation with TTL a photographer must balance the natural, ambient light with the off-camera flash; and using flash effectively is more about creating and controlling shadows than about filling them.

We walked out into the bright day and our model had barely reached a location in the meadow before 15 excited photographers got down to business. By then they weren’t at all shy about getting shoulder to shoulder in the process of experimenting, exploring, and learning about outdoor lighting.

I just received an email from Chambers saying, “You’ve definitely added a whole new dimension to our photographic adventures. Thanks a lot.” Gosh, a whole new dimension to their photographic adventures. That is one of the best “thank you’s” I have ever received.

10 Suggestions for Successful People Photography.


Constable Mike Moyer

Constable Mike Moyer.

Actor

Professional Actor

Actor 2

Professional Actor


I had an interesting discussion with another photographer over coffee this morning. He had brought his memory card with several different pictures and as we talked about his shots he asked, “What is your favorite photography subject?”

Like many other photographers, what I like best changes with whatever I’m currently photographing, and I enjoy photographing just about everything. But in truth most of my subjects in the past 40 years have been people. My reply was, “I enjoy photographing people.”

I’ve been employed doing many types of photography since I began earning my living as a photographer in the 1970’s. And I have worked as a photographer for all types of organizations photographing all types of subjects. However, most of the time I have photographed people.  I think most photography is of people.  We take pictures of our family, of friends, and of people at celebrations and other events.

His next question was, “how do you make a photograph that is more than just the usual snap shot?”

Here are my 10 suggestions that contribute to successful people photographs.

  1. When you take pictures of people look at them and pay attention to their appearance to ensure they look their best.  Don’t just rapidly take a photo and realize later that you should have had your subject adjust something, e.g., a necklace, glasses, a collar, or especially, that tie.
  2. Do three-quarter poses of single subjects. By that I mean turn their body so that they view the camera from over their shoulder.  Choose interesting and flattering angles or points of view. Avoid straight on or “up the nose” headshots.
  3. Focus on the subject’s eyes. When we talk to people we make eye contact. There is a greater chance of your subject liking the photo if their eyes are sharp and not closed or looking away. Ensure that subjects smile.  In my experience when subjects say they want a serious photo without a smile they appear sour or unhappy in the final photo. Do one of each as a compromise.
  4. Select an appropriate lens. Avoid short focal length lenses. On a full frame camera my favorite is 105mm. However, with crop-frame cameras I don’t mind 70mm. Longer focal length lenses create a flattering perspective.
  5. For portraits, an aperture of f/4 or wider will soften the background and make your subject stand out, but for group photos use an aperture of at least f/8 or smaller to increase the zone of focus (depth of field).
  6. Look at the background behind your subject especially when doing outdoor portraitures.  You don’t want the photo to appear to have something growing out of your subject’s head or to have objects in your photograph that are distracting.
  7. Pay attention to uncomplimentary shadows created by the sun, your flash, or other light sources.
  8. Get things ready first. Contemplate the poses before you photograph your subject. The best way to bore your subject and loose the moment is to make them wait.
  9. Tighten up the shot. Get rid of unwanted elements in the photograph that do nothing for it. If there is more than one person make them get close together.
  10. Talk to your subjects. The most successful portrait photographers are those who talk to and relate to their subjects.  We are dealing with people and we communicate by talking. Don’t hide behind the camera.

And as always be positive about the photograph you are about to make. Get excited. Your excitement will be contagious and affect those around you.

I appreciate comments. Thanks, John

My website is at http://www.enmanscamera.com

Photographer Didn’t Understand the Purpose of a camera’s Meter.

Wedding Kiss Touching Noses

A few weeks ago I wrote about digital camera terminology. I expected some readers may have skipped reading that to find something more advanced, however, I received lots of comments, and some good discussions on terminology I had not included, supporting my contention that many photographers are perplexed at the new jargon.

My article was in response to a customer confused about how to discuss her camera, however, this week I was reminded again that many photographers aren’t only confused with pixels, resolution, and bit depth, but also basic camera functions.

A photographer that had recently taken a local photography class complained to me, “I don’t really understand what the meter does, or how I would use it.”  The instructor had pointed out how to select the different camera modes, but neglected to include why one might select one over another for particular subjects. He told me the class ignored Manual mode, and left him thinking that only the three automated modes were worth using. The word exposure was only mentioned in passing when referring to those automated modes and guidance concerning the camera’s meter, and how to effectively use it didn’t seem to be part of the class.

I told the photographer that the meter is the measurement tool that allows users to control light, and suggested using the Manual mode as an easy way to access the two important camera mechanisms, the Shutter and the Aperture, to increase or decrease the amount of light reaching the sensor.

I explained that the Shutter blocks light from the sensor until the shutter release button is pressed, then it quickly opens and closes.  Setting the camera’s shutter speed controls the length of time light reaches the sensor.  The Aperture is an opening that lets light pass through the camera’s lens and is measured in f-stops. In actuality, it is a hole (aperture) that photographers control by opening it wider (wider aperture) for more light, and closing (smaller aperture) for less light, similar to the pupil of our eye.

Photographers can use the meter to determine under-exposure or over-exposure of their subjects, for example, I might want to slightly under-expose a highly reflective, white gown on a bright sunny day, or conversely, brighten it up on a heavily overcast day. In both instances I would use the manual mode to check a particular subject’s exposure with my camera’s meter, especially underexposed areas or subjects wearing a black suit.

To sum this all up, photography is all about reflected light and my recommendation to that beginning photographer was to pay attention to the camera’s meter and start using the Manual mode when he decides it is best for the job at hand. The camera is a tool with many functions, and one is never limited, and can choose as the situation demands.

Learning to use the camera’s meter and getting comfortable using manual exposure mode to manage shutter speed, and/or the aperture settings gives the advantage of full control without as many chances of the camera being fooled by unexpected changes in light. It gives optimal command, when needed, over the amount of light that still shows details in both the shadows and the highlights, allowing mastery over how photos are viewed and interpreted.

Don’t hesitate, I enjoy you comments.

My website is at www.enmanscamera.com

Excellent Photographic Adventure with old cars in the Palouse

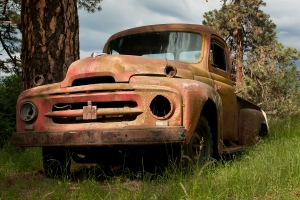
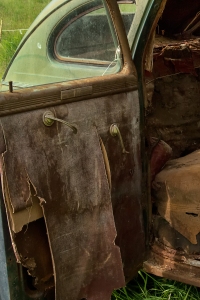
Resting in deep grass In a field of green  In the shade of a tree GMC grill   the trunkJRE_4530bJRE_4529b

Last week I wrote about my photography adventure in the Washington Palouse area, with its undulating landscapes and picturesque dunes.

For me, the most satisfying moments of that trip was photographing the patterned fields from the top of Steptoe Butte as the sun came up in the mornings, and, finally, at day’s end standing at a canyon edge capturing the falling light on the spectacular Palouse Falls.

However, during the day our group’s leader, Aaron Reed, offered the opportunity to photograph old derelict vehicles he had located on dusty back roads, and we spent our mid-day driving to several different locations.

I have always enjoyed photographing old clunkers left resting, rotting, and rusting in forgotten fields. Even though where I live in British Columbia they aren’t that hard to find, when we stopped and wandered out into some field when an old car was spied, I was as just as eager as the others.

My approach isn’t very formal and while the others strategically placed their tripods, and selected filters; I would kneel in the deep grass, or lie down in the dirt, and start shooting. Grass stains and dirt clung into my clothes as I shifted, rolled, and dragged myself along on the ground making photographs from low angles.  For me, it’s all about the picture, right?

My lens of choice usually is a 24-70mm used at the 24mm focal length, which on my camera’s ¾ frame sensor is equal to about a 35mm. I will add that in the days of using film cameras, a 35mm was what I liked the best then, same as now for photographing derelict vehicles.

I know many photographers prefer dramatically distorted images created with ultra-wide lenses, but even a 35mm has distortion, certainly not as much as the 11mm lens one person of our group on that trip was using on his full frame Canon, but distortion enough for me.

I usually place a polarizing filter on my lens when photographing automobiles. Not because I am concerned with controlling the sky as I would in a scenic shot, but because a polarizer allows me to reduce the glare on chrome and glass. And I prefer to photograph reflection-free windows, if I can get it, as opposed to those that mirror the sky and surroundings.

As I stated, my approach isn’t that formal. I usually operate my camera in manual mode, and I don’t use higher ISO like over 400, unless the lighting conditions demand.  Normally, I take a meter reading off the ground, get just as low as I can by sitting, kneeling, or laying down, depending upon the high grass or other obstacles in the way, then focus on the old vehicle, making both horizontal and vertical images, and then move on to the next.

I admit I also like close-up views and select features that interest me on the rusting clunkers, so I would set the focal length of my 24-70 lens to 70mm while looking through an open window, open door, or when I found an interesting hood, or trunk, ornament.

Photographing those dilapidated old automobiles was, in my opinion, the icing on the cake for what was already an excellent photographic adventure.

I always appreciate comments. Thanks, John

My website is at www.enmanscamera.com

Metering to Achieve the Right Exposure

I was leading a workshop about off-camera flash and had been discussing lighting. I paused and to make sure everyone was following and asked if there were any questions. One participant responded, “I don’t know what you mean by metering each light differently?  What is a meter?”

Caught off guard, I replied, “It’s how you get a proper exposure”.  He blankly looked at me, but fortunately, before I confused him more, another in the class said, “no, he means in his camera”.   I realized he had just asked a question (maybe one of the most important of the day) I should have anticipated early in my lecture.

Today’s high tech cameras are wonders at balancing all the light in a scene and many photographers unfortunately choose one of the programmed modes, point their cameras, release the shutter, and never look at anything on the camera but the LCD again.  Even using a flash, just the right amount of light almost always seems to be perfect. However, if we want to control and master light, whether it’s the sun, a reflector, a camera mounted flash, or off camera lights, we need to understand how that light is bouncing off the subjects we are about photograph.  Why would we bother when these newfangled cameras are marvelous?

That photographer in my lighting workshop had never used his camera on anything but the Aperture priority mode. That means he selected the aperture and the camera’s computer selected the shutterspeed.

In this workshop we were directing one flash to brighten the background, one to create a highlight on the subject’s cheek, and another high to the front as main illumination. Each of those lights had different intensity, and it’s the meter (consider it a tool) in the camera that we use to easily tell us what each individual exposure is so we can control the image.

Here is an example of critical metering I wrote about on 6 September; “The guest had a perfectly good camera, but criticized it, and said he wished he had a better one because the backlighted couple we were photographing were being recorded as silhouettes.”  That photographer had his camera set on a program mode and was of the belief the camera was capable of solving the high contrast lighting.

The camera’s computer couldn’t determine correct exposure with a strong changing backlight, and since he didn’t know how to use the camera’s meter all he could do was claim it was the camera’s fault.

On that day I began by metering to determining the overall exposure. I started with an ambient exposure, and by reading my camera’s meter, I decided to stop down enough to make the ambient backlight an underexposure, then added a flash slightly off camera which brought up the luminance of my subject so that, unlike that confused photographer that didn’t use or pay attention to his meter, I ended with a very usable photograph that didn’t need to be saved in postproduction.

I prefer using my camera on manual, but in both situations those photographers could also have used their camera’s Exposure Compensation (EC) feature. EC works great, and worth reading the instructions to learn, but for the application at my workshop, and at that fast moving outdoor wedding I prefer the “M” or manual mode. However, I must admit that although I like using exposure compensation, as it is fast and efficient, I get involved thinking about other things and forget to reset the EC. Staying on manual, and using the meter display at the bottom of my viewfinder helps me to remember.

Using the metering tool determines how the camera sets exposure, and today’s cameras make it easy for the photographer to choose a metering mode for the shooting conditions. Understanding the meter tool allows for control over the different exposure modes that determine how the camera will set the shutter speed and aperture.  I can only stress that readers who have DSLR cameras learn to use the meter.

Everyone’s comments are welcome.

My website is at www.enmanscamera.com

Modifying light and keeping photograph’s exposure believable.

A few weeks ago I wrote about modifying light instead of using the direct light from a camera mounted flash.  This is a topic I have discussed many times in my years writing for different publications as I strive to persuade photographers to add flash to their portrait photography.

It seems my comments are having some success because since my blog of May 5thth I have had more than one photographer tell me they had started using light modifiers like “shoot through” and reflector umbrellas. That is a good thing, however, I’m now receiving questions like, “Now that I’m bouncing and softening the light, how come the background doesn’t look right?”

Like any photograph, inside or outside, a photographer needs to take into account how all elements in the image are exposed. That’s the reason I prefer using the manual mode on my camera. It makes it easy to set the exposure where I want to make that subject look like it fits into the environment.

Here is an example that might help readers.  A week ago I photographed a couple in a wide field alongside the South Thompson River. They wanted the white, silt cliffs that jutted up from the grassy flatlands to be visible behind them. The sun (when it poked through the clouds) was bright and cast unflattering shadows on their faces.

My goal was to have the correct exposure for the cliffs, the sky, and, of course, my subjects.  It was slightly breezy; therefore, my wife held onto a stand with a 33” umbrella and wireless flash I used to provide a fill light that would get rid of unsightly shadows on my subjects.

Indoors or out, I always start with the shutter speed. If I need it to be faster I bump up the ISO. Usually I try for 100 ISO, but sometimes I need a higher shutter speed and a wider aperture and that’s when I adjust my ISO.

I first decided what exposure would give me a nice sky and scenic white cliffs. In this instance I metered the exposure and then underexposed by two stops to give me a bit of a darker appearing landscape. Then as my subjects were positioning themselves I fired the wireless flash from different positions until I saw that the light on their faces appeared in the way I wanted it.

My exposure and flash modes were both set to manual. Using manual exposure gave me consistent control over the ambient light. To find the proper exposure for the flash I just moved it closer till I was satisfied with what I saw in my camera’s LCD.   I had balanced the light. There was a nice dark sky, the white cliffs were shining and had defining shadows. My subjects were separated from the slightly darker ambient light without any shadows at all on their faces.

The ambient light kept changing quickly as clouds moved in and a storm approached so I switched from manual flash to TTL flash, and because of troubling wind removed the umbrella from the stand, and instead used a small diffuser cup on the flash to modify its light.

With the camera in manual mode, the shutter, aperture, ISO, distance of the light to the subject, and power of our light source, all controls flash exposure. Things change with the incorporation of TTL flash.  Used together, the TTL camera and flash controls and calculates the flash exposure, and adjusts the power of the flash to deliver and determine the correct flash exposure regardless of the photographer’s choice of shutter, aperture, ISO, and subject distance.

How a portrait looks does have a lot to do with how the subject(s) are posed, but I think light and how it is applied is just as important. Using flash, on or off camera, to modify light gives a photographer more control than just using the sun, or relying on a high ISO. In addition photographers must also experiment and learn how to balance the background, or ambient light, with that flash.

The location really does not matter, whether inside or out, as long as there is enough ambient light to expose the subject. Pose the subject in front of a window or on the lawn. Then add enough light from another source to achieve the final goal of having the background, the foreground, and the subject exposures all together appear to be balanced and not looking artificial.

http://www.enmanscamera.com


Photographing competitive events

On August 20th I was one of the photographers hired to produce images from this year’s BC 2011 Strongest Man Competition held at McDonald Park in Kamloops.

The day was hot and sunny with a clear blue sky, conditions that made it uncomfortable for the weight lifters and difficult for the photographers. For the athletes I think the heat made the competition more challenging, and for me the sharp contrast between subject and background on such a bright day meant camera metering changed constantly. Selecting Auto program modes would have drastically reduced the number of keepers under those quickly changing conditions, and as it was I constantly altering my settings depending on whether the contestants were facing the sun or not. Sun and shadows on moving subjects can be a problem and photographers have to pay attention, otherwise they will end up with both over-exposed and under-exposed images of their subjects depending on the action. My technical advice in this case would be to select the Manual mode, staying away from Auto Program modes, and keep checking the camera’s histogram, and to be prepared to use a flash when needed. The Manual mode allows one to meter for what is important, for example, a participants face in shadow (or in the bright light just seconds later). Then the histogram can be quickly checked to make sure that the exposure is what the photographer wants.

I know organizers for these types of sporting events always give photographers wide latitude and leave what is to be photographed almost entirely up to the photographers. For newcomers this might bring an immediate response of relief with thoughts that all they need to do is wander around happily snapping candids as they please, however, that is far from the truth. Organizers usually don’t put into words what they want, and trust that their photographers know what to photograph and will deliver usable images, but some random candid photographs that do not tell a story are not what they want, otherwise a photographer wouldn’t be included in their budget.

I am sure that the images of most value to clients will be the ones that aren’t just a document of a guy lifting some heavy weight, and I try to find camera angles that tell a bit of a story, and, hopefully, can stand alone if needed in some future advertisement. My opinion is that photographers need to work hard on this project, to think about their subjects, and be creative as they search for the decisive moment when everything comes together.

In this kind of work it is more than wandering the park with a camera, and creating a photograph that is strong enough to stand on it’s own goes beyond just being a picture filled with nice colors, as it needs to provide the viewers with information that they can make into a story. I think a good photograph is one that makes us have a connection with, or to think about, the subject.

An event photographer’s first goal is to successfully document everything important that happens. The second is to compile enough images to be a narrative of the occasion, then third and lastly, and maybe most importantly, to create photographs that by themselves tell individual stories of those that attended or are the main focus of the function.

I was there the entire day and enjoyed photographing that competition and liked the opportunities to make many excellent photographs of the many participants that I am sure everyone involved will appreciate and be able to use. I came home tired and a little rosy from too much sun, but overall it was a most enjoyable way to spend a Saturday, and by the time the day was over my memory card was just about full.

http://www.enmanscamera.com