Lighting flowers with off-camera flash   

I intended to spend some time this week photographing the spring garden.

Last week I was sure that the days and nights would warm and I would have lots of colour to point my camera at. However, as with all the other surprising changes this year has brought the weather turned cold and although there is a lot of green in my yard there isn’t much else. With that I thought I’d repost this article I wrote in April 2014.

“The snow has finally, and at last, left the north side of our house. It’s barely been gone two weeks; nevertheless, that means two weeks of new growth in my wife’s garden.

My wife mentioned the crocuses were coming up everywhere I thought I’d check to see if there were any left after a weekend visit with our two granddaughters who like to pick flowers. As it turned out the girls hadn’t got them all and there were many more coming up everywhere. So I decided I should select a couple plants to photograph before the bloom was over.

I had been making notes in preparation for a workshop on using flash outdoors that I planned on leading the May.

I thought why not photograph the flowers just as I would do a portrait of a person. I got out a small 2’x2’ backdrop and placed it behind some of the flowers. That small backdrop, especially constructed for flowers and other small items, is made of black velvet material attached to sharpened dowels that easily poke into the ground.

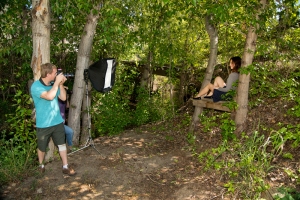
I mounted two wireless flashes on light stands, and put a 40-inch umbrella on one placed shoulder height to my right and a 30-inch on the other positioned low to the ground on the left.

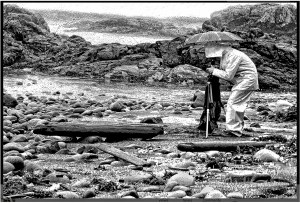
Needing to shoot low, I used my favourite garden tripod, the uniquely flexible Benbo. The Benbo tripod allows each leg to be independently positioned, and instead of a vertical center column configuration that most tripods have, the Benbo has a column that fits off center and when the legs, which go in almost any direction, are splayed out flat, the camera can be positioned just off the ground.

I mounted my 200mm macro lens on my camera. That focal length let me situate the camera several feet away from the crocuses so I wouldn’t have to put an end to the new growth coming up everywhere in my wife’s garden while still letting me have a close focus.

The exposure was made exactly the same way I would have made it if photographing a person in an outdoor studio. Slightly underexpose the ambient light, reposition the flashes for the best light direction, and continue to make tests until I got lighting that would flatter my subject.

Lighting a subject with off-camera flash is fun, and putting up a backdrop ensures that it is even more so. It doesn’t matter who or what the subject is because I like to use a flash.

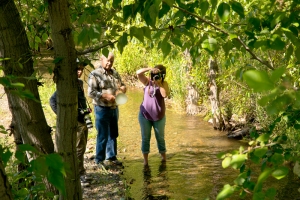
For me portraiture is all about adding light. It was also really nice to spend some time outdoors in the garden and see it coming to life in the spring.


Long exposure workshop at Chase Falls                               

Two weekends ago Jo and I hosted a long exposure workshop at the nearby Chase Falls.                  In the rain I might add.

After returning from Vancouver my photo partner Jo McAvany posted some of the long exposure night photographs she took of the Vancouver lights. Those images garnered quite a bit of interest and Jo was fielding questions from more than one local photographer about how she made them.

We decided to pick a date and offer a workshop that would allow participants to try long shutterspeed photography and also to use neutral density filters.

I like my classes to be strong learning experiences and as with all that teach I included handouts, and this time I also included a set of six ND filters for each photographer to use. All they had to bring was their camera with a fully charged battery, their favourite lens, and a tripod.

We chose the Chase waterfall because it was close, easy to get to and, this time of year, extremely safe if one has good enough balance to climb through and over the big rocks.

What we weren’t expecting was a rainy day… fortunately some of the photographers in attendance had the forethought to bring umbrellas. I also had two that I always keep in the trunk of my car and I brought a few towels that I handed out to wipe the rain off cameras.

Jo began the day when everyone was gathered at the parking lot, while I was passing out filters and handouts, by telling people that after our trip to Vancouver she has absolutely become hooked on long exposures, and I have no doubt that we now have a few more dedicated converts.

Most photographers understand their shutter, but using shutterpeeds longer than 1/30th of a second, and adding ND filters is often new territory.

The rain was only a slight inconvenience as the excited group started seeing their results of the waterfall. The light on that wet rainy day was, as I had hoped, perfect at the falls. Rainy days are usually like that.

We worked as teams in the rain. With one partner holding the umbrella keeping the camera, lens and filter dry as the other set up the tripod and camera at each location.

It was a great day for learning something new. Yep, I am sure there are now a few more photographers that have Jo’s passion for long exposures.

I am looking forward to the trip we are planning to Kelowna in December to photograph the Christmas lights. I think we may go a bit early so we can do some long exposures near the marina along Okanagan Lake. I’ll finish with this great quote I found by German artist Dieter Appelt.

“A snapshot steals life that it cannot return. A long exposure creates a form that never existed.”


The first Flash-How-To workshop of 2019    

I had planned to write about photography in the snow. After all it’s January here in western Canada and it should be snowing.

There isn’t much snow in my neighbourhood and it isn’t that cold out. So instead I’ll write about what I did on my first weekend on the New Year.

I decided that a good way to begin another year of photography would be to host a Flash (speedlight) workshop to help those photographers that are planning to photograph people in 2019.

While I was preparing for the class I found an article by California based photographer Jason Shelton tilled, “5 Reasons to Use Flash”. He continued, “Flashes are more than just Fill….Reason 1: Flash is Awesome. Reason 2: Flash is Awesome. Reasons 3, 4 and 5: Flash is Awesome.” Although I absolutely agree with Mr. Shelton, I needed a bit more to tell the photographers in attendance than that.

So many of today’s modern photographers have become lazy with the amazing camera technology we have. Without a thought about controlling the light, it’s direction, or the light’s quality. They point their cameras and hope their cameras will make good pictures.

The one-day session I lead was about speed lights (hot shoe type flashes) and how to use them on and off-camera.

This class filled up so quickly that I almost forgot how hard it is to convince photographers that a flash isn’t only for darkened rooms. When I passed handouts about using flash to everyone I watched people begin to read and some even nodded as if agreeing with what they were reading.

I use handouts so participants don’t need to take notes.

For those that didn’t have their own flash I had several lying on the table. There were also flashes with wireless receivers mounted on light-stands topped with umbrellas ready and waiting around the large room.

I began with my thoughts on why I think everyone should have a dedicated TTL flash and how we can balance the light in a room without giving our subjects that “deer in the headlights” look.

I moved on to high-speed sync and after everyone set his or her cameras up we moved outside to give that exciting feature a try. When I tell people their cameras can sync at 1/8000th of a second I always get looks of knowing disbelief because camera and flash manuals usually show a sync speed of 1/250th or slower.

After that, lets call it “awakening”, I gave everyone triggers to place on their cameras and we moved to the light-stands and spent the rest of the day using off-camera flash.

Although I talked a bit about posing, I was mostly interested in showing participants how to position the light.

It’s gratifying to have a group of photographers sit listening to one’s lecture on any subject, that’s great for the ego. But what makes me smile and reinforces my desire to continue is the excitement in the room.

In this case it was when 8 photographers, all competent at using their cameras, suddenly discovered how wonderful and creative using flash instead of natural light is, They may have bought a flash because the salesperson said they’d get a good deal if the purchased it with the camera. Or possibly they worried their camera’s ISO might not go high enough and needed a flash at a friend’s wedding reception.

As I was showing a quick, easy and flattering way to pose an uncomfortable subject I realized that the room was noisy with loud talk. I stepped back while a photograph was taken using an off-camera flash and I listened to the many excited discussions.

I realized I had a room full on converts.

Home studio Lighting set-ups for Beginning Photographers      


I am always pleased when I know that someone has actually read my articles.

Twice this past week I was visited by different aspiring photographers, that had read my last article on using lights and stopped by to ask advice on setting up home portrait studios.

For them and others that missed my past article on setting up a home studio, here it is again:

In each instance the photographers were quite troubled by the kind of lighting equipment other photographers were advising them to purchase and how much it was going to cost to get large and expensive studio lights.

They complained that they would have to wait till they had the money before a home studio lighting situation could be set up. I believe they were paying attention to those that included expensive manufacturer’s names for their studio type lighting setups.

One might be able to locate used studio lights with a bit of searching online. However, there will be shipping costs, plus there is a chance that they will arrive not working.

There usually isn’t lot of quality studio lights locally, and to confuse new photographers more there will be lots of those cheap, inadequate, constant light kits that were purchased by other unsuspecting beginners for sale.

My opinion is they don’t really need to go to the bank just yet, and would be better starting out with the smaller speedlight type flashes.

With the money they save by not purchasing those big studio type lights they could buy a couple inexpensive light stands, umbrellas and maybe even a softbox and backdrop.

Most small home photography studios are in the basement with equipment stored to the side until the photographer quickly sets up for a portrait session.

And if the room is less than twelve feet high, thirty feet long and only used for children, small groups or single person portraits, those big powerful and expensive studio lights may be overkill, and a real hassle when one wants to soften the background by shooting a wide aperture because there is just too much light power for small spaces.

Photographers intent on setting up small home studios for portraits and small groups don’t need to go to the expense of the brawny, studio type lights. They can easily, and without much initial cost, set up a studio with what I personally use, and call my “portrait kit”.

My portrait kit is four older hotshoe type flashes, each with it’s own wireless receiver and two stands. I can choose a shoot-through umbrella, a reflector umbrella, or once in a while a softbox, and might include a reflector. It’s an inexpensive and easily stored “portrait kit” that I would recommend for most first-time, home studio photographers.

Wireless senders and receivers come in all sorts of inexpensive incarnations, and it’s the same with lightstands and flash to umbrella mounts.

All of this is much less expensive, and a lot easier to store and/or move around than the big studio-type flash units.

Even if there were a wad of cash burning a hole it your pocket, my advice would be to proceed slowly, and learn how use light to best photograph a person first.

I have been using multiple flashes off-camera since the 1970s. I prefer inexpensive used units that I can cheaply replace if they get knocked over or I wear them out.

Hotshoe type speedlights off-camera will be perfect for that educational process, and when they are no longer a good fit with one’s creative growth, the choices as to the next step in lighting equipment will be educated decisions.

An outdoor studio for photography     


A couple of weeks ago Jo stopped by to tell me she and 8 friends wanted to do a “Disney Princess” shoot. She came up with that creative idea and posted a call for women that wanted to do modern interpretations of those cartoon characters from the Disney movies.

Her question to me was, “can I do this out-of-doors and still create flattering studio kind of light portraits?”

Absolutely! was my reply. Sure one could go through the expense and trouble of renting a studio, but it’s pretty easy to duplicate the indoor studio type lighting out-of-doors.

Gosh, the movie people have been doing it for years. I jumped at the chance to show Jo how easily it is.

We hadn’t had rain for almost a month so I decided to create an outdoor studio in the meadow on the south side of my home. The “princesses” would be showing up just after noon so I chose a location to set up the backdrop that had shade from several tall fir trees. I also planned to put up a canvas gazebo with a table for the makeup artist to work.

“The best laid plans”.

Actually, those aren’t the words I used as I looked out my bedroom window at the rain the morning of the event. The local weather reporter had suggested there might be some spotty rain in our area, but the pounding deluge outside my window wasn’t what I expected.

However, because of the possibility of rain Jo and I had set up one of my backdrops under my canvas carport the night before.

I got a “good morning I’ll be right over” text from Jo as I sloshed out to set up the lights under the carport. The rain was a hindrance that dampened the yard (and I am sure the spirits of the soon to be princesses) but “Light is Light” and all I had to do was balance my off camera lighting.

The larger backdrop we had set up was for blocking the wind, rain and what limited daylight there was. We then erected a black paper background and I used two lights mounted on stands with umbrellas to model our subjects.

I am sure there are those that would have just upped their camera’s ISO and hoped for the best on that dismal flat day. But I like the modeling, depth and control over a subject’s features a flash adds. Heck, we might as well have been in a dimly lighted room. The ambient light was that good for adding flash.

When Jo’s subjects arrived they turned my house into a makeup and change room. There were costumes and clothing everywhere. I just stayed out of everyone’s way and concerned myself with the outdoor studio except for an occasional quick trip to my kitchen for another coffee.

The rain lightened a bit, but never really stopped all that much. Nevertheless, those excited Princesses were all about creating a modern day reality or personal version of the Disney character they were supposed to be. There was a lot of laughter and running back and forth along the bushy wet path from the carport to the house.

American photographer and author of the Strobist.com blog, David Hobby said,  “…You hear a photographer say, “I’m a strictly available light photographer, I’m a purist.”

He continues to say, ” What I hear is, I’m scared of using light so I’m going to do this instead. Well, for me lighting was a way to start to create interesting pictures in a way that I could do it.”

I will add that I have, personally, always felt that photography is a series of problems to be solved, and rain or shine it’s really the goal of flattering portraiture.

I think that many people viewing the pictures Jo took outside on that rainy day will, unless told, think that the portraits were made inside a well-equipped indoor studio. I guess it doesn’t really matter where they posted for their Disney Princess portraits, only that they are good.

In all the commotion I forgot to begin the day with the words of legendary 1920s filmmaker, D.W. Griffith as Jo pointed her camera on that rainy day, “Lights camera action”.


Photographing a July garden.  


I waited all day for the bright harsh sun to dim. It was just after 8PM I was finally able to walk into my garden with camera and flash to photograph the July flowers.

June was, as usual, pretty wet and full of bloom, but I was waiting for the hot summer to present a change in the plants and flowers so I could continue with my photographs of the garden in all seasons.

I am not so much impressed by flowers as I am by the shapes of them. To me the colour is only part of what I want to capture with my camera, and I don’t really care if I am photographing in the spring, the summer, and fall or in the cold of winter. Dry, wet, or covered with snow. It’s the shape and plays of light that intregues me.

I don’t like bright, contrasty sunlight. I prefer overcast or, at the least, the lower light at day’s end.

I wandered out with my camera, macro lens attached, tripod, light-stand and flash fitted with an umbrella in the still bright, but certainly not as glaring as mid-day or early afternoon light.

Regular readers know that I always employ a flash. The flash gives me control over direction and intensity of the light. Some photographers my say they prefer “natural light”. I will just say, “naturally, I add light.”

With digital came high-speed sync. High-speed sync gives me the opportunity to increase my shutter’s speed dramatically when using a flash. Even up to 1/8000th of a second. That increase in shutter speed means I can use a wide aperture even in the direct sun.

It also means that I can control flash exposure with the shutter speed instead of the normal way photographers control their flash power, the aperture.

I choose my well-used old 200mm macro. It’s from the time of manual cameras and doesn’t have the option of auto focus. I like it because I can select any point along its focal length when photographing flowers.

My flash was a big 800w battery powered, wireless off-camera strobe. I use it in manual power mode and, of course, High-Speed sync.

I under exposed the ambient light 4 or 5 stops so the proper illumination would come from my flash.

The garden, designed by my wife when she was alive, continually blooms from spring to fall. It colours, shapes change with the season.

All I have to do is choose what interested me all year long.

I have never talked to my neighbours about all the photography I do in my yard, but I wonder what they must think about the bursts of light coming from my bushy property at all times of the year.

My garden photo session ended as the light dropped at about 9:30, but by that time I had wandered all over and photographed shapes of flowers, some alive and some only memories of their glorious and colourful spring blooms.

The hot, drying July heat is now with us and I wonder what will survive till next spring for me to photograph.

Camera Care On Wet Days    

linda-shooting-in-the-rain

Barriere, British Columbia Star Journal newspaper Editor, Jill Hayward, asked me to discuss the use, care of, and protection of cameras, lenses, and other photographic equipment during wet conditions. She worried about people carrying and using their cameras under the wet conditions at the North Thompson Fall Fair this past weekend. She also mentioned that she meets many local photographers that have scratched lenses.

I rarely let wet days limit my photography. Nevertheless, with the exception of those expensive pro level DSLRs and, of course, a few small waterproof cameras, most of the cameras photographers use don’t have much resistance to water.

Several years ago my wife, Linda, and I took a photography vacation on Vancouver Island. The weather was forecast to be completely rainy, so we prepared with plastic bags to cover our cameras, umbrellas to deflect water off our viewfinders, hairdryers to dry out cameras and tripods every evening, and wet weather attire because we didn’t want wet clothing. The trip was a bit uncomfortable, but the coastal downpour didn’t stop us from doing photography, and we didn’t waste a day of that trip huddled indoors. We were outside, cameras in hand, every day of that excursion and returned with great pictures, and a fun experience of shooting in the rain.

We had a good experience because we were prepared. That’s the secret. I always carry an old towel in my camera bag. And when water (or soon snow) begins to gather on my camera I continually wipe it off. Those areas I worry about are around the pop-up flash, where the lens mounts, the LCD, and the info window, and anywhere else that I think water might find a way into my camera.

I keep a lens cap on my lens. But what about when one is taking pictures? I know there will be those that advise putting a UV filter on every lens.

UV filters are from a time when we had a necessity to colour balance our film and in the spring we would use (U)ltra (V)iolet filters to warm the colours. Using an old UV filter is fine, as are any of the many different clear filters manufactures are selling for lens protection, but digital sensors no longer need colour correction filters and many photographers worry that inexpensive filters placed in front of their expensive lens glass might degrade the image.

Whether you agree with that notion or not, I think that using a lens hood is much better insurance than clear protection lenses. My advice is to get a plastic lens hood for every lens. Plastic lens hoods protect our lenses by bending, bouncing, and sometimes even breaking in the process of absorbing the impact and saving the lens. Personally I feel safer with a lens hood than a tight fitting glass filter. Anyway, we should always be using lens hoods to keep glare off the lens front.

When I return home after a day of photography I remove the lens and check my equipment. I remove the memory card for downloading to my computer, recharge the battery and, especially after rain, wipe my camera and lenses.

As I already wrote, I don’t let rain limit my photography. And there are times when the rain adds something to a picture.

Country singer Roger Miller wrote, “Some people walk in the rain, others just get wet.” Those are good word for creative photographers. And for those afraid of taking pictures in the rain, another singer, Cher made me laugh when she said, “Don’t take your toys inside just because it’s raining.”


Off-Camera Flash in Daylight  

Whatcha Got?

Perfect lighting

A little to the left

Teamwork

The right light

Ya gotta get wet

Who cares about the water

Lets see

Flash the Cadillac


This past weekend I lead another workshop for photographers about using off-camera flash when photographing portraits outside in bright light. As with past lighting workshops my goal was to help participants understand how to use flash in different environments during daylight, and gain techniques that I hoped would help them transform the harsh daylight of outdoor portraits into beautiful light.

I was fortunate to have a great rural location where participants began in the morning photographing our model using a speedlight and a diffusion panel in a bright meadow, then moved to a large, well lit, open barn with two-flash lighting using a shoot-through umbrella and softbox until lunchtime.

After a healthy lunch provided by Versatile Studio we set up by a small tree covered stream, getting both our feet and our model’s feet wet. We finally finished the day photographing the model posing beside an old 1970s Cadillac in a nearby field.

I enjoy guiding serious photographers through their first attempts to use flash as a tool to create better photos, I want them to think of the flash being more than an uncontrollable device perched on top of the camera when it’s too dark in a room to take the photo.

I have been offering off-camera flash courses since the early 1980’s, and still believe they are an important segment of a portrait photographer’s education.

So much has changed in photography, and yet here I am 35 years later, still helping photographers learn how to use off-camera flash. Modern cameras are amazing with sensors that are so much better at capturing light than film was. But just as 30 years ago, serious photographers realize how much more flattering off-camera flash is on someone’s face than just harsh daylight.

Off-camera flash gives a photographer the ability to choose the best direction of light.

There are times when I am forced to photograph a person without using a flash. I think “forced” is the best word, because I will always use flash if I can, and as those that have taken my advice have learned, in most instances using flash for portrait photography indoors or outdoors is better than not using a flash.

Those attending last weekend’s workshop began to get comfortable using flash.

David Hobby, lighting guru and founder of the blog, http://strobist.blogspot.ca, wrote,

“Learning how to light is incremental, creative and fun. There is almost no math involved, nor any difficult technical know-how. In fact, good lighting is less like math and more like cooking. It’s like, you taste the soup and if it needs more salt you add some salt. You’ll see that when we learn to balance a flash with the existing, ambient light.”

“Controlling harsh natural light – one of the most important things to know as a shooter is how to use bad light well. Taking hard, nasty daylight and turning it into beautiful light is actually pretty easy.”

Portraiture and the Photographer’s Use of Light

Monica aDemetra 3aMollyStephanie b6. BaileaStephanie a7. MonicaDemetraMonica  a


Photographer and author Frank Criccho states, “ The success of a photographic portrait depends as much on the photographer’s artistic and creative use of lighting techniques as it does on his or her skill with the camera.”

In an opposing remark during a recent conversation, a photographer told me that he didn’t have to worry about getting a flash for portrait photography and doubted he ever would, because he could just use a higher ISO, shoot multiple bursts, and fix everything in PhotoShop.

I don’t think that he is totally wrong, but his statement certainly demonstrates a lack of the basic understanding of how light impacts a subject’s face and how light can make the subject look younger, or older, or more glamorous, or down right unappealing.

I think in the race to purchase the latest hi-tech photographic marvel many photographers tend to forget about how lighting affects their subjects.

In my opinion, the goal for portrait photographers should always be to make the subject look his or her best, and provide an image that is flattering, and allows the person you are photographing to have a photo that impresses viewers.

One could say the responsibility lies with photographers, and not the subject, as to how good they look. Yes, I know in reality that isn’t the truth, but in my experience when one makes a bad photo of someone they will blame you, not themselves, if one makes a good photo they will thank you for capturing reality.

Many photographers just excitedly snap away without examining their subject, or posing them. Relying on luck and their subject’s talent to make that pleasing portrait, and pay little attention to how the light is making that person look.

Light and how a photographer uses it is very important. Too much contrast or side lighting shows lines and blemishes, whereas, on-camera flash, or bright, direct sunlight gives a flat, dimensionless, uninspired look.

To use the words of world-renowned photographer and writer, Joe Marvullo, “It is your ultimate decision, however, to determine what is “real” about that person and how to portray it in the photograph. You must successfully translate a distinct human personality in three-dimensional form into a two dimensional representation. This recorded image must come to life on it’s own. You, as an artist, must capture the “essence” of your subjects – their persona.”

Modern on-camera flashes are excellent if used correctly and creatively. Photographers can diffuse, bounce, and move the light off to the right or left, higher or lower, and modify that light using umbrellas, reflectors or softboxes to soften and control the direction and intensity.

I believe photography is all about the light. The lazy photographer just worries about exposure, where as the imaginative photographer pays attention, experiments, and practices creating portraits using light that are more than just documents of some person.  And as Marvullo suggests it is up to you, the artist, to capture the “essence” of your subject’s personality.


Photographer’s Lighting Workshop

    Sarah, Bart & Ronny

  Ronny & Candice

Sarah & Dave

Candice & Bailey

Bailey & Bart

I have just finished my first day of leading another Photographer’s Lighting Workshop. I will admit that a day spent guiding excited and, I must remark of this session, very talented photographers, does tire me out.

Participants that are willing to express opinions and aren’t shy about getting shoulder to shoulder in a process of experimenting, exploring, and learning are hard to keep up with, and their enthusiasm is infectious. I try to stand back and watch analytically, but every animated smile draws me in.  Multiply times seven each fired up photographer I was working with and there is quite an energy drain.

After over 40 years as a photographer I do have a pretty large chest of experiences in just about every aspect of this exciting medium and I was employed as a photography teacher for nearly half that time. I can easily sit a group of learners down and lecture about pretty much anything photographic and, particularly the lighting workshops that are currently all the rage for photography keeners.  My knowledge is on par with most experienced portrait professionals, and I teach so that beginners and intermediate learners can keep up with the jargon and the concepts.

I enjoy the enlivened interaction that happens when a student of photography makes the decision to participate. My job is to present information on the subject at hand and keep things going. I don’t like to be a demonstrator on a stage, and rarely pick up a camera. That’s left to participants.

Sure, they tired me out, but in the recent daylong workshop on Lighting and Posing I was fortunate to be leading a group of surprisingly skilled and very energetic photographers, and I must add, two lovely and creative young models that in my opinion were willing to work hard in a demanding environment for modeling.

The workshop was held in a rural studio minutes outside of Kamloops, British Columbia. I like this studio because it owner, Dave Monsees, has filled it with quite an assortment of lighting gear. I think there are at least eight studio strobes to choose from, all setup for wireless connection with a drawer full of senders. There are soft boxes, umbrellas, diffusion screens, reflectors and a great selection of wall-mounted backdrops.

There was even a fully equipped kitchen at the back that we made good use of, with fresh brewed coffee, pastries, and a large pot of chili for lunch. It can’t get much better than good food, great people, and photography.

Monsees is regularly adding props and stools to sit and pose on, as well as a growing selection of light modifiers.

The large, well-equipped space is a great rental studio and a perfect environment for an instructional session like mine. We started the session with one light behind a reflective umbrella, and moved on from there adding a large softbox, a shoot through umbrella, and a rim light to give depth to our subject when we used a black background.  We changed backdrops and light positions regularly. And those creative photographers really kept our models active and, heck, made my day.

Regarding portrait photography, Famous portrait photographer, Yousuf Karsh, once said, “I try to photograph people’s spirits and thoughts. As to the soul taking by the photographer, I don’t feel I take away, but rather that the sitter and I give to each other. It becomes an act of mutual participation.”

The first of our two-day workshop is over. I prefer two days because on the second we can review and reinforce what happened on the first. Now I am looking forward to spending another day and preparing to lead workshop participants into new territory.

I appreciate any comments. Thanks, John

My website is at www.enmanscamera.com