A Photo Trip to Margaret Falls

Linda at Margaret Falls

First bridge

Along the path

Reinecker Creek

Fallen Cedars

Crooked tree


Bridge to Margaret Falls

Margaret Falls, British Columbia (B)

I have spent the last few days slowly dismantling an old shed I built over 20 years ago. I will say that I enjoyed building that ramshackle structure that has served as a goat barn, a chicken coup, and lastly for storing stuff I didn’t know what to do with. The process of destruction hasn’t been going all that quickly because I have been finding any excuse to delay my work taking it apart and I suppose that’s why when my wife mentioned it would be pleasant to go to Margaret Falls I didn’t hesitate to put our cameras in the car and head out for an easy drive.

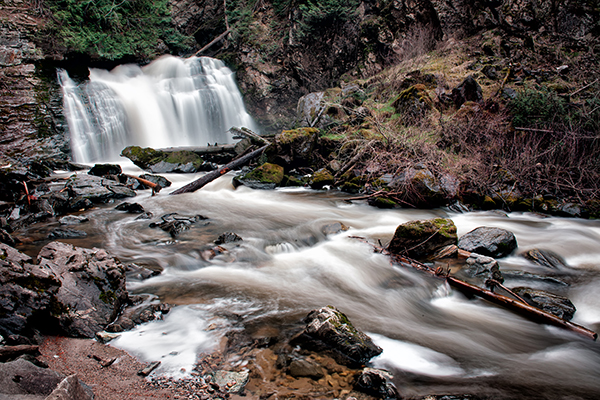
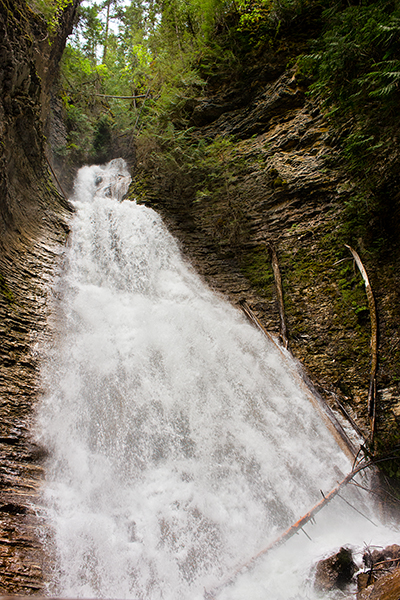
Margaret Falls is a 200 feet high cascade that drops into Reinecker Creek on the edge of Shuswap Lake’s Herald Provincial Park. Local lore says the falls gets its name from the first white woman to see them. I also have been told it was called Reinecker Falls. But I wonder what that place was called by those that went there long before the white settlers.

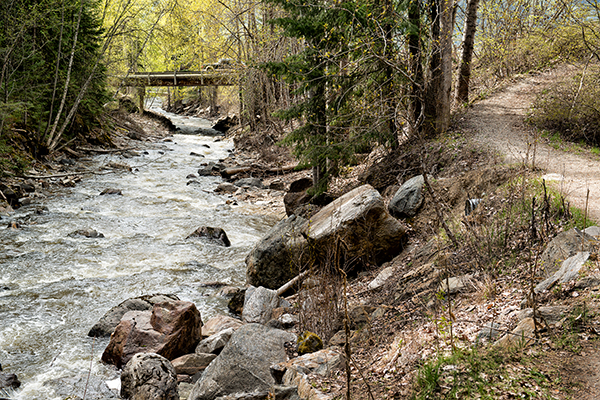
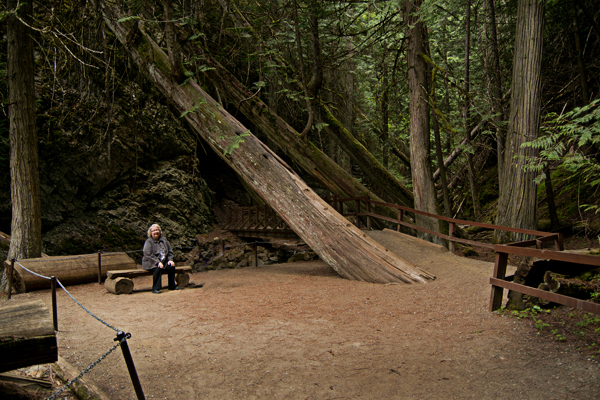
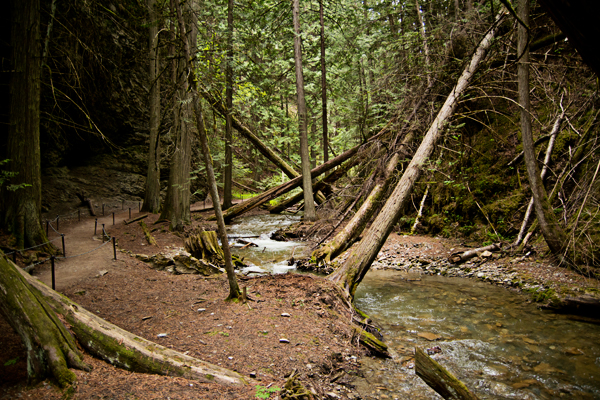
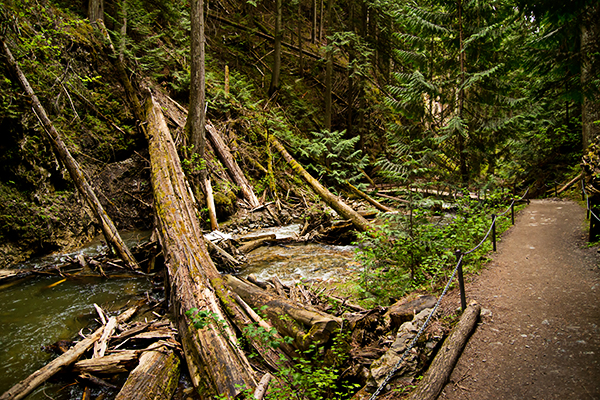
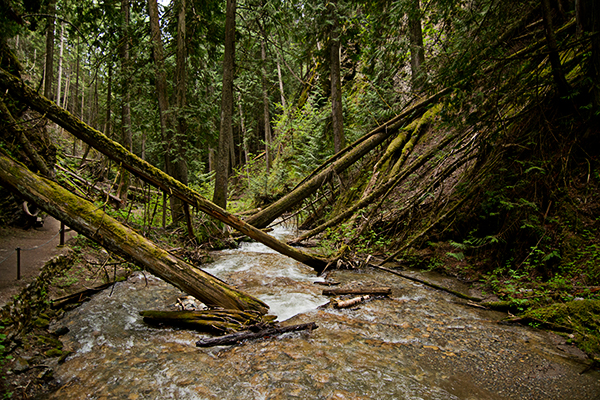
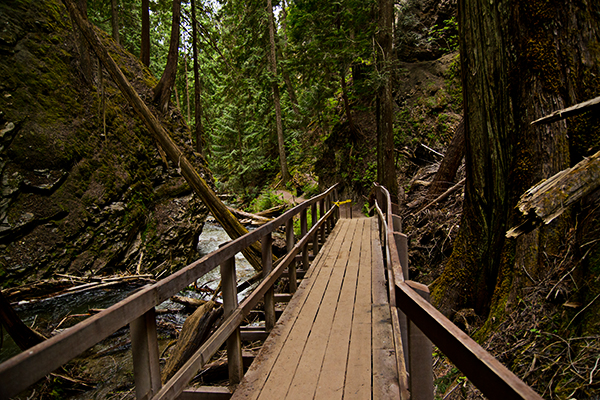
It is the place, and not the waterfall that draws tourists and photographers to make the short trek through that moss covered, old-growth cedar forest nestled in a narrow gorge.

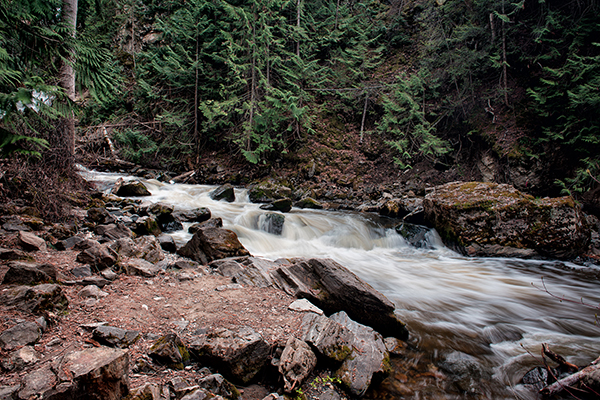
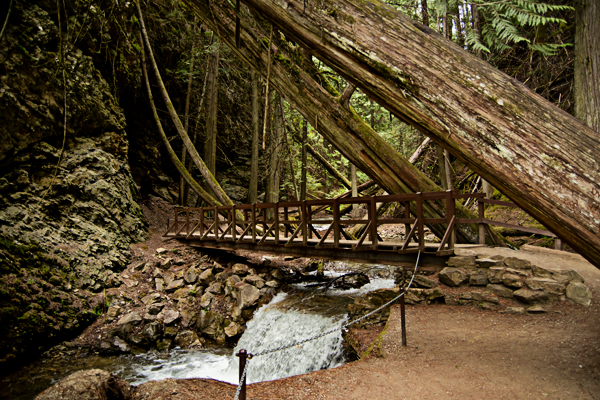
Reinecker Creek falls down a sheer rock face and into the narrow chasm creating a wonderland for those that walk along the beautiful gulley filled with large trees and looming cliffs above.

Before one is even aware of the unique ecosystem, there is the envelopment of a waft cool, damp air that on a hot July day will be a startling difference in temperature. Knowing that we included jackets with our camera gear.

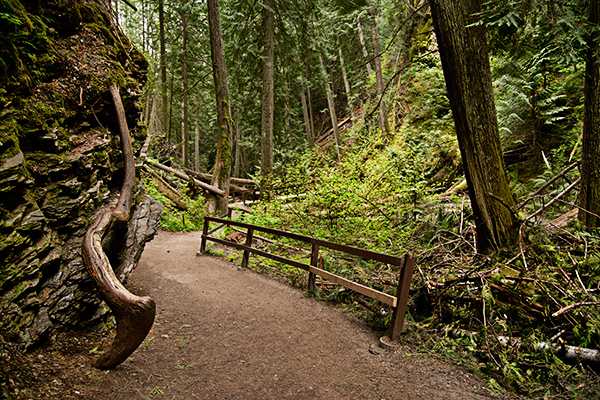
Over the years Linda and I have spent many hours wandering along paths with cameras and tripods, but this time the wind was picking up and we could see large, dark clouds looming. So we just brought our cameras in case we had to make a quick getaway. I do not remember how many times I have taken pictures along that cool walkway up to the falls, or all the different camera formats I have used. I have been there in every season of the year, rain or snow, and I have even photographed a wedding there.

For this visit Linda used a 24mm prime and I used my 24-85mm zoom. Wide angle is a must for that narrow canyon.

The overcast day really wasn’t a bother because our modern full-frame cameras can easily handle 1600 ISO and depending on our subject’s location we could choose either 125th or 250th of a second shutterspeed an still keep our aperture small enough to get reasonable depth-of-field.

One rarely has the trail to Margaret Falls to themselves. To achieve scenic photography photographers have to be patient. However, this outing was petty good. Our only interruption was a guy on his mountain bicycle that turned around and left when he realized there were people on the trail. And we met some people that told us they were celebrating their 70th reunion. They gently ambled up the path to the waterfalls, extended their arms for cell phone snaps and then left, giving us all the time we needed to compose our pictures. I did have a good time, but, as free as I was to wander around with my camera and 24-85mm lens, I missed having my tripod. We have decided to return in a week or two packing tripods and neutral density filters prepared and spend a bit more time.

I always look forward to comments. Thanks, John


The Vancouver Camera Show and Swap meet 2015

Linda at the SwapMeet

Linda at our table

Camera Swap find

A good find at the Swap meet

Camera Swap Meet

Check out this Leica

Vancouver Swap meet 2

Lets assemble this 4X5 camera 

Ziggy Rhode

The Swap Meet organizer, Ziggy Rhode selling a Hasselblad

Vancouver Swap Meet 1

Wow, a nice twin lens at the Vancouver swap.


The Western Canada Photographic Historic Association hosts Vancouver, British Columbia’s, original camera show and swap meet each year. This long-running show has now reached its 39th year, and makes the claim of being the largest in Canada with I believe approximately 120 tables, and I have no doubt well over 1,000 people walked through the doors this year.

I can’t remember exactly when we (my wife and I) had our first table there, maybe some time late 1990s. Since then each year we join an always-interesting diversity of photographers in a large, photographic equipment packed hall in Burnaby, BC, who are eager to exchange information and ideas, and, of course, are looking for great deals on all kinds of camera equipment.

Each year we make the three and a half hour drive from Kamloops the day before and lodge overnight and eagerly join other vendors the next day at 7:30AM to setup. The early morning scene is so much fun as we interact with others busily arranging equipment on tables before the show even begins. When I arrived I was happy to see people I have known for years. Better put, I was happy to see people I have known for only one day a year for about 20 years.

For me it is always a rush to organize my table quickly so I am ready for the swap meet’s early bird shoppers who pay a premium to begin shopping at 9am. That group of shoppers isn’t so much into browsing as they are searching for specific pieces, and they will walk quickly by a vendor’s table unless they spy that item.

At the 10am regular admission I always am glad to get a chance to sit for a moment (only a moment) after the hour of non-stop showing, demonstrating, explaining, and, of course, bargaining with savvy photographers.

Spending a day surrounded by a huge selection of cameras and other photography equipment is exhilarating, and getting a chance to talk with other photographers about their different interests is invigorating. Even after all these years I always learn something.

As I have mentioned before when I have written about this exciting event, one will find photographers of every age, from experienced elders to young people accompanied by patient parents. This congregation includes all kinds of lifestyles, interests, and photographic specialties. There are those that are dedicated to film, historic cameras, and processes of the past, walking alongside others that carry the latest and brightest in modern technology.

Other than actually pointing a camera at some inspiring subject, a gathering like the Vancouver Swap is a superb way to meet and exchange information with other photographers, and look at and check out the many kinds of photographic equipment that would not be so easily available anywhere else.

I had a great time with the photographers I met this year and the depending on who joined me at my table, the conversations always changed. My day of selling was a success, as it was for most of the dealers I talked to at the end of the day. And I even had some time to purchase another lens for myself, which is always nice.

I always look forward to any comments. Thank you, John


Chewy the Marmot and Chase Creek Falls

Chewy the Marmot

Chase creek Falls

Chase Creek April 2015

Path back to town

Spring is here. The weather has slowly warmed up I can see from my porch that the snow on the mountaintops is diminishing, so I decided it was time to visit a waterfall not far from my home.

I usually avoid waterfalls at this time of year because high volumes of murky, spring water rushing over the falls isn’t that photogenic and one never knows if the river’s bank will give away while you position your tripod. However, with the low volumes of water being reported I was sure that at Chase Creek Falls the interesting stream features like rocks and trees would be visible with the reduced water flow.

When I got to Chase Falls and parked my car I noticed a small sign along the trail that said to watch for a local marmot named “Chewy”. And sure enough, as I passed a large pile of very big rocks, there was a big marmot perched on top like some amusement park guard.

Marmots are usually shy when one walks near their burrow, but this rodent didn’t seem to be bothered in the least and readily posed for me as I hopped from rock to rock making portraits of him or maybe her. I did see a couple of immature marmots scurry out of sight; so I might be right thinking Chewy might be her instead him.

When I purchased my first DSLR years ago and began learning how to use Photoshop I remember saying to a friend that what I liked best was how easily one could crop without getting the degradation that came when cropping prints made from film. The problem with 35mm film was that anything shot over 400ISO was always grainy so that shooting wide and cropping later was usually disappointing. That’s why many photographers preferred medium or large format cameras to the tiny 35mm film.

I set my tripod up and focused my 24mm lens on the falls and shot wide.  I knew that when I viewed my images on my computer I would choose a crop that fit the rule-of-thirds without loosing much detail.

Modern DSLR sensors are much better in their ability to capture grainless detail at high ISOs than 35mm film was and even cropping away 50% of the picture doesn’t reduce the quality very much.

The low water level made it easy to scramble among the large rocks along the bank and chose a comfortable location to set my tripod up. I used a couple of neutral density (ND) filters so I could reduce my shutter speed to 3, then 4, 5, and finally 6 seconds to slow the water down and I chose a small aperture for lots of depth of field.

I have always enjoyed photographing that waterfall. I think I made my first photographs of it sometime in 1976, and I cannot recall how many times I have been back there since. I am fortunate to have a place like that so close to home where I can always find something to photograph.

With that I think I should end with a quote by a great Canadian photographer, Freeman Patterson, who says, “Seeing, in the finest and broadest sense, means using your senses, your intellect, and your emotions. It means encountering your subject matter with your whole being. It means looking beyond the labels of things and discovering the remarkable world around you.”

I look forward to comments. Thank you, John

Rainy Day Photography

Last drop

Wet fir tree

Spring bud

Oregon grape

Rain drops

Reflection

Too many springs

Monday was another day of rain. It is spring here in the hills of Pritchard, earlier than usual, but it is spring and rainy days go with spring.

Rain doesn’t bother me much and had I thought about getting my camera and going for a drive up into the hills to see what I could find. However, as I walked through my wife’s garden on my way to the car I noticed all the drops of water hanging from branches and those leaves that made it through winter. The wet and foggy hills would have been interesting, but all those droplets were just waiting to be photographed.

How does one prepare to do photography in the rain? Put on a hat with a brim if, like me, you wear glasses. I also like rubber boots. Bring an old tea towel in your pocket to wipe the rain off your camera, and you are ready. Oh, and remember to keep the camera lens pointed down.

When the garden is dry I would usually put a couple of flashes on light stands, and add umbrellas so I can control the direction and quality of light. But when it is raining I prefer using my ring flash.

A ring flash fits tightly around the front of my 200mm macro lens and is perfect for building reflections on the droplets of water that were clinging to branches and sparse foliage that I wandered around photographing.

I expect many photographers prefer waiting out the rain and the unappetizing low, flat light on rainy days. I can understand that. Rain is such a hassle, and getting wet is uncomfortable. Nevertheless, that flat light, slight breeze, and wet conditions forced me to approach my subjects differently and I like that challenge.

In the low light of a rainy day we don’t think about light in the same way as we do on a sunny day. Everything is usually about colour, and how to deal with the contrast, especially on a bright spring day.

When the light is low one needs to see tonality and shape, and raindrops are a challenging element to add. In this instance there was also a slight, intermittent breeze.

I chose a setting that without a flash everything would be underexposed. That means I would only see my subjects when they were properly exposed and a flash is the best way to do that. Using my camera’s manual mode I selected 1/250th of a second and I kept my aperture at f/11 so I would have as much depth of field as possible when and if a branch shook back and forth in the breeze. I also switched my flash to a manual mode. The flash power would always be the same putting out the same amount of light. I then could control exactly how much light I wanted for each location.

I could have increased my ISO and shutterspeed if I had decided to only use natural light, but then everything would have been flat and it would have been hard to get a sparkle in the raindrops.

I know it can be disappointing to see those gray clouds on your day off when you had made plans to be out shooting. However, keep a positive attitude, remember you don’t have to go far, and with a bit of creative thinking and preparation you’ll be out having fun making photos, even in wet weather.

I always look forward to everyone’s comments. Thanks, John

March is Here Again

The train goes by

Notch Hill Church


From winter's storm

Lost during winter’s storm


Lakeshore in spring

Desolate beach


Just before spring

Waiting for planting season


ReConstruction

Reconstruction


Winter tree in spring

Winter tree waiting for spring


Yes, March is here again. Those who have been reading my posts for a while know that I approach this month with a foreboding feeling. The optimism of January and the hopefulness of February have now passed.

Last year I wrote about the uninspiring landscape of this month and the frustration of photographers who are ready for something other than falling snow and icy roads. I quipped about useless forays into the countryside to photograph hungry coyotes, wandering deer, or sad little birds that hung about through the winter.

However, just when I was ready to be moody and join others gloomily complaining about the weather, Mother Nature has thrown a wrench in the spokes with spring-like weather.

I traditionally expect March to come “In like a lion and out like a lamb”, but not so this year. February 2015 is being heralded as the second warmest ever recorded here in British Columbia. What is a guy to do? I wasn’t ready for spring.

The landscape is mostly snow-less, but I know there is green growth beneath that drab, lifeless end of winter brown. So with that in mind, my wife, Linda, and I decided in spite of that lingering pale hue that we would pack our cameras and take a drive along the ice free Thompson River to see if we could find something worth pointing our cameras at.

I had decided to mount my trusty 18-200mm lens on my camera. I like that easy to use lens. It may not be the sharpest lens in many collections, but it is versatile, lightweight, and doesn’t take up much room. Besides that I can always tweak its slight lack of sharpness in Photoshop.

As we drove up the river valley I wondered if I would find anything in the lifeless landscape to photograph. We are so conditioned to search for colour when we set out to do scenics that we forget to look at the structure as the scene unfolds in front of us.

We talked and drove without finding anything to photograph and eventually stopped for lunch in the small lakeside town of Sorrento. I just couldn’t get motivated and after that big meal was about to resign myself to just returning home to sleep it off. But as I paid for our lunch, Linda talked to some local people who suggested we check out the old church at Notch Hill. I was surprised when they said that decrepit 1920s church was still there. Well, it was just barely there, and under some slow restoration.

As I selected different angles to photograph that decaying building I realized I should be photographing its transition in the landscape. I was seeing things wrong and falling prey to words of Shakespeare’s Julius Caesar who said, “beware of the ides of March”. It’s what is changing and emerging that I should capture, not try to photograph the bloom of spring when it isn’t here yet.

I began to look for the story that happens between one season and the next, the shoulder season. I realized my photographic goal should be to select subjects that visually talk about that moment just after winter and just before spring.

I am sure one could still wander up into the mountains and continue photographing winter or search for some hot location in the city with early growth. But for those that are always creating photography challenges for themselves, I suggest that as with that old Notch Hill church, this year’s March photography challenge should be about something between the seasons.

I look forward to your comments. Thanks, John

My website is at www.enmanscamera.com

Photographing Falkland in the afternoon

Falkland afternoon

Falkland, British Columbia


Ranch cafe

afternoon pub

street shadow

Falkland is one of the many small towns nestled along winding highway 97 that drivers almost miss if there weren’t signs posted at both ends of the village requiring them to slow down. Although I pass through there regularly, the only time I stop is when locals hold their roadside market during the summer. Usually I just reduce my speed to 50 km, watch for pedestrians and approaching vehicles from covered side streets, then resume speed without even thinking.   Falkland has about 600 residents, and is notable because each year on Victoria Day they host the Falkland Stampede (one of Canada’s oldest rodeos); and they also claim to have the biggest Canadian flag in western Canada.

My wife recently purchased a 24mm wide-angle lens and we were looking forward to checking it out. We had spent the day in Kelowna, about an hour south of Falkland and I thought that with the drive there would be lots of opportunity to see how her new lens would perform. I had read mixed reviews online, and I was anxious for my own results. I had made a few shots of the fence in front of our home, and allowed some side-lighted images to catch sunlight to check lens flare, but I hadn’t made any practical images.

I know reviewers can be very strict with their lens testing and even go so far to include charts and exaggerated enlargements when they evaluate a lens. However, in my opinion, all that most users care about is if a new lens is reasonably sharp and consistent in how it reproduces a subject; and regarding wide angles, if there is any unflattering distortion.

The day had been long and I wasn’t thinking about much of anything except getting home and out of that car before we lost daylight. I don’t mind winter very much, but I do mind driving that narrow, slippery, winding road after dark. However, traffic had been light and we hadn’t got stuck behind any big trucks. So we were making good time when we approached Falkland.

Photographers talk about that “Golden Hour” just before sunset when the light is warmer and softer than when the sun is higher in the sky. I doubt there is much of a golden “hour” in canyon towns like Falkland, but the light certainly was inviting at the moment and we had my wife’s camera and 24mm lens waiting for testing.

Linda was tired from our long day and was only willing to make a couple of shots of an old shop before handing me her camera. She said, “You walk around”. So I did. In Falkland it doesn’t take much time to see everything on the main street.

I like buildings, shop signs and afternoon deep shadows and the narrow street was perfect for testing that lens and anyway, I was happy to finally make a few pictures while the light was exciting in that interesting little town.

I only walked around for about ten minutes and had so much fun that I forgot I was supposed to be testing that lens. I have lived in this part of British Columbia for over 30 years, and as I walked around I wondered why the only pictures I have ever seen of Falkland were a few of cowboys being bucked off at the rodeo. I guess it is hard to stop and look. And some photographers might feel locals would be uncomfortable with outsiders intruding. I doubt that unless someone stuck a lens in a local’s face they wouldn’t even notice a person standing along the street, like I was, taking a few pictures in that neat little town.

Oh, and that Nikon 24mm was just fine. For those that wanted a review, I think my aperture was mostly at f8, f11 and f16 because I was interested in getting as much depth of field as I could get. So I can’t comment on how well it performs wide open.

I always appreciate your comments. Thanks, John

My website is at www.enmanscamera.com


Judging Photography

Ben-&-Dave-judging

Exhibition judges Ben and Dave.


I have written about judging photography previously, and I have also used the following quote by John Loengard, who worked as a photographer for Life, for Time, and for People magazines.                         “It is not important if photographs are “good.” It’s important that they are interesting”.

I agree with that statement and when I was asked to be part of the jury committee for a local exhibition by members of the Kamloops Photo Arts Club it was Loengard’s words that I first thought of.   I looked forward to a firsthand look at submissions and wasn’t let down by the interesting and creative work.

They entitled the upcoming juried exhibit of photographs taken within British Columbia as “Wild and Wet” and described it as displaying the impact of water on the environment and residents of this region.

To me, the poorest photographs are those that don’t speak to us, it’s those photographs appear boring. I think the viewer should feel something, should feel a level of emotion when they look at the images. A good photograph is one that creates an emotional response.

As I looked at the photographs I asked myself the following five questions that I think are questions any serious photographer should think about, as they are about to press the shutter.

  1. Is there a clear center of interest? In a successful photo, the viewer can immediately identify the subject.
  1. Is the image composed well? There should be a sense of overall organization.
  1. Is the focus tack sharp and is the exposure appropriate? With the exception of photos that intentionally show motion or soft-focus images (both should be obvious), tack-sharp focus is the first thing viewers’ notice about an image.
  1. Does the photo tell a story? The difference between a photograph one remembers and one that is easily forgotten depends on whether the photo tells a story.
  1. Is the approach creative? Creativity in an image involves more than predictable techniques and perspective. The creative photographer handles the subject in extraordinary ways that the viewer normally would not have seen.

I joined photographers Dave Snyder and Ben Verwey in an interesting discussion of the images as we reviewed the photographs. All the show’s photographs are worth taking the time to view and I look forward to the exhibition that will be held from March 12 until April 1, 2015. As this was to be a juried show, we ranked each submission and selected those that, in our opinion, stood out from the rest.

Whether readers attend this exhibition or any other, my suggestion to take along my guidelines and see how they apply. Then think about how the photographs appeal you. Are the photographs interesting and engaging? Do they capture a moment in time and what do they communicate to you the viewer.

I look forward to your comments. Thanks, John

My website is at www.enmanscamera.com

Photography in the Fog

Farm & Pond in fog 2

Moving cows in fog 2

Horse in Snow 2

Owl on wire 2


Pritchard above the fog 2

The past snowfall gave us a grand depth of a bit over two feet. That exciting event included hours of shoveling and roads that were pretty much closed to driving for a while. I wonder why we “dig” dirt and “shovel” snow? Hmm…I remove the dirt from the hole and remove the snow from the walk. Yep, it’s the same thing as far as I can tell.  Both activities use the same tool and make my back tired.

Our yard now has deep three-foot deep trenches dug out and shoveled clear by me that lead to all the important locations. Basement door to chicken coops, front door to the car, and car to the road; however, I also made trails for the feral cats so they can come to the door for the food we leave them.

When the days of soft, cold snow finally ended, everything quickly warmed up and a suddenly a thick, damp fog settled in.

My first thought was to get out my snowshoes and head up into the hills surrounding our home. I mentioned that to my wife, but not in the mood for trudging through the snow she suggested we get our cameras and go for a drive around the now foggy neighborhood in Pritchard instead. So we bundled up, grabbed our cameras and took off.

Our car is perfectly equipped for photography with beanbags. Just set them in the window and nestle the lens on them to reduce camera shake when using our long lenses. However, on this day my wife set aside her 150-500mm, and decided her light weight 70-300mm would be better suited for the foggy landscape, and I chose my 24-70mm. But it’s good to always have the beanbags in our car even if we don’t need them.

Fog is a tricky business because contrast is all but lost and the moving mist reduces sharpness. Everything is so flat that it’s hard to get definition.

I enjoy fog and recall the imagery of a poem from Carl Sandburg.

“The fog comes

on little cat feet.

It sits looking

over harbor and city

on silent haunches

and then moves on.”

I think that description is pretty good and I enjoyed how the fog obscured my view of things in the distance and created a mystical looking world as I drove along our snow covered rural road.

Years ago when photographers were making exposures of foggy landscapes with film the best way to increase contrast was to use yellow, orange, or sometimes red filters. We could also over-develop the film, or as a last resort process it in hot chemicals. There were also filters that could be used while printing to reduce the tonal values, and some specialized chemicals would help also increase the contrast. All that was lots of work and if you screwed up the negative…well, you were screwed.

Today we have software like Photoshop (and lots of other programs available that are just as good) to help us out in those flat, foggy conditions, and when Linda and I drove off into the whispering fog I knew I would be spending a short time sitting at my computer increasing the contrast and reducing the grey tonal values.

It is now all so easy and it doesn’t take much time. As I sat manipulating the hazy images I thought about all the hours I used to put into producing our photographs. We have it pretty good these days.

Fog is fun in which to shoot. All one has to do is find subjects that are distinctive enough to be understood through the quietly creeping and silent fog. My suggestion is instead of drinking your chocolate and staring out the window on the next foggy morning waiting for the sun to come out, get your camera, go out, and see what you can do.

As always, I really appreciate your comments. Thanks, John

My website is at www.enmanscamera.com


Photographing the Lights of Christmas Holidays

Kelowna-Tree-2014

Kelowna tree 4

Kelowna-5

Kelowna tree 2

Kelowna-tree-3

Well, it has been a wonderful Christmas holiday and I have enjoyed everything about it; the bright colours, gaudy decorations, the sentimental music, silly TV programs, and I especially like the Christmas lights in the city.

A drive this time of year through any town or city neighbourhood is an exciting visual presentation of festive bright lights and another opportunity for, at least a few weeks, to have fun experimenting and photographing the season’s sparkling subjects.

Photographers that want to make pictures of Christmas lights usually wait until dark and end up exposing for only the lights, and the resulting photographs show lots of colours, but don’t say anything about the location or environment; and a photograph in daylight doesn’t show the lights at all.

The photographer’s goal should be to balance an exposure for ambient light (existing environmental light) to and the electric lights. So to provide help and clarification to my readers here is my quick holiday how to for photographing their city or town’s Christmas lights.

As I suggested when I wrote about photographing the CP Holiday Train, begin by choosing the location well in advance, before it gets dark, and prepare to begin when the electric lights are first turned on, when there is still some light in the sky, yet dark enough for the lights to be bright.

Place the camera tightly on a tripod so it’s nice and steady because the exposures can be long. I like using a cable release, but if you don’t have one available, use the camera’s self-timer. The idea is to stop camera-shake.

Photographers can experiment by setting the white balance to “tungsten”. That setting will correctly balance the different lighting types; and as a bonus it will deepen the blue in the sky. I then control the final intensity with PhotoShop.

The composition should also include reflective subjects in the foreground like snow, sidewalks, cars and anything else that adds to the viewer’s attention.

Expose for the sky or buildings and make several test shots and keep checking the camera’s LCD. The lights will become more and more exciting as the sky light fades and as pictures are captured. There will be some length of time between your first images just before the sun sets and the last when everything gets very dark. I also do this in reverse, starting before the sun comes up in the morning.

Dress warm, so you aren’t uncomfortable and rush things. I expect the whole “shoot” should last less than 15 minutes if one is prepared. When the images on the camera’s LCD look too dark everything is finished and its time to rush home, excitedly transfer the images to the computer and have a warm drink.

Most importantly, the quality of light in a photo comes down to balancing the light; it creates the whole look of your photo and now is a good time, with all the added decorative illuminations, to learn about controlling the light around us. If your goal is a black and white image you will need an exposure that shows detail in all the subjects.

In summary, select the correct time of day just before everything is too dark or too light for a composition with sky, foreground, and bright lights. And be sure to leave enough time to experiment. Readers should be able to successfully photograph their own towns, or any favourite location.

I look forward to any comments. Thanks, John

My website is at www.enmanscamera.com

Photographing the CP Rail’s Holiday Train at Day’s End


Holiday Train 1

Holiday Train 3

Christmas Train 4


This past week I viewed a photograph made by a photographer at night that was not much more than a dark, featureless, long block with a string of brightly colored electric lights on its surface. The person that made that photograph commented that she was disappointed with what the result.

I suppose the photographer didn’t know there wasn’t much that could be done with a subject that has no light on it. She might have thought a high ISO would work, and like many others new to the medium of photography, didn’t understand that surfaces that don’t generate light, must have light reflecting off the surface it if we are to see or photograph it.

I thought about that frustrated photographer as I set up my tripod alongside my wife, Linda, and our friend, Nancy. We were preparing to photograph the Canadian Pacific Holiday Train that would be rolling along the railroad tracks that followed the wide South Thompson River a short distance from our home in Pritchard, British Columbia. We had read on the Internet about the train traveling through Chase and Kamloops on December 16 and had estimated the time it would come through Pritchard that is nestled between the two locations.

We positioned ourselves on the beach on the other side of the river so we could photograph the train passing on the opposite side and we would have a wide shot of the engine and all the brightly lit, Christmas box cars.

We arrived an hour in advance while there was still plenty of light and made test shots of a passing freight train. The schedule put the train in our location just at sunset, giving us plenty of light to define the train from its surroundings even with the declining light.

We set our cameras at ISO3200. That allowed my wife to set her camera at 1/250th second with her f4 lens, and with my f2.8 lens I could use1/400th second. Even at that we were both under exposing our images, however, in my experience, a stop or two under exposure when making exposures in the last light of the day usually works pretty well.

I prefer shooting just at sundown when there is still that cool, blue light illuminating the sky. It is easy to select out and brighten up the subject without affecting other elements in the landscape, whether making the final image in a traditional film darkroom, or using a program like PhotoShop.

I wrote that we were using tripods. Tripods are the best way to keep one’s camera still, but with our tests on the freight train that we photographed in advance of the Holiday Train we found that quickly releasing the camera from the tripod as it passed, handholding and panning worked best.

I like to preplan, so we had gone down to the river a week early and selected our observation site. In addition, on the day of the train we arrived an hour early, and that gave us time to test, to move about and experiment with our location a bit, so that when the train rolled by we were ready.

There was a strong, cold wind blowing down river directly at us. But we parked our car at the edge of the riverbank just above us with a good view to see the approaching train. After we had set up our tripods and camera, we sat in the car bundled up in blankets and drinking hot chocolate until the moment arrived. Suddenly exclaiming, “There it is!” we ran laughing and hopping down the sandy riverbank for three exciting, adrenaline filled minutes of photography.

My favorite times for scenics, and for the Holiday Train that was my center of interest for this scenic, is the hour just after sunrise and the hour just before sunset. I am sure one can find great light any time of the day and night, but these two hours are the most predictable when it comes to workable light.

Please don’t hesitate to comment. Thanks, John

My website is at www.enmanscamera.com