Long exposure workshop at Chase Falls                               

Two weekends ago Jo and I hosted a long exposure workshop at the nearby Chase Falls.                  In the rain I might add.

After returning from Vancouver my photo partner Jo McAvany posted some of the long exposure night photographs she took of the Vancouver lights. Those images garnered quite a bit of interest and Jo was fielding questions from more than one local photographer about how she made them.

We decided to pick a date and offer a workshop that would allow participants to try long shutterspeed photography and also to use neutral density filters.

I like my classes to be strong learning experiences and as with all that teach I included handouts, and this time I also included a set of six ND filters for each photographer to use. All they had to bring was their camera with a fully charged battery, their favourite lens, and a tripod.

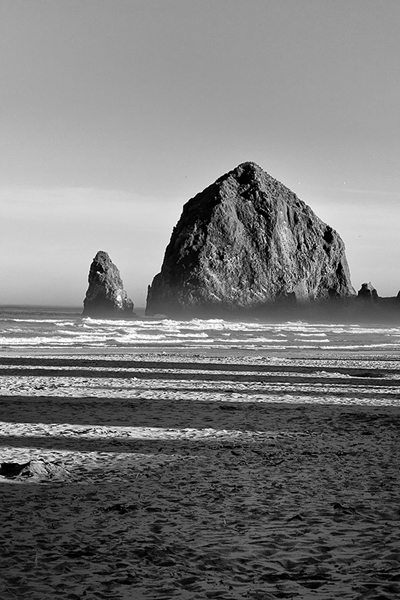
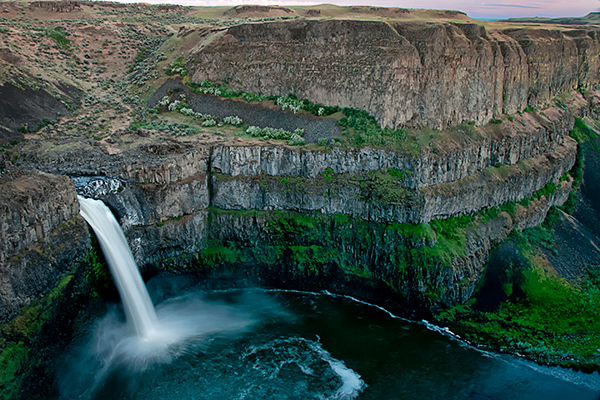
We chose the Chase waterfall because it was close, easy to get to and, this time of year, extremely safe if one has good enough balance to climb through and over the big rocks.

What we weren’t expecting was a rainy day… fortunately some of the photographers in attendance had the forethought to bring umbrellas. I also had two that I always keep in the trunk of my car and I brought a few towels that I handed out to wipe the rain off cameras.

Jo began the day when everyone was gathered at the parking lot, while I was passing out filters and handouts, by telling people that after our trip to Vancouver she has absolutely become hooked on long exposures, and I have no doubt that we now have a few more dedicated converts.

Most photographers understand their shutter, but using shutterpeeds longer than 1/30th of a second, and adding ND filters is often new territory.

The rain was only a slight inconvenience as the excited group started seeing their results of the waterfall. The light on that wet rainy day was, as I had hoped, perfect at the falls. Rainy days are usually like that.

We worked as teams in the rain. With one partner holding the umbrella keeping the camera, lens and filter dry as the other set up the tripod and camera at each location.

It was a great day for learning something new. Yep, I am sure there are now a few more photographers that have Jo’s passion for long exposures.

I am looking forward to the trip we are planning to Kelowna in December to photograph the Christmas lights. I think we may go a bit early so we can do some long exposures near the marina along Okanagan Lake. I’ll finish with this great quote I found by German artist Dieter Appelt.

“A snapshot steals life that it cannot return. A long exposure creates a form that never existed.”


The best lens (for the price) to photograph wildlife.    

In my experience, any image can be altered (sometimes dramatically) when one changes lenses.  A subject can be isolated and the perspective in front of, and behind, the subject flattened with a telephoto lens. And landscapes are changed using a wide-angle lens as the field of focus increases the view around the subject.

To add a bit more to my last article, “what is the best lens for scenic photography” I thought I’d continue with a discussion I had with a budding wildlife photographer.

I select my lenses depending on what I want my photograph to say about the subject. And to me, control over my image is important so I ask my self two questions.

What lens will show my subject best? And second, what final result do I want?

This past week I spent some time talking about lenses with a photographer after he read my last article and said, What about the best option for the price to photograph wildlife here in the interior of British Columbia.

I suggested starting with a zoom that can reach 300mm and then purchase a 150-600mm in the future. Each of those lenses has a narrow angle of view and plenty of magnification for wildlife photography.  I thought he might start with a lens that is inexpensive, lightweight, easy to pack around and hand holdable. The smaller multifocal length lenses are generally lightweight and excellent for vacations or just walking around.

He told me he is hesitant to dig into his savings for a super zoom at the present, so I thought moderately priced lenses like the might do for his introduction to long lens photography.

There are interesting lenses like the 300mm and more impressive lenses like a 400mm, 500mm and even the favourite of bird photographers, the 600mm. But for an introduction I thought a zoom might be more versatile until he was ready to make the financial commitment to a large prime or zoom.

When he gets serious and willing to spend a bit more there are big lenses with maximum apertures of f/2.8. Those large high quality lenses give the user lots of light gathering capability and the ability to use higher shutter speeds for reducing camera shake, and help stop fast moving subjects.

To explain that, there is an optimum amount of light that reaches the camera’s sensor for a correct exposure. When the aperture is closed down it lets in less light and one must slow the shutter speed.  With large aperture lenses the shutter opening can be increased and let in a lot more light, therefore one has the ability to increase the shutter speed for less camera shake and still get a proper exposure.

All this also affects “depth of field”.  Depth of field is best defined as “that area around the main subject, in front of and behind, that is acceptably sharp”.  Photographers like to blur non-essential elements in the background by reducing the depth of field, and do that by increasing the size of the lens aperture.  In addition, letting in more light makes shooting in low light conditions less difficult.

And to that photographer’s question:  What lens do I need?  There are lots of other choices that will better help him visually discuss his subject. I don’t think there is one lens that fits all.

Each year manufacturers introduce more lenses with different technology, which improves imaging capabilities, and naturally, increases the price.

One of the favourite sayings in photography is “it’s all about the glass”.

Photographers I know that spend their free time photographing birds tend to stay with long fixed-focal length, or prime lenses. However an opportunist like myself will prefer the versatility of a multifocal length (zoom) lens.

With regards to that soon to be wildlife photographer, I expect to see him with more than one lens choice as he pursues his hobby and selects different lenses that meet his photographer’s vision. I know he will be cautious with his purchases, but ultimately his choice of lens comes down to what he wants viewers to feel and see.

Photographing in the garden on a stormy day                                   


During my many years enjoying the exciting medium of photography I have photographed all most anything that happened to be in front of my camera.

I haven’t bothered with restrictions or claimed specialties. Sure, I have worked for all kind of clients, and most of the images I produced included people. That was how I put bread on our table for years. But when it came to my personal photography I always have been, and still am, an opportunist.

The process of creating an image on a roll of film or capturing data on my camera’s sensor excites me. Thinking the picture through, capturing a feeling and making technical decisions stimulates and excites me. However, I will admit all that also drains me. Photography has never been relaxing.

When I go out to photograph something it’s hard for me to think about anything else. Back when I when I spent almost every weekend photographing weddings my wife learned to just leave me alone. Nevertheless, over the past 40 plus years I did find a way to relax. No, not getting drunk.

No matter how wired I am or how mad something (or someone) has made me, if I pick up my camera and wander my wife’s garden the tension drifts away. I suppose any garden or quiet wooded area would work as well.

My wife could find enjoyment walking, smelling and looking at her flowers, but I don’t really care about the flowers unless I am pointing my camera at them. Where the colours would have mesmerized her, I would be thinking about how some plant’s tonality would look as a black and white photograph.

This week the storm clouds have been coming at me from all directions, not just the sky. Some photographers might chose to search out large birds that frequent the river or lakeside, while others would select the nearest sporting event to work out frustrations. I have friends that seek out the camaraderie of others and spend time in their studio creating masterful portraits. But for me a solitary walk, searching out shapes in a garden always lifts my mood or at least helps me cope with the storm clouds in my head.

Wednesday was as stormy as my mood and the clouds were darkening the landscape. There was a time when low light was bothersome for photographers, but with the technological marvels we now hang around our necks, low light is no problem at all. I just selected ISO 800, (I could easily have gone to ISO1600 or higher) and kept my shutterspeed at 1/250th to reduce camera shake and started taking pictures.

As readers know I prefer to use a flash to balance the overall exposure. In this case I mounted a ring flash on my wife’s 70-180 macro lens. I usually like to use a tripod, but I needed to walk and besides I was pretty sure I was going to get wet.

On flat overcast days it isn’t the colours that attract me, it’s shapes, interesting locations and the position of the plants. I spent a lot of time lying on the ground shooting at plant level.

The nice thing about using a flash is one can easily brighten or darken the background by either slowing down or speeding up the shutterspeed. And when the background has fewer details I stop down my aperture to disguise elements by under exposing them.

An afternoon garden is quiet, the plants are just there waiting and unlike locations with people one doesn’t have to engage in conversation.   How does it work for me? I like this quote by American photographer Annie Leibovitz, “The camera makes you forget you’re there. It’s not like you are hiding but you forget, you are just looking so much.”


Commenting on Depth of Field     

D of F 3 women                                                                                                                                        

Depth of field is a seemingly elusive topic that I discuss in my classes and repeatedly explain to photographers who come to my shop complaining about problems with their lenses.  The problem is really just a lack of understanding of how the aperture controls the field of focus around the subject.

Long time readers might remember my many articles over the years discussing “depth-of-field”. Hopefully, I won’t bore those that understand how to use depth of field, but it is always a good thing to review this concept.  I will reuse an example I used a couple years ago about a photographer that showed me an image made during a wedding. The photographer showed it to me commenting that he had chosen that lens because it had a wide aperture which allowed for photographing in low light, but was bothered that the expensive lens wasn’t very sharp.

The image showed a view of the central aisle of the church with pews left and right, leading up to the bride in the distant centre, approximately 20 feet from where the photographer was located.  The overall exposure shot at an aperture of f/2.8 was fairly good, however, what bothered him was the guests around the bride standing in the aisle weren’t very sharp

The definition of depth-of-field is, “that area around the main subject, in front of, and behind it, that is in acceptably sharp focus”.  

Wide aperture lenses are very popular and using a lens at a wide aperture like f/2.8 when making a portrait isolates the main subject and produces a soft, out-of-focus background by reducing the depth of field.

The photographer was relying on the wide aperture to increase the exposure in limited lighting conditions.  That additional light allowed for a faster shutterspeed for handholding, but along with the benefit of additional light reaching the camera’s sensor the photographer forgot, or didn’t realize, that the resulting effect would also be a reduced depth of field.   

Using a wide aperture reduced the field of focus in front of the subject of a couple feet and the same behind the subject. That would be fine in a close-cropped portrait, but in that photograph of the church aisle, the guests in the foreground and guests in the background, appeared to be out-of-focus.

                        The further your subject is away the more the Depth of Field.  

                        The closer your subject the less the Depth of field.

                        The smaller the aperture the more the Depth of Field.

                        The larger the aperture the less the Depth of Field.

                        The Smaller your aperture the slower your shutter will need to be.

I prefer using a small aperture for scenic photography and, as in this instance, for interiors.  The answer to that example, and the examples I saw posted online, would be how to solve the low light problem not with a wide aperture, but by increasing the ISO so a smaller aperture could be used.

Depth of field is that area in front of and behind your subject that is acceptably sharp.  Practically, the depth of the field of focus will be 1/3rd in front and 2/3rds behind the subject.  Photographers who understand how to use depth of field will become progressively more successful in their photography.  


Which Button is for the Composition Mode?        

Pritchard store

Open Gates bw

Forest path

Canon Beach 2

Palouse falls 2

Which button is for the composition mode?     Yes, I did get asked that question the other day, but it is not as silly as it first sounds. I’ll go back to the conversation from which it comes.

A customer stopped by my shop wanting to get a different camera other than the one he had been using for over 20 years.

I was showing him a couple of cameras and explaining the different modes like “aperture priority”, “shutter priority”, “program” and “manual” when he made the statement, “All that seems a bit complicated, just show me which button is for the composition mode because mostly I like taking scenics”.

The other customer in the store stopped her browsing, turned, and just looked at me. I’m not sure if she was troubled by his statement, or also wanted to know about this secret button.

I replied, “Composition is what you do, not the camera, to position your subject within the viewfinder frame,” and added; “composition also deals with perspective and the relationship you create between subjects in the foreground and background.”

Does all that seem too complicated of an answer? I was making squares and rectangles with my hand and moving things around on the counter as I explained it hoping to make it clear to him. Now, however, let us go back to his question of the “composition button” and what he was trying to achieve with his camera. Remember his last camera was from the 1970’s. Even auto focus was new to him.

Cameras programmed since the 1980s are pretty capable of getting the exposure correct in all but the most contrasty lighting conditions. If he were to get serious now that he was about to get a DSLR he would be trying to discover how other successful photographers compose a scenic. Or he would be doing some reading, joining a camera club, or taking some classes that would teach him composition. My impression was that he just liked to take pictures and capture memories of the places he has been. So I think either the mode with the “little mountains” or with the “running person” on the dial of the camera I was showing him would give him exactly what he was looking for and we could, if we wanted to, call them composition modes.

The exposure mode I feel most comfortable with is manual and I am continually thumbing through the different menus on my camera to reset things. I make my living using a camera so I have a camera in my hand a lot of the time. I think each of us needs to use our cameras in ways that make us comfortable so we won’t happen to be confused and experimenting with the settings at that moment when the action happens in front of our camera.

I used to call that a “Kodak moment”. Hmmm, I think I need to find a new phrase now that I am no longer using Kodak films and that company has pretty much disappeared.

In any event, I recommended that he not worry too much about composition and experiment with the different modes his camera has to offer other than “P”. Hopefully he’ll stop by again and I can get him using his DSLR as more than just a point and shoot camera.

In closing this article that started with thoughts of composition, I particularly like this quote of Alexander Lee Nyerges of the Art Institute of Dayton, Ohio, when discussing an exhibition of Ansel Adams of the American West.

“His landscapes were operatic in composition, complete with lighting, tragedy and drama—luring those who viewed his works to seek Nature and capture the spirit of the wilderness.” I am certain Adams had a special button for composition.

10 Suggestions for Successful People Photography.


Constable Mike Moyer

Constable Mike Moyer.

Actor

Professional Actor

Actor 2

Professional Actor


I had an interesting discussion with another photographer over coffee this morning. He had brought his memory card with several different pictures and as we talked about his shots he asked, “What is your favorite photography subject?”

Like many other photographers, what I like best changes with whatever I’m currently photographing, and I enjoy photographing just about everything. But in truth most of my subjects in the past 40 years have been people. My reply was, “I enjoy photographing people.”

I’ve been employed doing many types of photography since I began earning my living as a photographer in the 1970’s. And I have worked as a photographer for all types of organizations photographing all types of subjects. However, most of the time I have photographed people.  I think most photography is of people.  We take pictures of our family, of friends, and of people at celebrations and other events.

His next question was, “how do you make a photograph that is more than just the usual snap shot?”

Here are my 10 suggestions that contribute to successful people photographs.

  1. When you take pictures of people look at them and pay attention to their appearance to ensure they look their best.  Don’t just rapidly take a photo and realize later that you should have had your subject adjust something, e.g., a necklace, glasses, a collar, or especially, that tie.
  2. Do three-quarter poses of single subjects. By that I mean turn their body so that they view the camera from over their shoulder.  Choose interesting and flattering angles or points of view. Avoid straight on or “up the nose” headshots.
  3. Focus on the subject’s eyes. When we talk to people we make eye contact. There is a greater chance of your subject liking the photo if their eyes are sharp and not closed or looking away. Ensure that subjects smile.  In my experience when subjects say they want a serious photo without a smile they appear sour or unhappy in the final photo. Do one of each as a compromise.
  4. Select an appropriate lens. Avoid short focal length lenses. On a full frame camera my favorite is 105mm. However, with crop-frame cameras I don’t mind 70mm. Longer focal length lenses create a flattering perspective.
  5. For portraits, an aperture of f/4 or wider will soften the background and make your subject stand out, but for group photos use an aperture of at least f/8 or smaller to increase the zone of focus (depth of field).
  6. Look at the background behind your subject especially when doing outdoor portraitures.  You don’t want the photo to appear to have something growing out of your subject’s head or to have objects in your photograph that are distracting.
  7. Pay attention to uncomplimentary shadows created by the sun, your flash, or other light sources.
  8. Get things ready first. Contemplate the poses before you photograph your subject. The best way to bore your subject and loose the moment is to make them wait.
  9. Tighten up the shot. Get rid of unwanted elements in the photograph that do nothing for it. If there is more than one person make them get close together.
  10. Talk to your subjects. The most successful portrait photographers are those who talk to and relate to their subjects.  We are dealing with people and we communicate by talking. Don’t hide behind the camera.

And as always be positive about the photograph you are about to make. Get excited. Your excitement will be contagious and affect those around you.

I appreciate comments. Thanks, John

My website is at http://www.enmanscamera.com

Photographing Falkland in the afternoon

Falkland afternoon

Falkland, British Columbia


Ranch cafe

afternoon pub

street shadow

Falkland is one of the many small towns nestled along winding highway 97 that drivers almost miss if there weren’t signs posted at both ends of the village requiring them to slow down. Although I pass through there regularly, the only time I stop is when locals hold their roadside market during the summer. Usually I just reduce my speed to 50 km, watch for pedestrians and approaching vehicles from covered side streets, then resume speed without even thinking.   Falkland has about 600 residents, and is notable because each year on Victoria Day they host the Falkland Stampede (one of Canada’s oldest rodeos); and they also claim to have the biggest Canadian flag in western Canada.

My wife recently purchased a 24mm wide-angle lens and we were looking forward to checking it out. We had spent the day in Kelowna, about an hour south of Falkland and I thought that with the drive there would be lots of opportunity to see how her new lens would perform. I had read mixed reviews online, and I was anxious for my own results. I had made a few shots of the fence in front of our home, and allowed some side-lighted images to catch sunlight to check lens flare, but I hadn’t made any practical images.

I know reviewers can be very strict with their lens testing and even go so far to include charts and exaggerated enlargements when they evaluate a lens. However, in my opinion, all that most users care about is if a new lens is reasonably sharp and consistent in how it reproduces a subject; and regarding wide angles, if there is any unflattering distortion.

The day had been long and I wasn’t thinking about much of anything except getting home and out of that car before we lost daylight. I don’t mind winter very much, but I do mind driving that narrow, slippery, winding road after dark. However, traffic had been light and we hadn’t got stuck behind any big trucks. So we were making good time when we approached Falkland.

Photographers talk about that “Golden Hour” just before sunset when the light is warmer and softer than when the sun is higher in the sky. I doubt there is much of a golden “hour” in canyon towns like Falkland, but the light certainly was inviting at the moment and we had my wife’s camera and 24mm lens waiting for testing.

Linda was tired from our long day and was only willing to make a couple of shots of an old shop before handing me her camera. She said, “You walk around”. So I did. In Falkland it doesn’t take much time to see everything on the main street.

I like buildings, shop signs and afternoon deep shadows and the narrow street was perfect for testing that lens and anyway, I was happy to finally make a few pictures while the light was exciting in that interesting little town.

I only walked around for about ten minutes and had so much fun that I forgot I was supposed to be testing that lens. I have lived in this part of British Columbia for over 30 years, and as I walked around I wondered why the only pictures I have ever seen of Falkland were a few of cowboys being bucked off at the rodeo. I guess it is hard to stop and look. And some photographers might feel locals would be uncomfortable with outsiders intruding. I doubt that unless someone stuck a lens in a local’s face they wouldn’t even notice a person standing along the street, like I was, taking a few pictures in that neat little town.

Oh, and that Nikon 24mm was just fine. For those that wanted a review, I think my aperture was mostly at f8, f11 and f16 because I was interested in getting as much depth of field as I could get. So I can’t comment on how well it performs wide open.

I always appreciate your comments. Thanks, John

My website is at www.enmanscamera.com


Don’t Forget Some Photographic Basics

Helmkin Falls view   Low drifting clouds

A local photographer showed up at my shop with some scenic/landscape photographs he had made and asked me for a critique of them.

Photographers get excited about the subjects they photograph and sometimes forget, or never learned in the first place, some basic rules for photography. Rules that are actually procedures and guidelines that can be followed to make photographs more exciting for viewing. Although I enjoyed his series of photographs of Helmken Falls in British Columbia’s Wells Gray Park, I noticed two problems that I discussed with him.

The first is a very basic concept in photography – depth of field. Depth of field refers to the “in focus area,” or sharpness of a picture at different distances when the aperture diameter changes. Depth of field is the area around the subject that remains acceptably sharp. The farther things are away, the more depth of field one can achieve, and the closer things are, the less depth of field. To control depth of field one uses the lens aperture.

Photographers new to this medium think of the aperture only as a means of controlling the amount of light reaching the sensor. However, the aperture also controls depth of field.

Control over depth of field is accomplished by increasing or decreasing the aperture’s size. For example, the smaller the aperture opening (f/16) the more depth of field; and the larger the aperture opening (f/4) the less the depth of field is. So f/16 will give more “in focus area” in front of and behind the subject than f/8. Regardless of the F/stop one should have a shorter in focus area in front of the subject, and a longer in focus area behind the subject.

The ratio is approximately one-third in front, and two-thirds behind. So to obtain maximum depth of field in a photograph use a smaller aperture opening like f/11, and focus one third of the way into the scene.

The second thing I pointed out was his composition. I wondered what it is that makes photographers disregard the basics of compositional strategies and just snap away excitedly. My assumption is that many photographers are so excited about the subject they are photographing, and possibly the camera they are using at the time, that they forget to make the subject interesting in their final photograph.

With his scenics of the waterfall, as exotic and colourful as it was on that day, he ignored something fundamental in any properly composed photograph called “The Rule of Thirds”. This so called “rule” states that we shouldn’t place the main focus of interest in the centre of the frame, but should place it on an intersection line, or very close to it, created by dividing the picture into a grid of thirds.

That photographer’s pictures would have been stronger if he had paid attention to compositional elements that would make his image interesting by placing important or interesting visual information at intersections.

I have photographed those falls alongside other photographers many times since I moved to British Columbia 40 years ago; spring, summer, fall and winter.

Sometimes they have been excited, as with the fellow I critiqued, and just pointed their cameras without thought, overwhelmed by the roaring, wilderness splendour of Helmken Falls. Regarding those image makers, Guggenheim Fellowship for Creative Arts recipient Garry Winogand quipped, “Photographers mistake the emotion they feel while taking the photo as a judgment that the photograph is good”.

However, I have also set my tripod next to photographers that just seemed understand what it takes to make viewable images and appear to feel their way through the photograph. That’s always exciting. Of them I like to think they adhere to the words of Photo Imaging Association’s 2005 Photographer of the Year, David Harvey when he said, “Don’t shoot what it looks like. Shoot what it feels like.”

As always, I appreciate any comments. Thanks, John

My website is at www.enmanscamera.com

Photographer Didn’t Understand the Purpose of a camera’s Meter.

Wedding Kiss Touching Noses

A few weeks ago I wrote about digital camera terminology. I expected some readers may have skipped reading that to find something more advanced, however, I received lots of comments, and some good discussions on terminology I had not included, supporting my contention that many photographers are perplexed at the new jargon.

My article was in response to a customer confused about how to discuss her camera, however, this week I was reminded again that many photographers aren’t only confused with pixels, resolution, and bit depth, but also basic camera functions.

A photographer that had recently taken a local photography class complained to me, “I don’t really understand what the meter does, or how I would use it.”  The instructor had pointed out how to select the different camera modes, but neglected to include why one might select one over another for particular subjects. He told me the class ignored Manual mode, and left him thinking that only the three automated modes were worth using. The word exposure was only mentioned in passing when referring to those automated modes and guidance concerning the camera’s meter, and how to effectively use it didn’t seem to be part of the class.

I told the photographer that the meter is the measurement tool that allows users to control light, and suggested using the Manual mode as an easy way to access the two important camera mechanisms, the Shutter and the Aperture, to increase or decrease the amount of light reaching the sensor.

I explained that the Shutter blocks light from the sensor until the shutter release button is pressed, then it quickly opens and closes.  Setting the camera’s shutter speed controls the length of time light reaches the sensor.  The Aperture is an opening that lets light pass through the camera’s lens and is measured in f-stops. In actuality, it is a hole (aperture) that photographers control by opening it wider (wider aperture) for more light, and closing (smaller aperture) for less light, similar to the pupil of our eye.

Photographers can use the meter to determine under-exposure or over-exposure of their subjects, for example, I might want to slightly under-expose a highly reflective, white gown on a bright sunny day, or conversely, brighten it up on a heavily overcast day. In both instances I would use the manual mode to check a particular subject’s exposure with my camera’s meter, especially underexposed areas or subjects wearing a black suit.

To sum this all up, photography is all about reflected light and my recommendation to that beginning photographer was to pay attention to the camera’s meter and start using the Manual mode when he decides it is best for the job at hand. The camera is a tool with many functions, and one is never limited, and can choose as the situation demands.

Learning to use the camera’s meter and getting comfortable using manual exposure mode to manage shutter speed, and/or the aperture settings gives the advantage of full control without as many chances of the camera being fooled by unexpected changes in light. It gives optimal command, when needed, over the amount of light that still shows details in both the shadows and the highlights, allowing mastery over how photos are viewed and interpreted.

Don’t hesitate, I enjoy you comments.

My website is at www.enmanscamera.com

What is Bokeh?

Window Pane bokeh Sedum bokeh Wooden wheel bokeh

Wikipedia defines bokeh as “the way the lens renders out-of-focus points of light”. And my dictionary states; “bokeh, bōˈkā. “The visual quality of the out-of-focus areas of a photographic image, especially as rendered by a particular lens.”

Bokeh has become another one of those not-so-well-understood terms that has become over used, and in many cases misused, by photographers since recent technological advances in cameras have made the medium of photography so accessible and popular.

A young photographer walked into my shop last week and asked the question, “Do you have one of those depth of field lenses?” I knew what the answer was because that was not the first time I have been asked the same question.

The first time I was asked I thought there might be some new piece of equipment on the market and inquired if that meant a wide aperture that controls depth of field. That’s where the word bokeh came up. The response was, “Ya, depth of field, bokeh.”

In my classes I include a tutorial on depth of field and more than once participants have interrupted me saying, “Oh, so that’s what bokeh is.”

Actually, the word bokeh comes from the Japanese word boke, which means “blur” or “haze”, or boke-aji, the “blur quality”.  That’s right, not blur, but blur quality.

Wikipedia carries on stating, “However, differences inlens aberrations and aperture shape cause some lens designs to blur the image in a way that is pleasing to the eye, while others produce blurring that is unpleasant or distracting—”good” and “bad” bokeh, respectively. Bokeh occurs for parts of the scene that lie outside the depth of field”.

One of the problems with that word might be that photographers are applying it when trying to describe not only control over depth of field, but selective soft focus. Those new to these effects are searching for a quick term to define effects that they don’t understand.

The authors of www.picturecorrect.com write that there are, “fundamental differences between soft focus and bokeh. In soft focus photography there is an intentional blurriness added to the subject while the actual edges are retained in sharp focus, but in bokeh it is only an element of the image that is intentionally blurred. Additionally, bokeh tends to emphasize certain points of light in the image as well.”

Bokeh appears in the areas of an image that remains outside the focal region. Because of this the most common technique used to add it is a shallow depth of field created through a wide open aperture”.

Depth of field is, “That area, in front of, and, behind the subject, that is in acceptable sharpness.” In my experience depth of field is one concept that eludes many photographers.

I suggest photographers think of it as selective focus. Thinking that way will help one make decisions about how much should be in focus around the subject, and, of course, allowing bokeh to appear.

In my opinion, one need not be surprised or critical when someone says they want a “depth of field lens…ya know, a Bokeh lens”. Every medium has its slang or jargon, and. unless one has enough interest and energy to study a fast changing technologically like photography, I can understand the confusion using many of the new words.

As always, I do appreciate your comments. Thanks, John

My website is at www.enmanscamera.com