On Vacation in Vancouver.     

2-laughing-sculpture

3-group-laughing

4-denman-street

5-bike-rentals

6-bicycles-only

7-english-bay-bike-path

8-english-bay

9-tree-top

9a-mounted-police

9b-harbour-air

9c-grandville-bridge

9e-night-harbour

9f-expo-sales

9g-vancouver-harbour-lights

9h-park-goose

“We should go on some kind of trip”.  When my wife said that a month ago she didn’t have to do much to convince me.  So about an hour later we had reserved a top floor room at the hotel on the corner of Davie and Denman Streets in Vancouver.

We chose Monday, Tuesday and Wednesday, so we would miss the weekend rush.  After a picturesque five-hour drive through British Columbia’s coastal mountains I was carrying suitcases and my bag loaded with our cameras up to our room.

What a great location. Not only were we moments away from the restaurant and bar scene of one of Vancouver’s most exciting areas that divides the city from the magnificent 400-hectare natural rainforest of Stanley Park, but right across the boulevard from our hotel was picturesque English Bay.

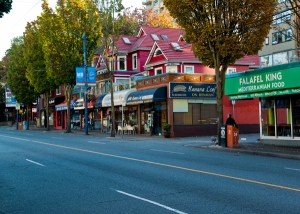
I discovered Denman Street when I first moved to Canada in the 1970s. Maybe it was the curiosity I had for a street that sounded and was spelled pretty closely to my name, I don’t know. But in any case the street was just as much fun then as it is all these years later.  One can either join others people watching while sitting at an out door pub, or choose food from almost any country in the world. We chose Greek at the English Bay for our first evening meal of the trip.

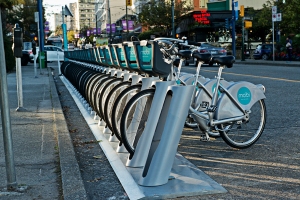
The next morning, while my wife slept I put a 24-70mm lens on my camera and headed out. There wasn’t much traffic on the street, or people walking along Denman. It was easy to photograph the buildings and I picked out a funky little coffee shop that we could go to later.  I walked the street and wandered the alley behind our hotel, (I like alleys) then headed for the beach.

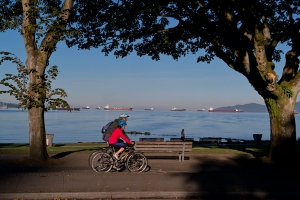
My mother always told me to look both ways and be careful of cars when I crossed the street, but she never told me how dangerous it was to cross the bike path along English Bay. I dodged several riders and jumped to the lawn covered with slippery geese droppings when a woman rider zoomed by yelling, “Bikes only!”

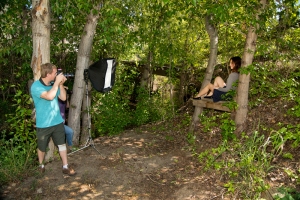
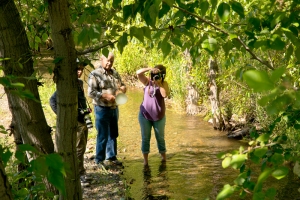
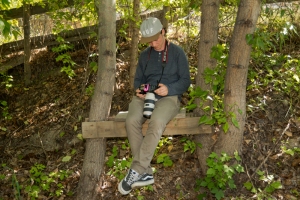
I suppose I have become one of those hick tourists gawking at all the sights of the big city, but I reached the safety of the beach where I could meander along pointing my camera where I pleased.  Gosh, I even got to meet local Vancouver photographer Trent Watts, who was kind enough to take time out of his morning to talk with me.

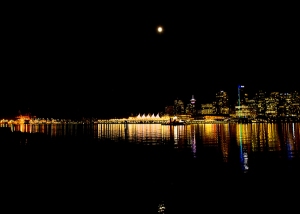
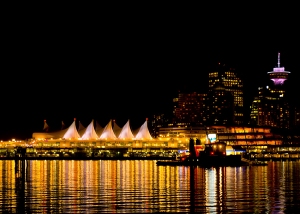
Linda finally got up, and after coffee at the little shop I found earlier, we decided to drive into Stanley Park to take pictures of the harbour and stopped for anything we thought might make a fun picture. We also were looking for a good vantage to take some night pictures of the bright city across the harbour. Gosh, we had so much fun we overlooked having lunch.

Much later we wanted to try our hotel’s fish n’ chips special being offered for supper, however even that had to wait because I stopped to photograph and talk with the two Canadian Mounties who have special dispensation to rest their horses after touring through the park in the cool pleasant entrance of our hotel’s basement parkade.

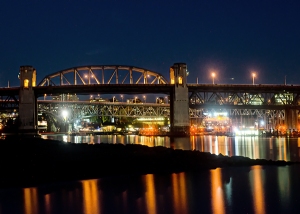
After supper I went out for night shots of the Granville Street Bridge that crosses both a boat filled water way into English Bay and the shopping district of Granville Island and joined several other photographers on the beach as the sun went down. Then just after 8:30 packed up and drove off for more photos at the location we had chosen in the park.


The next morning I must have been tired after all the previous day’s activities, because after I had photographed a white goose honking loudly at me on the beach I checked my watch and it was a late 7AM.  Oh, well I had a good time and anyway I was on vacation!

Two Photographers Are More Fun 

TwoPhotogs 1

It is always fun to do photography with someone else. This past week I have been talking to a friend who would really like his wife to get involved with photography, and I’ve told him how much enjoyment I get from this exciting medium of photography would be missing if my wife, Linda, were not also a photographer.

I have written about this in the past, but I am going to bring back a previous article for those readers that might have missed the original and would like their spouse to take up photography.

When we first got together 40 years ago Linda didn’t do photography, but that quickly changed.

I suppose she didn’t have any other option. Then and in all the years she has known me I have been I am either doing, teaching, talking or writing about photography.

My advice to any photographer that is actually interested in getting their spouse involved is as follows.

Match the equipment. I mean that with regard to cameras, both DSLRs should operate the same way. The models can be a year or so apart, but should be the same brand and the controls should operate similarly and if two of the latest models are affordable, so much the better.

Don’t be cheap with lenses or cameras for your spouse. If it isn’t good enough for you, it isn’t good enough for the most important person in your life. Just as you would select a lens for the subject and the way you like to shoot, your photo partner should select lenses for his or her preferences.

I know your mother told you to share, but my recommendation is don’t share. That just leaves someone behind. If you both like long telephoto lenses, get two.

I can remember the exact moment I thought about the concept of equality. I was in Yellowstone National Park in Wyoming waiting for Old Faithful Geyser to erupt. While I waited I noticed a man and woman with their tripods setting up closer than me. I was obvious they were both serious about getting good photos of the geyser, but I could see that his was larger and feature packed, while hers was just a tiny, toy-like, point-and-shoot camera.

In my mind, it didn’t matter who was the better photographer or had the better eye. That point-and-shoot reduced her chances, and I wondered why she would even try, or how long she would keep it up when her equipment kept her behind.

I had a friend who tried getting his wife interested in photography. He bought her a cheap, entry-level camera and while he would make 16×20 prints of his images, hers were rarely over 8×10. She lost interest.

Shop for accessories together. Each photographer has his or her own preferences and should make equipment choices for the subjects they like to shoot.

Education is always a good idea. Attend a photography class or workshop. Search for them online or check local camera shops. Take turns going to photography classes or better yet take part in the same workshop.

One of our most memorable vacations was when we both attended a weeklong wilderness photography workshop on Mt. Rainier.

In my opinion we may have gotten more out of that class than the other participants because we were able to share information and experiences during and after.

Gently critique each other’s photography. Don’t just store pictures away on the computer. Sit in front to the computer display together and decide which photographs work and which that don’t, and then delete all the failures. We make large prints and calendars of our pictures.

One photographer in the family is cool, but two photographers, in my opinion, are much better. If you want your partner to have the same excitement about photography as you do, don’t be stingy with the compliments. And on that occasion when your spouse makes a better picture of the waterfall or the running deer than you, be sure to tell them.

Oh, and I never have the worry or guilt about getting new equipment.


Why do photography?

No Loitering

Guitar

St. Andrews

Tall ships Victoria

Kamloops Lake 2

Sternwheel

Coca-Cola

Forgotten shops

Yellow & Red

Just Waiting

After a discussion with a fellow who told me he has become bored with photography I thought I’d revisit the following from an earlier post.

I once asked “Why do photography” to members of an online forum and received some unremarkable responses like, “because I can” and “because I have a camera”.  Well, I suppose it is all about the camera to lots of people. However, there were two responses that I really liked, the first from someone called Soenda who eloquently wrote,

“ Because taking pictures has helped me see better. Before, I was less aware or the way light strikes leaves. I didn’t notice the symmetry of birds on a wire. Sunsets were masses of agreeable colour; now they are gold, pink, lavender and blue”.

The second from someone named Laura who philosophically said,

“Because when I look at my life, I cannot say I have done nothing. The proof exists that I have seen at least a wee bit of the world. I take pictures because it is artistic expression, and I think when we repress our artistic nature, we do ourselves no good, no good at all. I take pictures because it is fun. I can spend the entire day taking pictures, and it could not be a day better spent…”

For me, photography changes. There are times when I just want to play and am interested in nothing more than experimenting, my goal just seeing how something works.   I enjoy photographing my friends, family and pets. Pictures that have meaning only to me, but might never go anywhere other than on my computer’s screen saver.  And of course, until I retired, photography was the way I earned my living.

There are those times when I try to visually create an image that says something to others about how I see and feel about something. I can’t really say that the medium of photography is a passion for me, but I am enthusiastic. It’s just something I think about a lot and do.

Many use photography as a way to express themselves artistically, of which I heartily agree. Expressing oneself through photography is easy, as it doesn’t require the trapping of other mediums like painting or sculpture, and merely requires a camera.

Photography, for those who first wanted to make photographs, became accessible during the 1800s. The first surviving image made by Jacques Daguerre was of some artistically arranged plaster casts resting on a window ledge in 1837, and a short 20 years later photographers were wandering the North American wilderness and newly constructed cities creating photographs with the same intensity, all though not in the same numbers, as we are today.

Why take pictures? For some it is to document history, we know about the civil war in the 1860s through the photographs of Mathew Brady and the Vietnam War in the 1970s by David Kennerly.   Timothy O’Sullivan, William Henry Jackson, Ansel Adams, Elliott Porter, Imogene Cunningham, Bret Weston and others gave us their visual opinions of an early American landscapes.

There were those like Dorothea Lang and Walker Evens that during the great depression of the 1930s told us about the human condition. While Photographers Arnold Newman, Richard Avedon and Canadian Yousuf Karsh, celebrated the beauty of the human expression”  paving the way for modern portrait photographers.

For some the question “Why do photography?” may be very philosophical and for others practical. Soenda commented, “ Because taking pictures has helped me see better.” And Laura wrote, “I take pictures because, when I look at my life, I cannot say I have done nothing.”

I wonder what readers would answer.

Communicating Our Personal Photographic Vision  


I enjoy pretty much everything when it comes to photography. I am happiest when I get to talk about it, read about it, and look at other photographer’s work, and of course, any occasion where I get to point my camera at a subject.

Famous and influential photographer Edward Weston once wrote, “Photography suits the temper of this age – of active bodies and minds. It is a perfect medium for one whose mind is teeming with ideas, imagery, for a prolific worker who would be slowed down by painting or sculpting, for one who sees quickly and acts decisively, accurately.”

Weston most likely said sometime in the 1950s, but it aptly describes many of those taking pictures with all kinds of cameras in the 21st century. Yes, it is the, “perfect medium for one whose mind is teeming with ideas…”

As I looked at several images (several were from iPhones) that were proudly posted online I thought how those words fit many modern photographers. However, there I was looking at many pictures that, although quite creative and colourful, lacked the basic compositional guidelines I was taught              (I suspect Weston learned also) and are still being taught in almost any class on photography.

Photographic composition is the selection and arrangement of the subject within the picture area. However, what I saw seemed in many cases to be hastily captured images with little regard to the importance of any centre of interest that might help viewers identify what the photographer is trying to communicate.

Maybe it is the conditioning we get by clumsily pointing our cell phones at a subject, or the thoughtless reliance on a camera’s auto focusing device to select whatever is in the middle of the viewfinder for proper focus.

There is a compositional guideline called, “the rule of thirds”. This so-called rule is a simple principal that divides an image into thirds, horizontally and vertically, and tells us to position the most important elements in our scene along these lines, or at the points where they intersect, and by doing so, adding balance and interest to one’s picture.

I subscribe to four components when I create a picture:

  1. The Centre of Interest: A strong center of interest helps the viewer identify the point of the picture, or what the photographer is trying to communicate.
  2. Angles: Begin by looking at the subject, move around – up and down, vertical or horizontal. Decide what should or should not be included.
  3. Distance: Don’t back away. Eliminate everything that does not add to the picture.  Close-ups convey intimacy, long shots build space and depth.
  4. Background: The background can make or break that photograph. Use the background to build interest in the center of interest.

There will be those photographers that in the interest of their own creative freedom will disregard anything that they believe will restrict their photographic independence and innovation or what they think might apply limits to their imagination.

I wouldn’t agree with that. I don’t think this is an argument of vision.

If our goal as photographers is to create an image that withstands the test of time and communicating a personal vision, then one must learn the        basics of composition in the same way as one would learn the basics of exposure, or how to make the camera actually work whether it’s a DSLR, or a feature of a cell phone.

Commenting on Depth of Field     

D of F 3 women                                                                                                                                        

Depth of field is a seemingly elusive topic that I discuss in my classes and repeatedly explain to photographers who come to my shop complaining about problems with their lenses.  The problem is really just a lack of understanding of how the aperture controls the field of focus around the subject.

Long time readers might remember my many articles over the years discussing “depth-of-field”. Hopefully, I won’t bore those that understand how to use depth of field, but it is always a good thing to review this concept.  I will reuse an example I used a couple years ago about a photographer that showed me an image made during a wedding. The photographer showed it to me commenting that he had chosen that lens because it had a wide aperture which allowed for photographing in low light, but was bothered that the expensive lens wasn’t very sharp.

The image showed a view of the central aisle of the church with pews left and right, leading up to the bride in the distant centre, approximately 20 feet from where the photographer was located.  The overall exposure shot at an aperture of f/2.8 was fairly good, however, what bothered him was the guests around the bride standing in the aisle weren’t very sharp

The definition of depth-of-field is, “that area around the main subject, in front of, and behind it, that is in acceptably sharp focus”.  

Wide aperture lenses are very popular and using a lens at a wide aperture like f/2.8 when making a portrait isolates the main subject and produces a soft, out-of-focus background by reducing the depth of field.

The photographer was relying on the wide aperture to increase the exposure in limited lighting conditions.  That additional light allowed for a faster shutterspeed for handholding, but along with the benefit of additional light reaching the camera’s sensor the photographer forgot, or didn’t realize, that the resulting effect would also be a reduced depth of field.   

Using a wide aperture reduced the field of focus in front of the subject of a couple feet and the same behind the subject. That would be fine in a close-cropped portrait, but in that photograph of the church aisle, the guests in the foreground and guests in the background, appeared to be out-of-focus.

                        The further your subject is away the more the Depth of Field.  

                        The closer your subject the less the Depth of field.

                        The smaller the aperture the more the Depth of Field.

                        The larger the aperture the less the Depth of Field.

                        The Smaller your aperture the slower your shutter will need to be.

I prefer using a small aperture for scenic photography and, as in this instance, for interiors.  The answer to that example, and the examples I saw posted online, would be how to solve the low light problem not with a wide aperture, but by increasing the ISO so a smaller aperture could be used.

Depth of field is that area in front of and behind your subject that is acceptably sharp.  Practically, the depth of the field of focus will be 1/3rd in front and 2/3rds behind the subject.  Photographers who understand how to use depth of field will become progressively more successful in their photography.  


Home Studio Lighting for Photographers      

Flash Kit 3

I have written about using off-camera flash several times. Nevertheless, with the conversations I had with two separate, aspiring portrait photographers this past week asking my recommendations for setting up a home portrait studio I have decided to revisit that conversation.

In each instance they were troubled by the kinds of lighting equipment other photographers were advising them to purchase.  Both were upset at how much it was going to cost to get large and expensive studio lights other people were suggesting, and complained that they would have to wait until they had the money before a home studio lighting situation could be set up.

With serious searching they might be able to find used studio lights listed on craigslist, or similar online sales, but that will include additional shipping costs. Further, they won’t have experience with the many brands of equipment available, and are taking a chance that the units will arrive in working condition. And, to confuse them even more they will be offered lots of those cheap, and inadequate, Constant Light kits that were purchased by other unsuspecting beginners.

I knew they were both new to portraiture and just want to learn about lighting. My opinion is they don’t really need to go to the bank just yet, and would be better off starting out with smaller, speedlight type flashes. With the money saved by not purchasing the big, studio type lights they can buy a couple of inexpensive light stands, umbrellas, and maybe even add a soft-box, and a backdrop.

Photographers intent on setting up small home studios for portraits and small groups don’t need to go to the expense of the brawny, studio type lights. They can easily, and without much initial cost, set up a studio with what I personally use, and call my “portrait kit”.

I use older hotshoe flashes for my portrait kit, each with it’s own wireless receiver and stand. I can choose a shoot-through umbrella, a reflector umbrella, or a softbox, and much of the time I include a reflector. It is an inexpensive and easily stored or transported “portrait kit” that I would recommend for home studio photographers.

Wireless sender/receivers come in all sorts of inexpensive incarnations, and it is the same with lightstands and flash-to-umbrella mounts. All of this is much less expensive, and a lot easier to store and/or move around than the big studio-type flash units.

I have been using multiple flashes off-camera since the 1980s, and I always choose inexpensive, used units that I can cheaply replace if they get knocked over, or if I wear them out.

Hotshoe type, off-camera speedlights are perfect for the educational process of learning to use flash effectively, and if they are no longer a good fit for one’s creative growth, the choices as to the next step in lighting equipment will be educated decisions instead of emotional.


Searching For that First DSLR 

Film then Digital

Digital technology has been around long enough that I occasionally overlook that there still are people who have never used anything but film cameras. I recently talked to a photographer who is finally ready to discard his old film camera and wondered which DSLR he should select.

He even sent me an email saying that regarding a camera; he would “need the whole meal deal.” I admit that I am not sure what he actually meant by that. I said to him that today’s modern technology cameras offer choices that are very different from his old film camera. As readers know, he is about to take a huge, creative step as he moves to digital.

He told me he has enjoyed photographing local rodeos. So what should be my advice to an aspiring rodeo photographer? Manufacturers like Nikon, Canon, Pentax, Sony, Fuji, and many more, all make cameras that will probably work fine for sports like rodeos.

I could start by suggesting he to go online and search out sport photographer sites for recommendations. Photographing sports is very technology driven and manufacturers are aggressively marketing to those photographers. He should begin by choosing a camera that is durable, and capable of taking some abuse, sturdy enough to be bumped around, because I think that’s a pretty rough and tumble (and dusty) world he’s participating in.

Both Canon and Nikon make professional cameras specifically designed for sports and the accompanying high ISO needed for low light, interior locations, that will focus almost any lens extremely fast, and are easily capable of high quality, excellent enlargements.

For fun I read up on professional rodeo photographer, Rick Madsen, who wrote, “Remember the camera is just a tool. When a hammer is used, it is the operator who makes it strike the nail. The same concept applies to a camera. It is just a tool and it’s what the photographer does with that tool that makes the difference between a good and a mediocre image. You must take the time to learn the camera’s operation and then utilize that acquired knowledge through practice to become proficient. You have to pay your dues.”

I personally would save my money on the camera and spend it on the lens, as my real concern would be to get a quality lens. A saying I have heard over and over in the many years I have been in this medium is that, “it’s all about the glass,” referring to the lens. And from my readings, most rodeo photographers recommend 70-200mm lenses, and I also think a 70-300mmm would fit the job also.

I hope he can find a good, well priced, used camera and a couple of quality lenses for it. He will be faced with so many choices and will receive many, many well meaning recommendations from other photographers that he’ll stay awake nights wondering what he’s got himself into. Nevertheless, I know he will be excited when he finally gets that first DSLR and embarks on the exciting journey as he learns how to use it.


Selecting a Tripod


Tripod & Hat        In his book, “Backcountry Journal, Reminiscences of a Wilderness Photographer”   Dave Bohn writes, “The trouble with photographers, and anyone else attempting anything creative, and in fact doing anything, is that they get addicted…(and)…I was addicted to the tripod as a necessity for the photography of large landscapes.”

I remembered (and liked) that quote from an article I wrote in October 2013 and thought I should post it again. I can’t say that I am addicted like Mr. Bohn, but I, too, really enjoy using a tripod when I shoot landscapes.

I reread my 2013 article on tripods and decided to repost some of my discussion after talking with a friend about tripods. He is planning on getting a new one as a gift for his wife, and we were discussing what might be the best for her.

When I select a tripod I want one that extends above my head so I can use it on hills. I don’t like bending over to peer through my camera’s viewfinder. I also prefer tripod legs that can be extended out horizontally when the ground is uneven.

I don’t want a crank to raise the center column as that is just added weight, and becomes one more thing to get caught on things. I like a column lock that turns to lock and unlock so I can easily adjust it up or down.

An important feature on the tripod I select is a strong and easily available quick release on the tripod head. The tripod head is another subject completely and my advice is get one that has a reasonable size ball surface and that is lightweight.

A tripod shouldn’t be so heavy that it’s a bother to carry. Nevertheless, it must be sturdy and capable of supporting my camera without shaking. I am always amazed when a photographer uses a cheap, little tripod to hold their camera and lens that are worth well over the thousand dollars plus mark.

I am pragmatic in my approach to photography. Sometimes the conditions are fine for just pointing and shooting, but if I really care about the picture I know I will have better success getting a quality enlargement if I return to the car and get my tripod. That’s just good sense.

I know there are many modern photographers are of the belief that the difference between a blurry and a sharp enlargement is megapixels or vibration reduction features. I can’t disagree with that altogether, but I do think a good, stable tripod is just as important and in some cases more.

Using a good tripod that allows one to stand up straight, take time to analyze the scene, problem solve, compose, and contemplate is an excellent experience. In addition, it keeps the camera from moving.

I suggest buying from people that have used, or at least can discuss, the tripods they sell.  The department stores will allow you to bring it back if you aren’t satisfied, but I am sure they are not interested in paying for the damages to your camera and lens that crashed to the ground while using their bargain tripod.

In recent years more and more quality tripods have become available and are worth owning and using. All one needs to do is spend some time researching and checking reviews.

Photographers spend lots of effort selecting that DSLR and lenses for each purpose they want to use it for. My advice is to take the same amount of effort with that purchase a really good tripod.


Off-Camera Flash in Daylight  

Whatcha Got?

Perfect lighting

A little to the left

Teamwork

The right light

Ya gotta get wet

Who cares about the water

Lets see

Flash the Cadillac


This past weekend I lead another workshop for photographers about using off-camera flash when photographing portraits outside in bright light. As with past lighting workshops my goal was to help participants understand how to use flash in different environments during daylight, and gain techniques that I hoped would help them transform the harsh daylight of outdoor portraits into beautiful light.

I was fortunate to have a great rural location where participants began in the morning photographing our model using a speedlight and a diffusion panel in a bright meadow, then moved to a large, well lit, open barn with two-flash lighting using a shoot-through umbrella and softbox until lunchtime.

After a healthy lunch provided by Versatile Studio we set up by a small tree covered stream, getting both our feet and our model’s feet wet. We finally finished the day photographing the model posing beside an old 1970s Cadillac in a nearby field.

I enjoy guiding serious photographers through their first attempts to use flash as a tool to create better photos, I want them to think of the flash being more than an uncontrollable device perched on top of the camera when it’s too dark in a room to take the photo.

I have been offering off-camera flash courses since the early 1980’s, and still believe they are an important segment of a portrait photographer’s education.

So much has changed in photography, and yet here I am 35 years later, still helping photographers learn how to use off-camera flash. Modern cameras are amazing with sensors that are so much better at capturing light than film was. But just as 30 years ago, serious photographers realize how much more flattering off-camera flash is on someone’s face than just harsh daylight.

Off-camera flash gives a photographer the ability to choose the best direction of light.

There are times when I am forced to photograph a person without using a flash. I think “forced” is the best word, because I will always use flash if I can, and as those that have taken my advice have learned, in most instances using flash for portrait photography indoors or outdoors is better than not using a flash.

Those attending last weekend’s workshop began to get comfortable using flash.

David Hobby, lighting guru and founder of the blog, http://strobist.blogspot.ca, wrote,

“Learning how to light is incremental, creative and fun. There is almost no math involved, nor any difficult technical know-how. In fact, good lighting is less like math and more like cooking. It’s like, you taste the soup and if it needs more salt you add some salt. You’ll see that when we learn to balance a flash with the existing, ambient light.”

“Controlling harsh natural light – one of the most important things to know as a shooter is how to use bad light well. Taking hard, nasty daylight and turning it into beautiful light is actually pretty easy.”

What Shall I Photograph when its windy? 

Lilac

Oregon Grape

Allium

Oriental Poppy in wind

Iris in wind

B&W Iris in wind

I looked out the kitchen window at my wife’s garden. It was late afternoon, the sun was peaking out under the clouds after a light rain, and the garden was glowing with a gusty, light breeze.

Linda mentioned that we hadn’t taken any pictures of the spring garden yet and suggested that it looked so fresh after that rain that I should be able to get some good flower photos in spite of the wind.

Wind? Wind is not a problem if photographers take the time to problem solve. I could increase the ISO or shutterspeed, but that wouldn’t do much for the ambient light, and I like more control. My normal technique for photographing flowers is to underexpose the ambient and illuminate the subject with a flash. I recall years ago having given my photography students a “stop action” assignment. They were to go out at night or find a large, dimly lit room, and use a flash to stop a moving subject in a photograph. All they had to do was select enough flash power at a specific distance to illuminate their subject properly when they released the shutter.

Those were assignments given before modern, computerized cameras and TTL dedicated flash when the flash would always produce the same amount of light and the aperture controlled the amount of light exposing the subject.

My technique for my windy garden was the same. I placed my 200mm macro lens on my camera and attached a ring-light on it. I really like is using a ring light on rainy days. I keep it on manual mode and stay at a specific distance so it won’t under or over expose the subject I am photographing. My ring flash also has ¼ and ¾ power increments to reduce the flash power output if I need it.

Just as my photography students learned all those years ago, when I pressed the shutter the flash stops the movement of the flowers in the wind. Nevertheless, the wind was quickly drying out the plants, so I had to quickly search for leaves that still showed raindrops.

The movement problem was almost solved. I took extra shots when I thought some motion had wrecked my shots, however, it was the sun that became the biggest concern. I had hoped the high clouds would block the sun, but instead of getting more bad weather, I got less, and with the clearing sky I began to struggle with the bright light.

The bright light would have been fine if all I wanted to do was document plants in the sun, but I wanted to go beyond that. Just pointing and shooting is boring. I would have liked to get out lightstands, a couple of off-camera flashes, and even a black backdrop, but the wind continued on, and would probably blow all that stuff over and I never followed up on that option.

So while other photographers might have celebrated the sunny, clear sky and be willing to put up with windy landscapes, I was done for the day.

I think I am pretty lucky that I don’t have to go far when I want to take pictures. Over the years I have looked hard into what is close to me and instead of being one of those photographers that depends on a car to find a location to get inspired. I just look around the yard and adjust my thoughts and camera for what awaits me.