Another evening of photographing along the river.    

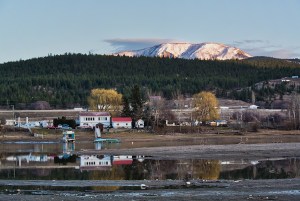
Days like today remind me why forty plus years ago I chose to build my home in the hills of Pritchard.

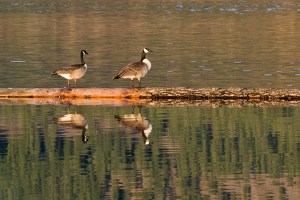
The end of March sun has melted most of the snow and there was a slow warming that drew me to again, on a cool evening to one of my favourite places to wander; the barren Thompson River shore just minutes from my woodsy.

I set my camera bag on the car seat drove down into the river valley, crossed the wide river bridge, parked my car, and walked out on the river beach. I had to be careful where I stepped or I would be ankle deep in mud.

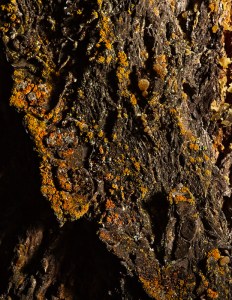
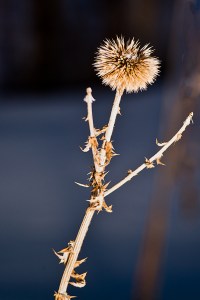
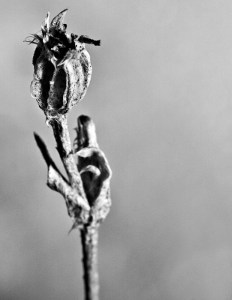
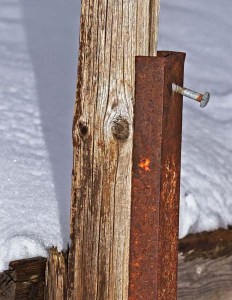
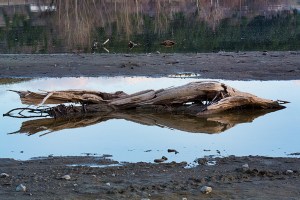
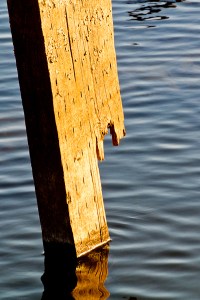
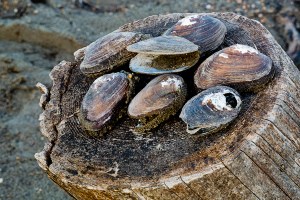
I like the river in the winter and early spring. The water is still low and its always fun to photograph rocks, broken clam shells, sunken posts, and all sorts of treasures that very soon will be covered with several feet of water.

I usually have a winter walk, but I guess I was lazy; this would be my first 2018 sojourn along the wet sand.

There is always a lot to photograph if one likes to get into the hunt. I look for stumps that were dragged along in the fast high fall water that now have become sculptural features. I like the sparkling late afternoon sun as it colours a long forgotten post sunk deep in the sand. And there’s so many of fresh water clamshells, now without life, that are always worth getting a wet knee while in search of a creative angle.

Soon the beach under the bridge will be under water and people with their excited dogs will be running everywhere. There will be boats lined along the bank and lots of trucks and trailers parked. Yep, in no time the small park will be filled with enthusiastic people enjoying themselves.

However, for me, it’s the enjoyment of a quiet peaceful walk with my camera.

I had decided to use my tiny little mirrorless Nikon V this afternoon. The small one-inch sensor doesn’t have the enlargement quality that my huge 36mp full frame camera has, I have two lenses for it and it is capable of Manual mode and shoots in RAW format.  And for the Internet and the occasional 8X10 print it’s perfect.

I call it my grandpa camera because I purchased it for those times when I go for high energy walks with my two granddaughters. At nine and eleven, “high energy” is the correct word and that pocket able little camera is convenient for the kind of animated photography I always seem to be doing when they are around.

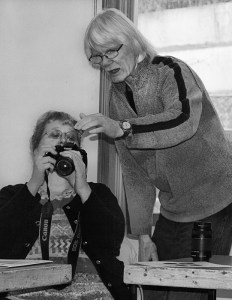
The river beach on the late afternoon was beautiful. I know there are several serious photographers that also live in Pritchard, but I never see them wandering the beach. I sometimes think I should call them all and invite them down to my private winter beach. Well, private spring beach might be more correct at this point. I did send my friend Jo a text message hoping she had time to get her camera and join me. Heck, she only lives a couple streets away from the river.

I have often written about doing photography with another photographer, and I hope readers are fortunate enough to have like-minded camera owning friends.

I know this summer will be filled with excursions to distant visually interesting locations. We all yearn to for those away from home trips to recharge our fascination with this exciting medium. However, in my opinion, it would be such a waste not to photograph the wondrous world just outside our front door. I have met photographers that tell me they can’t find anything interesting around their home or town. They will say, “It’s all so familiar and boring.”

I doubt anyone will ever hear me say that.

Photographing the garden in the March snow.     


Jo McAavany

Jo McAvany

Jo McAvany

This time last March I wrote about flowers as portraits, and discussed my indoor makeshift studio setup using modifiers like reflectors, umbrellas and softboxes to photograph potted plants.

This year I decided to put my winter boots on and wander out in the sub-zero, snow-laden garden out side my front door to see what interesting features I could discover.

As I have written before, I prefer using flash and the waning March light at 7PM was perfect for my off-camera flash equipped with a shoot-thru umbrella.

I really don’t care what time of year or the weather, I like photographing the plants and flowers in my garden. Shrubbery, weeds, and vegetation in general always make for fun subjects.

Plants are so much easier to photograph than people, plants don’t get tired, nervous or jittery, and always are happy to wait for me. Maybe that’s why I like photographing flowers, they (almost) always cooperate.

This time my goal was to photograph anything that caught my eye.

It didn’t matter how the late afternoon light was, because I had my key light with me. Relying on ambient light is so troublesome, and I knew that the only way to give my subjects “pop” and reduce deep shadows caused by sunlight was to use flash.

The slowly dimming light was perfect for my sojourn through the garden. I easily metered the ambient light, then under exposed slightly so the flash would become the main light instead of the late afternoon sun. The soft modified light from a shoot-through umbrella was even across the image with a gradual transition from highlights to mid-tones to shadows.

The snow was deep and more than once it filled my boots as I trod off the packed down path. However, there were lots to things photograph I didn’t care.

Branches and sticks poking out of the snow, shadows along the fence, a rusty old wagon wheel, the red leaves of Oregon grape, weathered boards, dead and dried out flowers, and as the sun sunk below the mountains, a light bulb hanging from the snow cover above my car.

I was enjoying myself so much that I texted my friend (Jo lives down in the valley and across the river from me) and suggested she grab her camera and join me.

We took turns holding the stand mounted flash and finally, when it was to dark to see things and we finished our photographic we went inside to load our images on my computer and warmed up with a glass of red wine as we looked over the pictures we had just taken.

As I have written before, I photograph my garden in every season.    I know there are many photographers that only take pictures of plants when they are in bloom and prefer colourful representations. However, spring, summer, fall, winter, snow, rain, sunny, or overcast, my garden is filled with ever changing subjects that always offer something new.

As always, my advise to photographers that think they must wait for inspiring weather before their next garden safari is, there’s always something to photograph no matter the weather or the season, just get up close and look for the small stuff.


Leading another class on photography         

The first class I ever taught on photography was sometime back in 1976. I think.

I had just moved from Los Angeles to Kamloops, British Columbia and a coordinator from the local Parks and Recreation Association asked me if I would teach a class for beginning photographers.

He had talked to some friends and found out that I had worked as a photographer for the Los Angeles office of Education and also spent time teaching grade school age children in private schools, so he thought I would be a perfect fit in their community education program.

I always liked sharing my knowledge of photography with those that, like me, were excited about this exciting medium and always enjoyed hanging out with other photographers. I had trained to teach grade school, but I wasn’t sure about adults.

Well, here I am all these years later. Gosh, 1976 seems so darned long ago. And I have shared my knowledge with so many people. I taught classes all over the province and was even employed as a college photography instructor for many, many years. So when a friend’s mother; who works for the Ashcroft community association asked me get up early on a Sunday morning and travel two hours to teach a photo class to fifteen eager photographers, lazy as I am, I couldn’t say no.

I designed the sessions I lead for busy adult beginning photographers that have lots of other stuff on their plate. I break my presentations into four separate headings that allow me to add information as I go along. I begin with Modes and give participants my opinion as to why they should only use and how to use, Shutter priority, Aperture priority and Manual modes. The terminology varies with different manufactures, but the discussion is the same. I can then easily plug in all sorts of tips and directions regarding their camera menus without loosing track of our exploration of Modes.

Naturally my next heading is Understanding Exposure, how could it not be after examining their camera’s Modes. Then as they scribble notes on the handouts I have given them I turn on my projector and begin my talk about Depth of Field.

Depth of field is, “that area in front of and behind the subject that is acceptably sharp”. Treating DOF as a main topic helps to show learners how the Aperture and Shutterspeed have a use other than just choosing a way to make sure their image isn’t under or over exposed.

Finally, and my favourite discussion of the day, I present Composition. The word composition gets thrown around a lot. I’ll read forums where members might say something like, “great capture, good composition,” or sometimes, something as meaningless as “I love your composition”.

I know they don’t actually mean composition as a photographic technique. I think it’s become an alternative word that means, “Picture”. They want a more modern word, and I suppose using the word “composition” instead of “picture” has sadly and ignorantly become that word.

Photographic composition is defined as, “the selection and arrangement of subjects within the picture area.” And my discussion is about using composition and compositional guidelines to enhance a photograph’s impact.

Those four topics allow me to interject all sorts of information about using their cameras and I can sum every thing up as I finish discussing Composition.

I always hope that those in attendance take the time to reread the handouts I gave them, browse their notes, practice their photography when they leave the same way one would when learning a musical instrument and when the opportunity arises, take another class on photography.

In my opinion the learning never should end.

What about Black and White photography?    

A fellow stopped by my shop this past week to see what kind of film cameras I was selling. I don’t think he was planning on a purchase as much as he was interested to see if there were still film cameras available and, likely, just wanted to kill some time in a warm shop after wandering along the freezing street.

He began by saying he missed the days when he would load his camera with Black and White film and go out for the day. I laughed and said there is no reason you can’t still do that. “You just have to set your digital camera to black and white only mode. ” Then added, “of course I prefer to convert my images to Black and White in post.”

I remember those days (Not so fondly I may add) when I would always carry two cameras to photograph a wedding or a family. One would be loaded with colour film and the other with black and white.  I placed a bright sticker on one camera so I would remember which had which film. And when I went on vacation I also would carry two cameras, one with black and white and one with slide film.

Always toting two cameras, and always changing lenses! Gosh, what a hassle lugging a big case with two cameras, lenses and bags of film.

I knew that fellow was just being nostalgic so I didn’t say any of that, but I sure thought about it and how much easier I have it now.  He commented how much he liked black and white photographs and said he still has enlargements he made years ago hanging on his walls.

I also share is love for black and white prints. There are eight framed photographs that my wife and I made hanging on my walls. Including one that’s 3 feet by 4 feet. And there is even a B&W framed poster by Alfred Stieglitz on the wall behind the computer.

I agreed with him when he said that he thought that, black and white photographs, “convey a mood that stretches the imagination” and he mentioned that he admired several of the B&W portraits I have hanging in my shop.

That was a perfect time for me to quote Photojournalist Ted Grant, who is regarded as Canada’s premier living photographer, “When you photograph people in color, you photograph their clothes. But when you photograph people in black and white, you photograph their souls!”

In an article in June of 2014 I wrote. “A black and white photograph depends on its ability to communicate, it doesn’t need to rely on eye-catching colours for its’ visual presentation. Those B&W images that stand and pass the test of time combine attention to subtle changes in light, composition, and perspective. And it stretches our creativity and forces us to visualize our world in different terms.”

I wouldn’t want to be limited to shooting black and white any more than I would want to be limited to only using one lens. Some images just seem stronger in colour. However, if I can again repeat what I also wrote in that 2014 article, “I remember a photographer once saying that he believed shooting in B&W refined one’s way of seeing. And I heartily agree.”


An early morning photo challenge                                         

My friend, neighbour, and photo pal Jo decided to give herself an early morning photo challenge. That meant after feeding her kids, 6 dogs, making sure her 13 year old son is ready for school and greeting her tired husband after his long night shift, she quickly sneaks out with her camera to create artistic images out of normally uninspiring objects she finds close to her rural home.

I first knew Jo was taking this challenge on when she texted me a picture of deer chomping on her neighbour’s bushes one morning. She casually added a close-up of snow that had drifted around a small tree trunk. I was thrilled with how she captured the play of light and shadow on something most photographers would walk past.

The mundane, normal features people ignore along the snow laden winter neighbourhood street as they dash from their warm homes, coffee in hand to jump in their cold cars, and join the morning battalion on the icy highway, are Jo’s chosen subjects.

I wonder what people think as they look out their windows at Jo all bundled up, holding her camera in gloved hands as she wanders the vacant streets. I can imagine her dodging oncoming cars as they slip along the icy snow packed street.

What those drivers are thinking when they see her standing calf deep in the snow, photographing a tree branch.

I’ll add this first quote by the iconic American photographer Annie Leibovitz, “The camera makes you forget you’re there. It’s not like you are hiding but you forget, you are just looking so much.”

I like her words, and I am pretty sure that most serious photographers get lost in the moment when they look into a scene searching to create interest out of some normally unremarkable object.

Of all the photography challenges people post on the many social media sites I think I like this one the most. It is hard for us to find interest in the world we walk by everyday. And forcing oneself to be creative with some unremarkable subject is a struggle, let alone wandering around on a cold February morning just after sun up.

I asked Jo why she likes to meander around with her camera in the early morning. She wasn’t sure, and at first only said, “because its peaceful”. However, I think there is more to that kind of challenge than searching for a peaceful moment. I know her enough to say that she is demanding in her photography, and is always exploring alternatives.

Photography is such an exciting medium that lets us examine the world around us in our own personal way. This kind of photographer’s challenge does just that.

I’ll end this with a couple quotes by Depression era photojournalist Dorothea Lange who wrote, “A camera is a tool for learning how to see without a camera.” And she also wrote “To know ahead of time what you’re looking for means you’re then only photographing your own preconceptions, which is very limiting, and often false.”

Thoughts on upgrading to a better camera.     


In the previous era of film cameras many serious photographers would come to a point when they would consider whether to upgrade from an automated point and shoot type camera to a 35mm interchangeable lens SLR or to trade in the their well used 35mm SLR for a medium format 120mm camera, and maybe even to take the climb to a 4X5 view camera.

For film-based cameras it was all about the size of the film and bigger was better.  I recall feeling bad for those people that had friends photograph their wedding with a 35mm camera. The only way to get quality-wedding photographs was really only by photographers using larger film in their 120mm medium format cameras.  If one wanted a colourful, sharp, grain free enlargement then 120mm or larger was a must.

What do I now say to a photographer that is considering a more serious approach to photography?   I will always begin with the question, “what are your interests and what subjects do you like to photograph?”

My short answer for digicam and iPhone users is, if sports and fast action, wildlife or quality print enlargements are the goal, then, yes absolutely get a DSLR.    DSLR cameras don’t have shutter lag so sports photography is easy and action demands a camera (and quality lenses) that can adjust shutter speed and aperture. Wildlife photographers prefer a selection of telephoto lenses that can be changed at will, and obviously the best images are produced with sensors that are considerably larger than digicams and iPhones.

Digicams & iPhones are convenient for candid shots. Most of us have ’em in our pocket anyway. However, for photographers that are aware of the huge limitation of those tiny sensors and cheap little lenses the next question is, what is the best choice for a first time DSLR?

For this discussion I will put DSLR cameras in two simple categories, amateur and professional.  The difference between amateur and pro cameras has surely become hazy. If I were to offer a short comment I would say the most obvious difference is durability.  Pro cameras feel sturdy, are heavy and sealed against the elements. When dropped, they usually don’t break, and even with hard use will last a long time.  The amateur camera generally has lighter weight and smaller size.

When the first DSLRs came onto the scene there was definitely a difference in the quality of the images between entry level and professional level cameras, but that is not as distinct now. The technology for sensors and in-camera processing has rocketed.  The latest entry-level model may well have the same sensor as the previous year’s expensive pro model as the technology is transferred over.  The main difference is in the weight, substance, durability, and controls.

The new models are always being introduced, with that many previously great camera models will be reduced in price, discontinued and there are opportunities to purchase at reduced prices.  As always there will be a flurry of megapixel chasers that change their camera with every new model upgrade, making used cameras available.

Whatever the camera availability, my advice to those photographers asking the “upgrading” question is to consider what kind of photography they want to do. Talk to other photographers about the cameras that are interesting, go online and check out the many photography forums to find out what others with that same interest are using, and attend some classes.

So what are my thoughts on upgrading to a better camera? If it’s affordable, don’t hesitate, do it. Using a new camera is always fun, educational, and I believe the process of learning how to control and effectively use the unfamiliar technology a new camera offers is like a shot in the arm that gets the excitement going and ultimately helps one become a better photographer.

Photographing the Canadian Pacific Holiday Train 

A couple weeks ago I wrote about how much I like Christmas lights.

Well, the Christmas holiday season isn’t over yet and to prove it I got a chance to set my tripod up on the cold, winter’s river beach a few minutes down the hill from my home to photograph Canadian Pacific Railroad’s Holiday Train.

CP Rail’s website says, “The CP Holiday Train program launched in 1999 and has since raised more than $13 million and four million pounds of food for communities along CP’s routes in Canada and the United States…. The holiday season is the best time of the year, and we look forward to bringing together thousands of Canadians and Americans this season for this incredibly important cause and a great time.”

As I have in past years, I positioned myself on the beach across the river so I could get a wide shot of the brightly lighted train passing on the opposite side with the dark hills and forest behind.

I arrived an hour in advance while there was still plenty of light and made a few test shots. The schedule put the train at our location a bit after 4PM, just as the sun was going down. The time was about right for my preference of shooting just while there is still that cool, blue light illuminating the sky and I have enough light in my photograph to define the train from its surroundings.

I set my camera at ISO 3200. That allowed me to keep my aperture at f/5.6 for plenty of depth-of -field. I was a bit under exposed, but a stop or two really didn’t bother that kind of low light image. After all, the train’s lights were very bright.

As with past years there was a strong, cold wind blowing down river. In past years it was colder and I had bundled in the car drinking hot chocolate till the train arrived, but this year was warmer and I just stood there enjoying watching my neighbours children running around on the beach. When the train finally arrived the three year old boy and I both yelled, “The Christmas Train” I am sure his mother, shivering in the cold wind, just shook her head thinking, “Boys”.

A young fellow purchased a 1980s film camera from my shop today and we talked for some time about how interesting prints made from film are. He was really thrilled to begin capturing the world around him with film.

As I selected the images that I had edited and worked over using several computer programs for this article I thought of that young photographer and the journey he is beginning with film.

I am sure he will have fun, but the photographs I made of the Holiday train would have been beyond the ability of most popular films he will find at local outlets, and I had the unfair advantage of computer programs with which I could squeeze every bit of data there was in the digital file I made.

Photographing the Holiday train was fun and I am always surprised that there aren’t carloads of photographers joining me on the beach when the train comes by.


The Camera’s LCD.                

Of all the modern technology conveniently packed into our DSLRs there is one major trap DSLR users should be aware of when attempting to find a correct exposure. And that, in my opinion, is relying on the camera’s LCD.

That little picture screen will lead you astray faster than believing a politician’s promises. It should never to be trusted.

This past week I talked to two different photographers that were wondering why their photos were improperly exposed when they downloaded them into their computer. However, when they handed me their cameras in hopes I would correct some programing error I immediately saw their problem.

The LCD is great for previewing and checking for closed eyes and composition, but it’s never completely trustworthy, and committing the following three transgressions are a sure way to give yourself an unpleasant surprise when you download your images for processing.

I’ll begin with the LCD’s Brightness. If you leave your camera on auto it will change the brightness based on ambient lighting and that can be confusing when one reviews images.

I suggest setting the LCD’s brightness manually for a more reliable way to judge the image. Some photographers even change it for different events so they know exactly how their image is meant to look for different ambient light levels. However, for most of us, a static setting will be just fine. Whatever brightness we our LCD to, it’s going to be better than auto.

My next thought goes to the Histogram. Even with the LCD set to manual brightness, many still only rely on that JPEG preview without paying attention to, in my opinion, one of the best features on digital cameras; The Histogram. The histogram gives a mathematical bar graph representation of the image’s tones. It is also a quick and easy indicator of an under or over exposed capture. And most importantly when the graph shows clipping on the far right or far left, that the photograph is losing detail.

Reading the histogram may be a bit daunting at first, but it’s just a simple bar graph and with a little research and practice reading the histogram will become second nature.

And finally the Highlight alerts. Highlight alerts are a flashing overlay that can be set up to alert when there are clipped highlights. This means that some areas of the photograph are to bright and have no detail recorded at all. The flashing areas on the LCD that many affectionately call, “blinkies” show us where the detail is missing.

It is important to remember that what we are looking at is, in fact, a JPEG preview and hopefully you are shooting raw and won’t actually lose that all that data when opening the image to post-process. However, if a large portion of the image is flashing your camera is alerting you that much of the data may not be recoverable.

If the subject is a bride and her white gown is flashing on the camera’s LCD, you’re in trouble and need to dial back your exposure or face a very angry bride when she sees her expensive gown is reduced to a wash of pure white.

Every camera should come with an instruction manual. The Instruction Manual is one of the most important accessories you have with your camera. And if the camera was purchased second hand it is very easy to find the instruction manual on line. The instruction manual will help you understand and control the three important LCD features I have dicussed.


Light the Portrait workshop part two.                                              


The second of my two day off-camera lighting workshop is now over and I am pretty sure I have converted a few more photographers to using off-camera flash indoors and out.

The session we just finished was all outside. I would have been happier with a warm, sunny day that had deep shadows and harsh light, but what we got was a cold, slight overcast day instead. Oh well, at the end of the last session I told everyone (yes, our model too) to come prepared for a cold wet day.  As it was, the rain came at night with a wind that dried things out by morning, so all we had to contend with was a cool October, and fortunately, windless day.

Whether one is shooting under a bright sun or overcast conditions, the goal should be to balance both the ambient and the light from the flash. The subject shouldn’t look like a deer-in-the-headlights and the background shouldn’t be unusually under or over exposed.

I began by discussing TTL flash and how to set up and use high-speed sync. Then progressed to demonstrating manual flash lighting. I will say that TTL is wonderful for fast moving events and high-speed sync allows the photographer amazing control over ambient light.

Our first location was in the middle of a field where I had set up a backdrop and two flashes. The 15X15 foot backdrop was a well-used old painter’s tarp that I had found when sorting through the garbage at a house vacated by some tenants who snuck out during the night to avoid paying rent. A drag for the landlord, but an excellent find for me.

Painted backdrops are expensive, especially if they are large and seamless. However, for budget conscious photographers I suggest purchasing a painter’s cloth from the local hardware store and dying it grey. All those that want to be creative need to do is work on the dyed cloth with some spray paint or a large sponge dipped in paint. Instead of spending the extra cash on a seamless cloth, one just employs the cloning tool on the seams in post-processing.

After using different light modifiers at the backdrop location we moved to the edge of the meadow with it’s colourful background of fall leaves. Then we all carefully climbed down into the deep shadowed creek for some photos. After that our model, Sarah wanted to pose against a discarded Cadillac resting in the field. That Caddy was caked up to its bumper in mud from a spring flood that washed out the bridge and almost damaged the studio. From there we posed our model against an old rail fence and finished with a setup using flash and reflectors in a large open barn.

I know that between the very active day and all the handouts I gave those in attendance everyone was dealing with a bit of information overload. Hopefully they will review their notes and remember how we set up the pictures they have on their memory cards. After a few days and a bit of practice everything will come into focus. Pun intended.

Light the Portrait workshop        


This past weekend I lead the first day of a workshop titled “Light the Portrait”. My goal during the two sessions was to help photographers understand how to use light, indoors or out, when they photograph people.

Fear-of-Flash has always been a topic of discussion for photographers photographing weddings, and portraits both indoors and out.

American photographer and author of the Strobist.com blog David Hobby said,  “…You hear a photographer say, “I’m a strictly available light photographer, I’m a purist.”  He continues, ” What I hear is, I’m scared of using light so I’m going to do this instead. Well, for me lighting was a way to start to create interesting pictures in a way that I could do it.”

It’s with those words that I began the workshop that would discuss using both studio lights and speed lights. Adding that personally, I always use a flash when I make a portrait of someone inside or outside. I don’t care if the ambient light is bright or dim.

My goal is to not only help photographers gain an understanding of off-camera lighting, but to also convince them that using flash will separate their photography from those that rely on natural or as I prefer calling it, “ambient light”.

The first session was about the big studio lights and accompanying light modifiers like, umbrellas, softboxes and reflectors, to name a few we employed during the day.

Those of us in Kamloops British Columbia are fortunate to have a local portrait studio that is not only large enough for a class, but also is packed with all sorts of lighting equipment, backdrops and change rooms for models. The portrait studio, Versatile Studio, also comes complete with a kitchen and dining area. And there are all sorts of props for posing.  All I needed to do was write up my lesson plan, print some handouts, book the studio, hire a model and show up in time to start leading participants into the exciting world of off-camera lighting.

I enjoy leading; I like that word better than “teaching”. I know to teach “is to show or explain to people how to do something”, but most of those that attend know a lot about photography and have already been shooting portraits for some time. All I need to do is build a bridge for them between what they already know and what I am presenting.  And as I stand with them in the studio/classroom I get watch that quick tightening of shoulders, widening of eyes and smiles when they suddenly get it. When that happens I can’t help but smile too.

Well, the first day is over and, as usual, they tired me out. However, I am already looking forward to next week with those enthusiastic photographers (and our energetic model). I wonder if I should begin next week’s session with the words of legendary filmmaker from the 1920s, D.W. Griffith. “Lights camera action”.