Rainy Day Photography

Last drop

Wet fir tree

Spring bud

Oregon grape

Rain drops

Reflection

Too many springs

Monday was another day of rain. It is spring here in the hills of Pritchard, earlier than usual, but it is spring and rainy days go with spring.

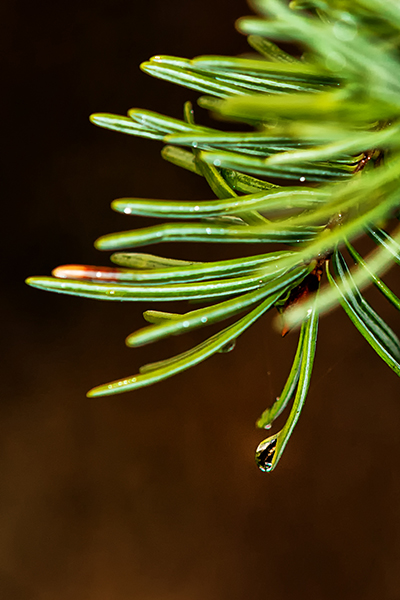
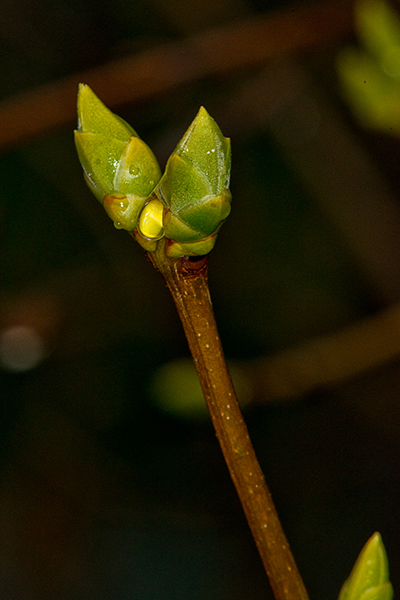
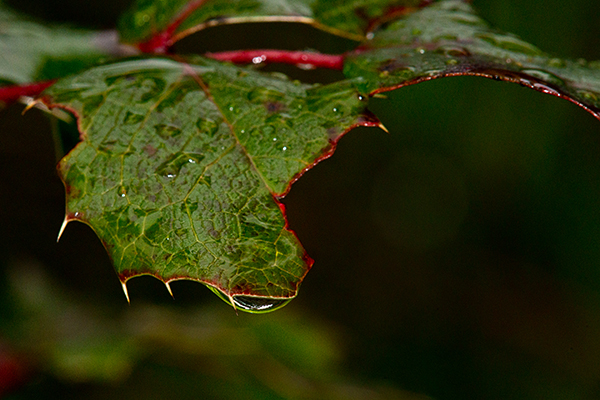
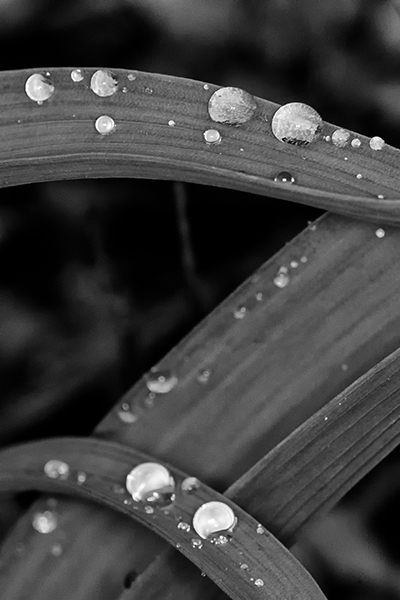
Rain doesn’t bother me much and had I thought about getting my camera and going for a drive up into the hills to see what I could find. However, as I walked through my wife’s garden on my way to the car I noticed all the drops of water hanging from branches and those leaves that made it through winter. The wet and foggy hills would have been interesting, but all those droplets were just waiting to be photographed.

How does one prepare to do photography in the rain? Put on a hat with a brim if, like me, you wear glasses. I also like rubber boots. Bring an old tea towel in your pocket to wipe the rain off your camera, and you are ready. Oh, and remember to keep the camera lens pointed down.

When the garden is dry I would usually put a couple of flashes on light stands, and add umbrellas so I can control the direction and quality of light. But when it is raining I prefer using my ring flash.

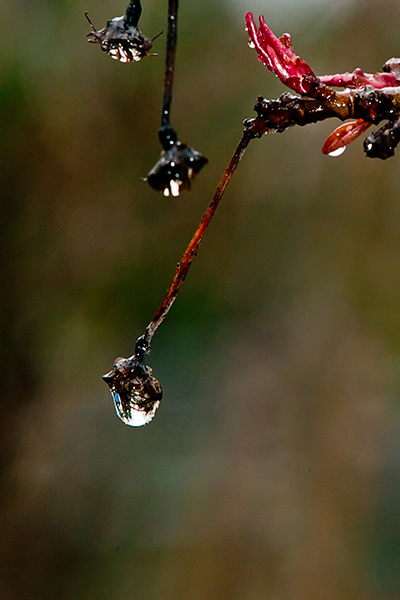
A ring flash fits tightly around the front of my 200mm macro lens and is perfect for building reflections on the droplets of water that were clinging to branches and sparse foliage that I wandered around photographing.

I expect many photographers prefer waiting out the rain and the unappetizing low, flat light on rainy days. I can understand that. Rain is such a hassle, and getting wet is uncomfortable. Nevertheless, that flat light, slight breeze, and wet conditions forced me to approach my subjects differently and I like that challenge.

In the low light of a rainy day we don’t think about light in the same way as we do on a sunny day. Everything is usually about colour, and how to deal with the contrast, especially on a bright spring day.

When the light is low one needs to see tonality and shape, and raindrops are a challenging element to add. In this instance there was also a slight, intermittent breeze.

I chose a setting that without a flash everything would be underexposed. That means I would only see my subjects when they were properly exposed and a flash is the best way to do that. Using my camera’s manual mode I selected 1/250th of a second and I kept my aperture at f/11 so I would have as much depth of field as possible when and if a branch shook back and forth in the breeze. I also switched my flash to a manual mode. The flash power would always be the same putting out the same amount of light. I then could control exactly how much light I wanted for each location.

I could have increased my ISO and shutterspeed if I had decided to only use natural light, but then everything would have been flat and it would have been hard to get a sparkle in the raindrops.

I know it can be disappointing to see those gray clouds on your day off when you had made plans to be out shooting. However, keep a positive attitude, remember you don’t have to go far, and with a bit of creative thinking and preparation you’ll be out having fun making photos, even in wet weather.

I always look forward to everyone’s comments. Thanks, John

Studio Portraiture Workshop

Class Portrait 1  Class 2

This past Sunday I lead the first day of a two-day workshop discussing posing and lighting. I hadn’t planned on undertaking any workshops this early in the year, but I had been getting requests from several excited photographers who are out there getting ready for spring and summer portrait sessions.

I finally made the decision to proceed when my friend Dave Monsees, owner of the Versatile Photography Studio near Kamloops, mentioned that photographers renting his studio told him they needed help in lighting couples. They lamented that most tutorials available were only about photographing one person.

I am sure if they browsed the internet they would have found what they were looking for, but working with live models is a lot more fun than reading articles and looking at pictures, so I hired two up-and-coming local models that fit that request perfectly.

In previous posts I have stated how I enjoy the enlivened interaction that happens when students of photography participate in active learning. So when I started getting requests that I offer  another session I crossed my fingers and hoped for an early spring, booked that large local studio, and hired two models.

During a workshop my job is to present information on the subject, and keep things going. I don’t like to be a demonstrator on stage and I rarely pick up a camera during the workshops I lead, unless it is to take a snapshot or two of photographers in action. And besides, when I finally let the workshop participants apply what we had discussed, there wasn’t room for me anyway.

The workshop dealt with modifying and placing light. We employed one, then two, and then three lights; and modified the light first with umbrellas, then changed to a softbox and reflector to create shadow, and, of course, that classic and compelling “Rembrandt lighting” effect.

This was an advanced workshop and I limited participation to seven photographers. As with all my workshops, my main goal is to help participants gain an understanding of how to use light. I want them to consider the “quality” of light instead of the “quantity” of light. I lecture to them that they should use light to “flatter” their subjects as opposed to only “illuminating” them.

I think that studying the mechanics of lighting includes two additional aspects, which are (1) experience, and (2) the willingness to step beyond lazily pointing a camera in a light filled room or out in the sunshine. Posing a model, or in our case, two models, seems to me to be more about engaging with the subject and being comfortable with telling someone how you want them to look. I once heard a photographer say that he never posed people because he thought is was rude to tell adults what to do. I can’t comment on that fellow’s work, maybe he was really lucky, but I expect there were lots of missed shots. I suppose he would disagree, or just plain ignore the words of award winning Dallas, Texas photographer, Caroline Mueller when she says, “What I look for in pictures (that) I take: eyes, hands, head tilt, body language, background, and use of space.”

I believe those photographers that are successful at portrait photography don’t hide behind their camera, but they start with a plan and are good at engaging, explaining, and demonstrating what their vision for the session is.

Now I am really looking forward to next Sunday. The few images I have seen so far are great and I am certain spending another day (this time with speedlights out-of-doors in the failing afternoon light) helping and watching each photographer’s progress is going to be a lot of fun.

class 3  class 4


Thanks in advance for your comments, John

My website is at www.enmanscamera.com

Photographing a home’s interior


a. front room  B. front room  c. Kitchen  d. dinning suite  g. kitchen wine  h. dinning room

The past month has seen me spending hours and days painting a rental property that my wife and I own. The tenant had lived in it for the seven years since we purchased it and was already there for about four years when we purchased the duplex, so needless to say, when that nice, old lady finally decided it was time to leave the place showed plenty of wear.

I loaded my truck with tools and pretty much moved in to change a worn out house back into an inviting home. Finally, after what seemed to this lone-painter, to be a never-ending job has reached an end. I have painted the complete interior for the one side and all the exterior trim for both sides. Whew!

We have decided to sell and relinquish the job of landlord to other investors, and that means after I pick up all the ladders, paint cans, brushes, and vacuum the place; my fun days will begin. It’ll be time to get out my camera, tripod, and flashes, and produce images of that shining place that will make it easy for a realtor to find buyers for us.

I suppose pointing a camera inside a building to take a few pictures has never been easier than it is today, and I have seen some interior work where a photographer saw and worked with the existing light, without any additional flash units, and was able to produce excellent images. But I like using flash, and any chance I have to modify a room’s ambient light I am going to take. Yep, I just like using flash.

I remember the difficulty of trying to hide my lighting unit’s power cords before we had the benefit of Photoshop, and then after Photoshop was available the extra time it took to clone out those ugly flash cords. However, now everything is wireless, the cords are gone, and I no longer pack in large studio type lights. Gosh, other than the light stands, my whole lighting “kit” of four-hotshoe type flashes fits into a small seven by ten inch bag.

Later this week I’ll show up at the renovated rental unit with two flashes on light stands and start taking pictures. I don’t like to use lenses that are too wide angle. Everything gets distorted, so I will be using my full frame D800e and a 24-70mm lens. I prefer the zoom rather than a fixed focal length (prime) lens because it gives me a bit of in-camera perspective control. And although I use a tripod, I find much of the time I end up jamming my shoulder into a corner, or sitting on the floor, or standing on a stool to get the most interesting view of the small rooms. The neat thing about using a wireless sender/receiver on one’s camera and flash is that the flash can be positioned in another room to illuminate a hallway or give the effect of light coming through a window.

I’ll arrive in the late afternoon and stay till late morning. There’s lots of food and drink in the refrigerator and I’ll stick some CDs in my portable player and start having a great time, listening to music and doing my photography.

Photographing any interior space presents a variety of photographic challenges and coming up with interesting ways to light the indoor space to show texture and form, and solving the challenges that windows and exterior lighting introduce is time consuming and enjoyable.

Adding light to a portrait is probably one of the best ways to improve the mood, emotion, contrast, and impact for viewers. And the same applies for interiors and architecture.

I welcome comments. Thanks, John

My website is at http://www.enmanscamera.com

An Enjoyable Group Photography Process

Demetra 1a  Monica 7a

When I write my blog each week,  my goal is to educate, to be entertaining, and to have a new topic each week. My topics are usually the result of something I have been involved in (like this week’s post), or my thoughts on discussions I have had with other photographers. Sometimes, my wife refers to my discussions as rants about whatever issue has hit my “hot” button the previous week. It could be about joining other photographers to do scenics or wildlife photography, however, this week I am going to discuss a great time I had on the previous weekend.

Last Sunday I got together with friends Demetra, Monica, Dave, and Nancy in a photographic modeling session that was different than what I had been used to.  Demetra and Monica worked in front of the camera as models, while Dave, Nancy, and I were behind the cameras.

Monica 10a Demetra 3a

I usually write about photographers, but this time I wanted to include the models who were just as much a part of a fun and interesting photography process as the photographers. I don’t know what it would be like to put on a play that included input from actors, directors, producers, etc., but on this day five friends collaborated in a photo studio to see what we all could come up with and I likened it to a theatrical experience.

Normally I come prepared with ideas that I have creatively worked through before I start directing my subject. I rarely show the subject the images on my camera’s LCD; and, usually they must be content with my approval of what we shot as we move to the next pose. However, we were game for a new experience, and the thought of working together as a group to produce photographs seemed like a good time.

Dave and I began by searching for some sample pictures with different poses and lighting that we thought would be fun to emulate and presented them to the group before starting our day at the studio. Then we all joined forces and laid the pictures out so every one, models and photographers alike, could see them, as we worked out camera angles, lighting and posing.

Monica and Demetra took turns posing as Dave and I adjusted studio lights. Nancy kept making test exposures that we would all look at, and then we would compare with the sample pictures to see if the effect was what we were seeking.  We weren’t trying to copy the original sample, inasmuch as we were using the poses and the lighting as guides. Then once the poses and lighting were set each photographer would choose a way to personally interpret the original in a way that seemed best.

Demetra and Monica are both new to this, but were willing to work, I expect, as hard as any professional, and being involved in the decision of how they would appear in a final image appealed to them.

Nancy is familiar with posing subjects and the lighting process, but her subjects are usually students, or beauty pageant portraits, so working with models and other photographers was unique and entertaining. Dave is the newcomer to photographing models, however, after years of scenic and personal work he had decided to try something new. He converted a vacant building on his rural property to a full functioning studio filled with all types of lighting, light manipulators, and several choices of backdrops. The studio includes a full functioning kitchen, which we made full use of during this session.

We had all previously participated in the “shoot-what-ya-can” whirlwind Stobist meets, so this group style of working was familiar. As stated earlier, photographers and models interpreted the pose in their own way and then chose respectively slightly different perspective camera angles and physical stances.  I am sure the photographers will finish their images slightly differently in PhotoShop.

I have not talked to, or seen, Dave or Nancy’s pictures yet, but in the next week they’ll drop by my shop with their final image files and I will make CDs for Monica and Demetra.  I like to hang out with other photographers, and enjoy watching them work, but I prefer being the prime photographer when I do portrait work; however, I must admit I enjoyed this group process and hope we can get together again sometime in the future.

I appreciate any comments. Thanks, John

My website is at www.enmanscamera.com

Another Strobist Meet-up for Photographers

Demetra Koutsopdiotis  Monica Nicklas   Monica Nicklas 2

My friend, Dave Monsees, decided to host another Strobist Meet-up at his photography studio, and I was definitely up for that. I like trudging around photographing snowy scenics, but, the thought of spending a photo-filled day in a warm, wood-heated studio was enticing, and when he extended the invite I didn’t hesitate to accept.

My request to the other photographers was to continually change the two lighting setups  that we were using. I had participated in past meets, and, they were fun and photographers got to make lots of pictures of models; however, even though the resulting pictures were great, the lighting remained basically static for every image. For this day I wanted to change the modeling lights and modifiers every hour.

That meant photographers and models had to rethink what they were trying to do, but after the first change everyone got into the swing and began to get really innovative. Photographers changed lenses, shooting angles, helped each other out by moving the lighting around, and our models went through several clothing changes and were as involved in the creative process as the photographers.

The studio had lots of lighting equipment set up with wireless camera connectors for each photographer. There were two different backdrop set-ups, and we had our choice of lights and modifiers like softboxes, umbrellas, snoots, barn doors, and reflectors.

When I wrote about the last studio meet-up I attended I said that photographers always need to explore and experiment, and get-togethers like this are perfect for practicing off-camera lighting in a studio (that most photographers don’t have access to) without the pressure of actual clients, and it is a fun way to refine one’s skills. Monsees commented that he liked being around fun people with a true passion for photography, and dedicated to off-camera flash.  He also said that he enjoyed himself so much that he intends to try to have photographer and model get-togethers in his studio every month if he can.

Although photographers have been using off-camera light nearly as long as they have been making portraits of people, that practice has really been limited to a few that owned studios. Recently all that has been changing what with quickly advancing camera technology, and the word “strobist” now refers to a photographer who uses off-camera flash to take pictures, instead of the usual pop-up flash, or hotshoe flash attached on top of the camera.

I am often asked, “Why use off-camera flash?” Instead of using just a camera, one must lug around a light stand and a flash. That means carrying extra weight. Sometimes a photographer would require an assistant since weather conditions might knock over the light when shooting outdoors.  My response to the question is, “Better pictures.” Light is the language of photography. Without light there are no photos. With off-camera light one adds light and control over the final image. Adding light might introduce drama in a picture and can increase detail or hide it. The extra work greatly affects the output.

I like quotes and here is one regarding light from George Eastman, American innovator and entrepreneur, who founded the Eastman Kodak Company and invented roll film. He summed it up for me when he said, “Light makes photography. Embrace light. Admire it. Love it. But above all, know light. Know it for all you are worth, and you will know the key to photography.”

I always appreciate your comments, Thanks

My website is at www.enmanscamera.com

Metering to Achieve the Right Exposure

I was leading a workshop about off-camera flash and had been discussing lighting. I paused and to make sure everyone was following and asked if there were any questions. One participant responded, “I don’t know what you mean by metering each light differently?  What is a meter?”

Caught off guard, I replied, “It’s how you get a proper exposure”.  He blankly looked at me, but fortunately, before I confused him more, another in the class said, “no, he means in his camera”.   I realized he had just asked a question (maybe one of the most important of the day) I should have anticipated early in my lecture.

Today’s high tech cameras are wonders at balancing all the light in a scene and many photographers unfortunately choose one of the programmed modes, point their cameras, release the shutter, and never look at anything on the camera but the LCD again.  Even using a flash, just the right amount of light almost always seems to be perfect. However, if we want to control and master light, whether it’s the sun, a reflector, a camera mounted flash, or off camera lights, we need to understand how that light is bouncing off the subjects we are about photograph.  Why would we bother when these newfangled cameras are marvelous?

That photographer in my lighting workshop had never used his camera on anything but the Aperture priority mode. That means he selected the aperture and the camera’s computer selected the shutterspeed.

In this workshop we were directing one flash to brighten the background, one to create a highlight on the subject’s cheek, and another high to the front as main illumination. Each of those lights had different intensity, and it’s the meter (consider it a tool) in the camera that we use to easily tell us what each individual exposure is so we can control the image.

Here is an example of critical metering I wrote about on 6 September; “The guest had a perfectly good camera, but criticized it, and said he wished he had a better one because the backlighted couple we were photographing were being recorded as silhouettes.”  That photographer had his camera set on a program mode and was of the belief the camera was capable of solving the high contrast lighting.

The camera’s computer couldn’t determine correct exposure with a strong changing backlight, and since he didn’t know how to use the camera’s meter all he could do was claim it was the camera’s fault.

On that day I began by metering to determining the overall exposure. I started with an ambient exposure, and by reading my camera’s meter, I decided to stop down enough to make the ambient backlight an underexposure, then added a flash slightly off camera which brought up the luminance of my subject so that, unlike that confused photographer that didn’t use or pay attention to his meter, I ended with a very usable photograph that didn’t need to be saved in postproduction.

I prefer using my camera on manual, but in both situations those photographers could also have used their camera’s Exposure Compensation (EC) feature. EC works great, and worth reading the instructions to learn, but for the application at my workshop, and at that fast moving outdoor wedding I prefer the “M” or manual mode. However, I must admit that although I like using exposure compensation, as it is fast and efficient, I get involved thinking about other things and forget to reset the EC. Staying on manual, and using the meter display at the bottom of my viewfinder helps me to remember.

Using the metering tool determines how the camera sets exposure, and today’s cameras make it easy for the photographer to choose a metering mode for the shooting conditions. Understanding the meter tool allows for control over the different exposure modes that determine how the camera will set the shutter speed and aperture.  I can only stress that readers who have DSLR cameras learn to use the meter.

Everyone’s comments are welcome.

My website is at www.enmanscamera.com

Photographing Portraits of Seniors

There was a time in photography when the word “seniors” meant people near or over 50 years in age.  Today photographers refer to senior portraits as high school graduation photos. But it is those in the aging demographic that don’t get much attention during discussions on photography that I want to write about this time.

When one does a search about portrait techniques or checks published books on portraiture I doubt there will be much, if anything at all, about photographing people whose faces are starting to, or have already, aged.  After all, our society is obsessed with youthful beauty and we don’t want to be reminded about aging. Despite that, baby-boomers make up a large segment of our population and they will still want portraits by photographers.

Attend a class, or buy a book, on how-to portrait techniques, and you’ll find it’s all about angles of light with discussions about off camera directional light to create drama and dimension to a subject’s face with highlights and shadow.

Shadow on the smooth face of some 18-year-old can be flattering and sexy, but when a sidelight creates deep shadows on a face that has a few more years of life it is anything but flattering, and certainly won’t be sexy on most.

Lighting manuals instruct us not to use a flash from the camera’s position, and are critical of straight-on flash. However, using a diffused flash straight-on reduces shadows and wrinkles, and a soft, direct light makes it easy to reduce any age lines easily during postproduction.

Retouching, or postproduction as it seems to be called now, has always been part of the process with those that do portrait photography, especially with seniors. I can remember hours with magnifying lenses, fine tipped brushes, mixing dyes and reprinting for final photographs. Now, I have computer programs to remove blemishes, creases, and bags under eyes. I brighten eyes, and sometimes whiten teeth, and always make sure there isn’t loose skin under the chin, or on someone’s neck.

Some of this I have done for years, only now I do it more, and it is a lot easier to retouch with computers and digital cameras. I know there are many photographers that say with misguided pride they do everything in the camera. In my opinion, that’s all right for sports and wildlife photography, but it would never do with a portrait client, they deserve more.

My advice for those photographing seniors is to take the time to choose a flattering perspective that hopefully shows some of their personality, and remember senior portraiture requires direct diffused light, retouching, and more relaxed poses than when they were young. Don’t choose low or awkward angles and tell your subject what you are doing. Remember these senior clients have been having their picture taken for a long time and in my experience are helpful in producing their own photograph.

My website is at www.enmanscamera.com

Camera Manual and the Basics of Photography.

I was photographing an outdoor event on a hot, bright day a short time ago when another photographer walked up to me complaining that most shots were not turning out as hoped. This happened again at a wedding I was photographing last weekend. The guest had a perfectly good camera, but criticized it, and said he wished he had a better one because the backlighted couple we were photographing were being recorded as silhouettes.

Ending up with faulty photographs from time to time isn’t unusual, although not as much nowadays as when film was used. However, I think most faults occur because photographers haven’t taken the time to learn how their cameras work, and have a poor basic understanding of photography and techniques.

With digital technology it’s easy to determine what is going wrong by checking the camera’s LCD and the histogram. I doubt that either of those complaining photographers I talked to used the LCD for anything but reviewing pictures. They probably hadn’t gone through the camera’s menu and set it for the conditions under which they would shoot. Both had selected the auto, or program mode, and to add light to the bright, backlit environment were only using the camera’s tiny pop-up flash. They would have been much more successful if they had a mounted a hotshoe flash on their cameras and selected the “M” mode. I expect they will be relying on their images being saved by technicians at the local photo lab or hoping for some friend with PhotoShop wizardry.

I continually meet photographers that complain about how various big photo labs are failing to make their prints the way they think they should be. They rely on their camera’s preset programs, and I expect are of the belief that if the camera they have been using doesn’t make good pictures then they should change and upgrade to the manufacturer’s latest offering to make it so.

When I arrive at a location to photograph I immediately start making tests. I keep my camera in the manual exposure mode so I can quickly change the ISO, shutter, or the aperture to suit my shooting.  I continue to do that throughout the entire session, checking the histogram frequently, and leaving nothing to chance by lazily relying on the camera’s pre-programmed modes.

I begin by contemplating about the subject and its environment.  What is the background and how will that affect the subject? What is in the foreground that will interfere with that subject?   If one considers depth of field a decision must be made about how much will be “in focus”.  Sometimes in a portrait that includes a landscape, I’ll want everything from the foreground to the far-off distance to be crystal clear, and at other times I’ll want the background to be “out of focus”; whichever I select requires its own aperture setting.

What is the lighting like and will its direction be flattering on the subject? The sun and its direction are always very important when photographing people. I prefer to have it coming from behind my subject and like to use a flash for “fill” lighting to remove shadows and silhouettes.

I can do all this because I have taken the time to learn the basics of photography, and I have also taken the time to learn how my camera works. I don’t think either of those photographers that complained to me had done that. I expect they just got themselves ready for the event, grabbed their camera on the way out the door without reviewing their manual beforehand, recalled that the digital camera has a “P”, or auto mode, and believed the camera would make everything they photographed perfect.

Photographers using film used to say that it was all in the negative; that a properly exposed and developed negative gave the best possibilities of a fine quality print.  I still agree with that principle, only now it isn’t an image about to be developed on the negative, but an image about to be processed on the sensor.

I always appreciate comments, Thanks in advance.

Wireless Hotshoe Flash for Photography

I have always been excited about technology changes in photography; for example, I remember how spectacular it was to have a workable, in-camera light meter when I got my Pentax Spotmatic II. Shortly thereafter I added a Vivitar 283 flash that allowed me to do preflash tests with my flash off camera and make adjustments to the lighting.  Within a couple years came the wonderful Nikon F3 with TTL (through the lens) on-camera, flash metering, and for me the world of photography changed even more. Since then a lot has happened to flash photography and I will confirm that the current trend of using off camera, wireless hotshoe camera flashes is exciting.

A greater number of serious photographers are learning to employ flash, from what was originally a flat, one-light source for an image, and they are starting to use the word “modelling” to show how the light affects their subject, and easily can wirelessly locate several small flashes at different positions around their subject.

I recently talked to a friend learned about portrait lighting by attending a Scott Kelby lighting workshop, however, there are other very well known photographer-writers worth researching, people such as David Hobby (www.strobist.com) and Joe McNally (www.joemcnally.com) that have created a world wide following with their books, blogs, and videos on using wireless hotshoe flashes instead of the heavy, cumbersome, power cord lighting that photographers have previously used for many years (like me).

So why go to wireless flash? Or, why a wireless hotshoe flash that we originally purchased to set on our camera?   For me it comes down to ease of use and portability as I regularly do staff portraits for businesses.  In the past I’ve arrived on site with two large bags of lighting equipment containing big strobe heads, stands, umbrellas and lots of power cords. Now, I carry lightweight stands and umbrellas in a small bag slung over my shoulder, and several small hotshoe flash units in a handbag. Both the equipment and the setup time is considerably less.

In his book “The Hot Shoe Diaries,” McNally writes, “it makes my job easier. It enables me to move fast, and have a flash system that thinks along with me and solves certain problems historically attached to flash photography (big heavy units, cables and wires everywhere…”

As I have written before, I like using flash indoors or out. There are those times when I am following a moving subject and have my flash mounted above my camera on a flash bracket. I rarely rely on a single ambient light source and prefer using a flash to add light to improve the quality of my photographs.

For occasions when my subject is stationary I use the wireless flash off camera; and for portraits I like three lights, one above and behind me, one off to the side and one behind the subject. My set up isn’t always the same, it depends on the available space, but for example, the flash above and behind might be either in a softbox or a reflector umbrella, the sidelight could be a small shoot-through umbrella or bounced off a reflector panel, and backlight directed at the background with only a small dome diffuser covering it.  That’s one quick, effortless setup that I can easily carry in two small bags – one bag for light stands and one for the flash units while my camera is comfortably hung around my neck as usual. All this, as I just wrote, is easy to setup without having to connect the flash to the camera with wires and the flash to the wall with power cords.

Because of the interest and questions fellow local photographer Rick Tolhurst (www.shotsbyrick.com) and I have been getting questions about how to setup and use small, off-camera, wireless flashes for portraits, we have decided to put on a simple lighting workshop. The interactive one-day session will discuss one, two, and three-light setups for portrait and glamour photography. For those interested the workshop will be held on Sunday, 30 October, 10am-4pm, cost is $60. Pre-registration is required and any photographers interested should call or email me for specifics.

Using small wireless hotshoe flash has made photographing people a lot easier and serious photographers that have not tried it yet are going to feel the same way as those that dragged their feet in moving from film to digital.

www.enmanscamera.com