A process of observation.       

Salmon Arm

Street rest art

Town sculpture

Shuswap Lake

Pier view

Dragon boat

Lakeside residents

Smugglers love

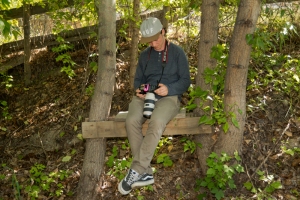
My wife, Linda, has been wanting to really put her new 135mm lens to the test.   Even though the 135mm focal length is normally used for portraitures, she wanted to give it a roadside work out and suggested we take a short drive. We decided a morning drive along the meandering South Thompson River ending in Salmon Arm, just short of an hour away, for coffee and some photographs.

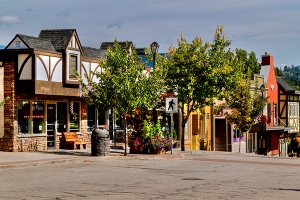
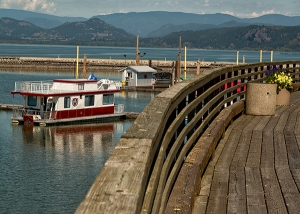
The British Columbia city of Salmon Arm with it’s unique, picturesque downtown and what residents claim to be the longest, curved wooden wharf in North America is located on the Shuswap Lake, midway between Calgary and Vancouver on the Trans-Canada Highway. The lakeside city also became infamous in August of 1982 when then Canadian Premier Pierre Trudeau raised his middle finger at protesters from his seat inside a private rail car.

When I’m not making portraits I prefer zoom lenses. Using a multi-focal length lens when photographing buildings and other features that one finds along a busy city street makes photography easy to do because it’s simple to crop out people, cars and other unwanted elements. Nevertheless, Linda wanted to use her 135mm and I decided to follow suit and brought my 105mm.

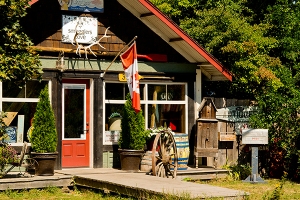
We wandered the downtown photographing anything that caught our attention. It was Sunday and most shops were closed and the streets, other than a couple of people walking to the grocery store or, like us, driving to Tim Horton’s for coffee, were almost empty.

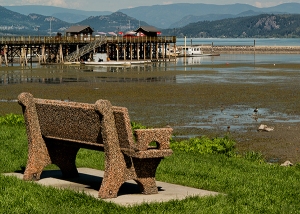
It was a perfect day to walk around, and there was plenty of room to step backwards on to the street or move around in front of shops with our prime lenses. We spent a leisurely hour or so just taking pictures in town before driving to the lakeside park to sit in the shade, take in the view, and talk about our pictures.

My preference would have been to use my 24-86mm and although Linda really liked the 135mm, she wished I had brought along her 70-300mm. However, we both thought using the long prime lenses was a good exercise. Placing a subject and composing the final image took longer than just zooming the lens length forwards or back. Our fixed focal length lenses required that we had to physically move about to get the image we desired. There was also a change in perspective because of the mid-range of our lenses.

I have been trying to think of some words that would sum up our experience. Maybe American documentary photographer and author, Elliott Erwitt, got the closest to what I was experiencing when he wrote, “To me, photography is an art of observation. It’s about finding something interesting in an ordinary place… I’ve found it has little to do with the things you see and everything to do with the way you see them.” Perhaps our exercise wasn’t so much, “an art of observation” as it was an “act of observation”.

Communicating Our Personal Photographic Vision  


I enjoy pretty much everything when it comes to photography. I am happiest when I get to talk about it, read about it, and look at other photographer’s work, and of course, any occasion where I get to point my camera at a subject.

Famous and influential photographer Edward Weston once wrote, “Photography suits the temper of this age – of active bodies and minds. It is a perfect medium for one whose mind is teeming with ideas, imagery, for a prolific worker who would be slowed down by painting or sculpting, for one who sees quickly and acts decisively, accurately.”

Weston most likely said sometime in the 1950s, but it aptly describes many of those taking pictures with all kinds of cameras in the 21st century. Yes, it is the, “perfect medium for one whose mind is teeming with ideas…”

As I looked at several images (several were from iPhones) that were proudly posted online I thought how those words fit many modern photographers. However, there I was looking at many pictures that, although quite creative and colourful, lacked the basic compositional guidelines I was taught              (I suspect Weston learned also) and are still being taught in almost any class on photography.

Photographic composition is the selection and arrangement of the subject within the picture area. However, what I saw seemed in many cases to be hastily captured images with little regard to the importance of any centre of interest that might help viewers identify what the photographer is trying to communicate.

Maybe it is the conditioning we get by clumsily pointing our cell phones at a subject, or the thoughtless reliance on a camera’s auto focusing device to select whatever is in the middle of the viewfinder for proper focus.

There is a compositional guideline called, “the rule of thirds”. This so-called rule is a simple principal that divides an image into thirds, horizontally and vertically, and tells us to position the most important elements in our scene along these lines, or at the points where they intersect, and by doing so, adding balance and interest to one’s picture.

I subscribe to four components when I create a picture:

  1. The Centre of Interest: A strong center of interest helps the viewer identify the point of the picture, or what the photographer is trying to communicate.
  2. Angles: Begin by looking at the subject, move around – up and down, vertical or horizontal. Decide what should or should not be included.
  3. Distance: Don’t back away. Eliminate everything that does not add to the picture.  Close-ups convey intimacy, long shots build space and depth.
  4. Background: The background can make or break that photograph. Use the background to build interest in the center of interest.

There will be those photographers that in the interest of their own creative freedom will disregard anything that they believe will restrict their photographic independence and innovation or what they think might apply limits to their imagination.

I wouldn’t agree with that. I don’t think this is an argument of vision.

If our goal as photographers is to create an image that withstands the test of time and communicating a personal vision, then one must learn the        basics of composition in the same way as one would learn the basics of exposure, or how to make the camera actually work whether it’s a DSLR, or a feature of a cell phone.

My First Cameras   


Kodak 1

One of my first little 127 camera’s pictures secured in albums.

Instamatic 1

Even after swimming my little Kodak Brownie camera worked for a picture of a friend photographing a wet model in my car.

Taped 'em down 1

The sticky corners failed so I just taped the pictures from my Kodak Instamatic to the pages.     Note my early “selfie” wearing a gas mask.

Tape didn't work 1

I tried glue, but it wasn’t that successful.

Petri V6

Masking tap sort of worked, but my early attempts in the darkrooom processing film from my Petri V6 weren’t always very successful.

Spotmatic ii

A favourable outcome using the Spotmatic and processing the film at the “Free Venice” festival.  The pictures still fell out of the self-adhesive album.


This week a photographer stopped by to talk about the article I wrote last week about the popularity of 1970s cameras. We discussed cameras we had used over the years and eventually got around to the question, “What was your first camera?”

The very first cameras that I likely used to make snapshots of family and friends were probably 127 Kodak cameras made of dark brown Bakelite plastic and I remember little (I think 3×6) prints with wavy edges coming back from the department store lab.

My father had the more serious 120 format folding bellows camera and usually posed us with the sun behind his back with the resulting squinting and pained smiles on our young faces.

I snapped pictures for years with cameras that had little or no control over exposure or focal length. I glued the pictures into photograph albums with little sticky corners. Of course, the self stick holders didn’t last long, and the pictures fell out, so I glued the pictures directly to the pages, but the glue’s chemical reaction discoloured the images and eventually those that weren’t lost by falling off and out of the album just faded away.

My first serious camera was purchased in 1967 while I was in the US Army. I purchased it from the Army PX (post exchange) while stationed overseas. The location was visually spectacular and different from anything I had ever experienced and I wanted to have photographs for memories.

I looked at the limited selection in my price range and purchased a Petri V6 with two lenses, a 58mm and a 135mm.

When I got the Petri, I was so excited because it had an attachable light meter, used slide film and I purchased the 135mm lens because I was advised it was the perfect lens to take portraits of people.

My next camera was a loaner from a friend’s father so I could take a photography class in 1969 at Santa Monica College; the previous Petri had seen better days.  That neat Pentax H3V camera had a clip-on meter and came with only a 55mm lens, but my instructor said it would be perfect for his class.

Shortly there after, in 1971, a fellow student who worked for United Airlines purchased a camera for me during a trip he took to Japan. The photo magazines were talking about a new camera with “multi-coated” lenses, and an amazing through-the-lens spot meter. I then became the proud owner of a SLR Pentax Spotmatic II.

Although I used colour film for events like parties and Christmas I absolutely believed serious photographers only used black and white film. I added another lens, a Vivitar 35mm. Wow, a wide-angle lens! Then I got a 200mm. Gosh, I had everything I needed.

Those first three SLR cameras wetted my interest in photography. They were complex enough that I read magazines, books, and took classes to learn how to operate them effectively. In addition, I searched for opportunities to meet other photographers and talk about cameras, lenses, enlargers, photographic paper, and all sorts of picture making.

Before the Petri and two Pentax cameras, photography was only about documenting events around me, not creating a personal vision of the things that interested me. If I hadn’t had the opportunity to start making images with those three SLRs I expect my photography would never have advanced from anything more than just snap shots.

I am sure readers that used cameras before the digital onslaught remember their first camera(s) that helped their enthusiasm for photography grow and might even have great memories on prints or slides packed away in boxes.

I made fun of those old film camera wondering about the nostalgia some feel for them. I remarked that I personally wouldn’t want to return to film. But gosh, it was nice it was to hold those old metal cameras that were constructed so tight with shutters that clunked solidly instead of the high-pitched clatter most make today.


What’s Up With The Return Of Those Old 1970s Film Cameras?   

1970 Film cameras


When I wrote about this year’s Vancouver Swap in April I mentioned that I always go to the event wondering what the latest trends will be, or what is popular with the photographers that attend.

I didn’t discuss it in that article, but, this year those photo enthusiasts that turned up surprised me when they all but ignored the modern digital equipment sellers were displaying, and, instead seemed mostly interested in older 1970s manual cameras and lenses.

I commented about that this week to a photographer who came in to pick up an old Canon FTB camera she had left for light seal replacement. She had dropped it off a couple weeks ago saying it had been given to her. She also brought in an old cloth camera bag and pulled out three old Canon lenses she got with the camera and asking me my opinion.

Other than the 50mm that was mounted on the camera, there was a 28mm, a 135mm and a 200mm. All were Canon brand and, although very dirty from the dissolving foam inside the bag, very great lenses.

I remembered the time period, before zoom lenses, or automatic exposure, when cameras that actually had light meters like that old FTb were the pinnacle of technology. The original owner had chosen the most popular lenses of the day. And now a new owner was planning on putting the 45-year-old film camera and lenses to use again.

It’s been about 16 years since digital single-lens-reflex cameras became affordable and capable of making images equal to, and now surpassing, film cameras.

The photographer I talked to in my shop as well as those I met at the swap meet all owned modern DSLRs. I suppose there is a sense of nostalgia in holding and shooting those shiny, old metal cameras.

The local high schools whereabouts I live have photography programs where students use film cameras and learn to process and print photographs. I don’t know if the same happens in Vancouver where the swap meet was held. Nevertheless, those old film cameras are certainly popular.

There are many of us old enough to have used and even to have made a living with cameras during the 1970s who don’t for a moment regret the change in technology from film to digital. I sometimes wonder how we survived with that inefficient, cumbersome technology from a time period my friend Alex refers to as, “the days of click and pray”.

Digital cameras are a great way to learn photography, with instant reinforcement and no cost unless one wants to make prints; whereas, with film there is the initial cost of film, the cost to process, and the cost to print; however, one can easily and economically scan and download the image file to a computer. And unlike the cost of a DSLR those old cameras have become very inexpensive. That photographer’s whole kit, camera and three lenses here in BC should cost well under a hundred dollars.

I don’t know if it’s the nostalgia, or the low price, that has brought a return of popularity to those old film cameras. Even though I personally wouldn’t want to return to film I do remember how nice it was to hold those old cameras (there is a 1948 Olympus sitting on a shelf in my store that I keep eyeing) that were made by engineers instead of technicians and I will grudgingly admit there is something wonderfully tactile in the quality of an image captured on film.


Commenting on Depth of Field     

D of F 3 women                                                                                                                                        

Depth of field is a seemingly elusive topic that I discuss in my classes and repeatedly explain to photographers who come to my shop complaining about problems with their lenses.  The problem is really just a lack of understanding of how the aperture controls the field of focus around the subject.

Long time readers might remember my many articles over the years discussing “depth-of-field”. Hopefully, I won’t bore those that understand how to use depth of field, but it is always a good thing to review this concept.  I will reuse an example I used a couple years ago about a photographer that showed me an image made during a wedding. The photographer showed it to me commenting that he had chosen that lens because it had a wide aperture which allowed for photographing in low light, but was bothered that the expensive lens wasn’t very sharp.

The image showed a view of the central aisle of the church with pews left and right, leading up to the bride in the distant centre, approximately 20 feet from where the photographer was located.  The overall exposure shot at an aperture of f/2.8 was fairly good, however, what bothered him was the guests around the bride standing in the aisle weren’t very sharp

The definition of depth-of-field is, “that area around the main subject, in front of, and behind it, that is in acceptably sharp focus”.  

Wide aperture lenses are very popular and using a lens at a wide aperture like f/2.8 when making a portrait isolates the main subject and produces a soft, out-of-focus background by reducing the depth of field.

The photographer was relying on the wide aperture to increase the exposure in limited lighting conditions.  That additional light allowed for a faster shutterspeed for handholding, but along with the benefit of additional light reaching the camera’s sensor the photographer forgot, or didn’t realize, that the resulting effect would also be a reduced depth of field.   

Using a wide aperture reduced the field of focus in front of the subject of a couple feet and the same behind the subject. That would be fine in a close-cropped portrait, but in that photograph of the church aisle, the guests in the foreground and guests in the background, appeared to be out-of-focus.

                        The further your subject is away the more the Depth of Field.  

                        The closer your subject the less the Depth of field.

                        The smaller the aperture the more the Depth of Field.

                        The larger the aperture the less the Depth of Field.

                        The Smaller your aperture the slower your shutter will need to be.

I prefer using a small aperture for scenic photography and, as in this instance, for interiors.  The answer to that example, and the examples I saw posted online, would be how to solve the low light problem not with a wide aperture, but by increasing the ISO so a smaller aperture could be used.

Depth of field is that area in front of and behind your subject that is acceptably sharp.  Practically, the depth of the field of focus will be 1/3rd in front and 2/3rds behind the subject.  Photographers who understand how to use depth of field will become progressively more successful in their photography.  


Home Studio Lighting for Photographers      

Flash Kit 3

I have written about using off-camera flash several times. Nevertheless, with the conversations I had with two separate, aspiring portrait photographers this past week asking my recommendations for setting up a home portrait studio I have decided to revisit that conversation.

In each instance they were troubled by the kinds of lighting equipment other photographers were advising them to purchase.  Both were upset at how much it was going to cost to get large and expensive studio lights other people were suggesting, and complained that they would have to wait until they had the money before a home studio lighting situation could be set up.

With serious searching they might be able to find used studio lights listed on craigslist, or similar online sales, but that will include additional shipping costs. Further, they won’t have experience with the many brands of equipment available, and are taking a chance that the units will arrive in working condition. And, to confuse them even more they will be offered lots of those cheap, and inadequate, Constant Light kits that were purchased by other unsuspecting beginners.

I knew they were both new to portraiture and just want to learn about lighting. My opinion is they don’t really need to go to the bank just yet, and would be better off starting out with smaller, speedlight type flashes. With the money saved by not purchasing the big, studio type lights they can buy a couple of inexpensive light stands, umbrellas, and maybe even add a soft-box, and a backdrop.

Photographers intent on setting up small home studios for portraits and small groups don’t need to go to the expense of the brawny, studio type lights. They can easily, and without much initial cost, set up a studio with what I personally use, and call my “portrait kit”.

I use older hotshoe flashes for my portrait kit, each with it’s own wireless receiver and stand. I can choose a shoot-through umbrella, a reflector umbrella, or a softbox, and much of the time I include a reflector. It is an inexpensive and easily stored or transported “portrait kit” that I would recommend for home studio photographers.

Wireless sender/receivers come in all sorts of inexpensive incarnations, and it is the same with lightstands and flash-to-umbrella mounts. All of this is much less expensive, and a lot easier to store and/or move around than the big studio-type flash units.

I have been using multiple flashes off-camera since the 1980s, and I always choose inexpensive, used units that I can cheaply replace if they get knocked over, or if I wear them out.

Hotshoe type, off-camera speedlights are perfect for the educational process of learning to use flash effectively, and if they are no longer a good fit for one’s creative growth, the choices as to the next step in lighting equipment will be educated decisions instead of emotional.


Photographing the Chase Falls    

Chase Falls 1

Chase Falls 2

Chase Falls 3

It is just over a year since I talked about my spring visit to a waterfall about 20 minutes from my home. Photographing the Chase Falls is, as the name infers, the falls just across the Trans Canada highway from the center of the small lakeside town of Chase, British Columbia.

Spring with its warm, snow-melting temperatures sure rolled in very early this year. Gosh, who would have thought we’d experience 30+ Celsius at the beginning of June. With that warm weather I was positive I wouldn’t see high, murky, water rushing over the falls.

I arrived around 11am and took the short walk along the sandy path to the falls. And sure enough, although there was plenty of water coming over Chase falls, the creek level was low enough that I was easily able to scramble among the large rocks along the bank and found many comfortable locations to set up my tripod. Ansel Adams said, “A good photograph is knowing where to stand.”

I guess that’s right when it comes to photographing a waterfall, I leaned against a big bolder and pulled out a couple of neutral density (ND) filters so I could reduce my shutter speed by a few seconds, and slow the water down in my shot. Then began moving my tripod from place to place, in hopes of finding that “good photograph.”

Photographing waterfalls and getting that smooth water that is so popular is really easy to do, and not complicated at all. All one needs is a camera, a sturdy tripod and a neutral density filter.

I put my camera on the tripod, focus, place a ND filter in front of the lens, and release the shutter. I rarely bother with a cable release. I usually just select my camera’s self-timer. I use 4-inch by 4-inch square ND filters that are well worn and a bit marked up.

When I purchased the filters they came with a filter holder to attach to the lens front, but that’s just more stuff to carry and instead I hold them by the edge in front of my camera lens and move them up and down so anything on them won’t show up when I take the picture.

I had a nice time taking pictures and even sat for a while on one of the large, smooth boulders just enjoying the cool air and the sound of the water. I think I might go back next week to try out a fish-eye lens that came into my shop.


Searching For that First DSLR 

Film then Digital

Digital technology has been around long enough that I occasionally overlook that there still are people who have never used anything but film cameras. I recently talked to a photographer who is finally ready to discard his old film camera and wondered which DSLR he should select.

He even sent me an email saying that regarding a camera; he would “need the whole meal deal.” I admit that I am not sure what he actually meant by that. I said to him that today’s modern technology cameras offer choices that are very different from his old film camera. As readers know, he is about to take a huge, creative step as he moves to digital.

He told me he has enjoyed photographing local rodeos. So what should be my advice to an aspiring rodeo photographer? Manufacturers like Nikon, Canon, Pentax, Sony, Fuji, and many more, all make cameras that will probably work fine for sports like rodeos.

I could start by suggesting he to go online and search out sport photographer sites for recommendations. Photographing sports is very technology driven and manufacturers are aggressively marketing to those photographers. He should begin by choosing a camera that is durable, and capable of taking some abuse, sturdy enough to be bumped around, because I think that’s a pretty rough and tumble (and dusty) world he’s participating in.

Both Canon and Nikon make professional cameras specifically designed for sports and the accompanying high ISO needed for low light, interior locations, that will focus almost any lens extremely fast, and are easily capable of high quality, excellent enlargements.

For fun I read up on professional rodeo photographer, Rick Madsen, who wrote, “Remember the camera is just a tool. When a hammer is used, it is the operator who makes it strike the nail. The same concept applies to a camera. It is just a tool and it’s what the photographer does with that tool that makes the difference between a good and a mediocre image. You must take the time to learn the camera’s operation and then utilize that acquired knowledge through practice to become proficient. You have to pay your dues.”

I personally would save my money on the camera and spend it on the lens, as my real concern would be to get a quality lens. A saying I have heard over and over in the many years I have been in this medium is that, “it’s all about the glass,” referring to the lens. And from my readings, most rodeo photographers recommend 70-200mm lenses, and I also think a 70-300mmm would fit the job also.

I hope he can find a good, well priced, used camera and a couple of quality lenses for it. He will be faced with so many choices and will receive many, many well meaning recommendations from other photographers that he’ll stay awake nights wondering what he’s got himself into. Nevertheless, I know he will be excited when he finally gets that first DSLR and embarks on the exciting journey as he learns how to use it.


Selecting a Tripod


Tripod & Hat        In his book, “Backcountry Journal, Reminiscences of a Wilderness Photographer”   Dave Bohn writes, “The trouble with photographers, and anyone else attempting anything creative, and in fact doing anything, is that they get addicted…(and)…I was addicted to the tripod as a necessity for the photography of large landscapes.”

I remembered (and liked) that quote from an article I wrote in October 2013 and thought I should post it again. I can’t say that I am addicted like Mr. Bohn, but I, too, really enjoy using a tripod when I shoot landscapes.

I reread my 2013 article on tripods and decided to repost some of my discussion after talking with a friend about tripods. He is planning on getting a new one as a gift for his wife, and we were discussing what might be the best for her.

When I select a tripod I want one that extends above my head so I can use it on hills. I don’t like bending over to peer through my camera’s viewfinder. I also prefer tripod legs that can be extended out horizontally when the ground is uneven.

I don’t want a crank to raise the center column as that is just added weight, and becomes one more thing to get caught on things. I like a column lock that turns to lock and unlock so I can easily adjust it up or down.

An important feature on the tripod I select is a strong and easily available quick release on the tripod head. The tripod head is another subject completely and my advice is get one that has a reasonable size ball surface and that is lightweight.

A tripod shouldn’t be so heavy that it’s a bother to carry. Nevertheless, it must be sturdy and capable of supporting my camera without shaking. I am always amazed when a photographer uses a cheap, little tripod to hold their camera and lens that are worth well over the thousand dollars plus mark.

I am pragmatic in my approach to photography. Sometimes the conditions are fine for just pointing and shooting, but if I really care about the picture I know I will have better success getting a quality enlargement if I return to the car and get my tripod. That’s just good sense.

I know there are many modern photographers are of the belief that the difference between a blurry and a sharp enlargement is megapixels or vibration reduction features. I can’t disagree with that altogether, but I do think a good, stable tripod is just as important and in some cases more.

Using a good tripod that allows one to stand up straight, take time to analyze the scene, problem solve, compose, and contemplate is an excellent experience. In addition, it keeps the camera from moving.

I suggest buying from people that have used, or at least can discuss, the tripods they sell.  The department stores will allow you to bring it back if you aren’t satisfied, but I am sure they are not interested in paying for the damages to your camera and lens that crashed to the ground while using their bargain tripod.

In recent years more and more quality tripods have become available and are worth owning and using. All one needs to do is spend some time researching and checking reviews.

Photographers spend lots of effort selecting that DSLR and lenses for each purpose they want to use it for. My advice is to take the same amount of effort with that purchase a really good tripod.


Off-Camera Flash in Daylight  

Whatcha Got?

Perfect lighting

A little to the left

Teamwork

The right light

Ya gotta get wet

Who cares about the water

Lets see

Flash the Cadillac


This past weekend I lead another workshop for photographers about using off-camera flash when photographing portraits outside in bright light. As with past lighting workshops my goal was to help participants understand how to use flash in different environments during daylight, and gain techniques that I hoped would help them transform the harsh daylight of outdoor portraits into beautiful light.

I was fortunate to have a great rural location where participants began in the morning photographing our model using a speedlight and a diffusion panel in a bright meadow, then moved to a large, well lit, open barn with two-flash lighting using a shoot-through umbrella and softbox until lunchtime.

After a healthy lunch provided by Versatile Studio we set up by a small tree covered stream, getting both our feet and our model’s feet wet. We finally finished the day photographing the model posing beside an old 1970s Cadillac in a nearby field.

I enjoy guiding serious photographers through their first attempts to use flash as a tool to create better photos, I want them to think of the flash being more than an uncontrollable device perched on top of the camera when it’s too dark in a room to take the photo.

I have been offering off-camera flash courses since the early 1980’s, and still believe they are an important segment of a portrait photographer’s education.

So much has changed in photography, and yet here I am 35 years later, still helping photographers learn how to use off-camera flash. Modern cameras are amazing with sensors that are so much better at capturing light than film was. But just as 30 years ago, serious photographers realize how much more flattering off-camera flash is on someone’s face than just harsh daylight.

Off-camera flash gives a photographer the ability to choose the best direction of light.

There are times when I am forced to photograph a person without using a flash. I think “forced” is the best word, because I will always use flash if I can, and as those that have taken my advice have learned, in most instances using flash for portrait photography indoors or outdoors is better than not using a flash.

Those attending last weekend’s workshop began to get comfortable using flash.

David Hobby, lighting guru and founder of the blog, http://strobist.blogspot.ca, wrote,

“Learning how to light is incremental, creative and fun. There is almost no math involved, nor any difficult technical know-how. In fact, good lighting is less like math and more like cooking. It’s like, you taste the soup and if it needs more salt you add some salt. You’ll see that when we learn to balance a flash with the existing, ambient light.”

“Controlling harsh natural light – one of the most important things to know as a shooter is how to use bad light well. Taking hard, nasty daylight and turning it into beautiful light is actually pretty easy.”