My First Cameras   


Kodak 1

One of my first little 127 camera’s pictures secured in albums.

Instamatic 1

Even after swimming my little Kodak Brownie camera worked for a picture of a friend photographing a wet model in my car.

Taped 'em down 1

The sticky corners failed so I just taped the pictures from my Kodak Instamatic to the pages.     Note my early “selfie” wearing a gas mask.

Tape didn't work 1

I tried glue, but it wasn’t that successful.

Petri V6

Masking tap sort of worked, but my early attempts in the darkrooom processing film from my Petri V6 weren’t always very successful.

Spotmatic ii

A favourable outcome using the Spotmatic and processing the film at the “Free Venice” festival.  The pictures still fell out of the self-adhesive album.


This week a photographer stopped by to talk about the article I wrote last week about the popularity of 1970s cameras. We discussed cameras we had used over the years and eventually got around to the question, “What was your first camera?”

The very first cameras that I likely used to make snapshots of family and friends were probably 127 Kodak cameras made of dark brown Bakelite plastic and I remember little (I think 3×6) prints with wavy edges coming back from the department store lab.

My father had the more serious 120 format folding bellows camera and usually posed us with the sun behind his back with the resulting squinting and pained smiles on our young faces.

I snapped pictures for years with cameras that had little or no control over exposure or focal length. I glued the pictures into photograph albums with little sticky corners. Of course, the self stick holders didn’t last long, and the pictures fell out, so I glued the pictures directly to the pages, but the glue’s chemical reaction discoloured the images and eventually those that weren’t lost by falling off and out of the album just faded away.

My first serious camera was purchased in 1967 while I was in the US Army. I purchased it from the Army PX (post exchange) while stationed overseas. The location was visually spectacular and different from anything I had ever experienced and I wanted to have photographs for memories.

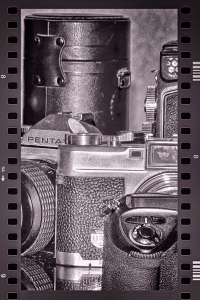
I looked at the limited selection in my price range and purchased a Petri V6 with two lenses, a 58mm and a 135mm.

When I got the Petri, I was so excited because it had an attachable light meter, used slide film and I purchased the 135mm lens because I was advised it was the perfect lens to take portraits of people.

My next camera was a loaner from a friend’s father so I could take a photography class in 1969 at Santa Monica College; the previous Petri had seen better days.  That neat Pentax H3V camera had a clip-on meter and came with only a 55mm lens, but my instructor said it would be perfect for his class.

Shortly there after, in 1971, a fellow student who worked for United Airlines purchased a camera for me during a trip he took to Japan. The photo magazines were talking about a new camera with “multi-coated” lenses, and an amazing through-the-lens spot meter. I then became the proud owner of a SLR Pentax Spotmatic II.

Although I used colour film for events like parties and Christmas I absolutely believed serious photographers only used black and white film. I added another lens, a Vivitar 35mm. Wow, a wide-angle lens! Then I got a 200mm. Gosh, I had everything I needed.

Those first three SLR cameras wetted my interest in photography. They were complex enough that I read magazines, books, and took classes to learn how to operate them effectively. In addition, I searched for opportunities to meet other photographers and talk about cameras, lenses, enlargers, photographic paper, and all sorts of picture making.

Before the Petri and two Pentax cameras, photography was only about documenting events around me, not creating a personal vision of the things that interested me. If I hadn’t had the opportunity to start making images with those three SLRs I expect my photography would never have advanced from anything more than just snap shots.

I am sure readers that used cameras before the digital onslaught remember their first camera(s) that helped their enthusiasm for photography grow and might even have great memories on prints or slides packed away in boxes.

I made fun of those old film camera wondering about the nostalgia some feel for them. I remarked that I personally wouldn’t want to return to film. But gosh, it was nice it was to hold those old metal cameras that were constructed so tight with shutters that clunked solidly instead of the high-pitched clatter most make today.


What’s Up With The Return Of Those Old 1970s Film Cameras?   

1970 Film cameras


When I wrote about this year’s Vancouver Swap in April I mentioned that I always go to the event wondering what the latest trends will be, or what is popular with the photographers that attend.

I didn’t discuss it in that article, but, this year those photo enthusiasts that turned up surprised me when they all but ignored the modern digital equipment sellers were displaying, and, instead seemed mostly interested in older 1970s manual cameras and lenses.

I commented about that this week to a photographer who came in to pick up an old Canon FTB camera she had left for light seal replacement. She had dropped it off a couple weeks ago saying it had been given to her. She also brought in an old cloth camera bag and pulled out three old Canon lenses she got with the camera and asking me my opinion.

Other than the 50mm that was mounted on the camera, there was a 28mm, a 135mm and a 200mm. All were Canon brand and, although very dirty from the dissolving foam inside the bag, very great lenses.

I remembered the time period, before zoom lenses, or automatic exposure, when cameras that actually had light meters like that old FTb were the pinnacle of technology. The original owner had chosen the most popular lenses of the day. And now a new owner was planning on putting the 45-year-old film camera and lenses to use again.

It’s been about 16 years since digital single-lens-reflex cameras became affordable and capable of making images equal to, and now surpassing, film cameras.

The photographer I talked to in my shop as well as those I met at the swap meet all owned modern DSLRs. I suppose there is a sense of nostalgia in holding and shooting those shiny, old metal cameras.

The local high schools whereabouts I live have photography programs where students use film cameras and learn to process and print photographs. I don’t know if the same happens in Vancouver where the swap meet was held. Nevertheless, those old film cameras are certainly popular.

There are many of us old enough to have used and even to have made a living with cameras during the 1970s who don’t for a moment regret the change in technology from film to digital. I sometimes wonder how we survived with that inefficient, cumbersome technology from a time period my friend Alex refers to as, “the days of click and pray”.

Digital cameras are a great way to learn photography, with instant reinforcement and no cost unless one wants to make prints; whereas, with film there is the initial cost of film, the cost to process, and the cost to print; however, one can easily and economically scan and download the image file to a computer. And unlike the cost of a DSLR those old cameras have become very inexpensive. That photographer’s whole kit, camera and three lenses here in BC should cost well under a hundred dollars.

I don’t know if it’s the nostalgia, or the low price, that has brought a return of popularity to those old film cameras. Even though I personally wouldn’t want to return to film I do remember how nice it was to hold those old cameras (there is a 1948 Olympus sitting on a shelf in my store that I keep eyeing) that were made by engineers instead of technicians and I will grudgingly admit there is something wonderfully tactile in the quality of an image captured on film.


Photographing the Chase Falls    

Chase Falls 1

Chase Falls 2

Chase Falls 3

It is just over a year since I talked about my spring visit to a waterfall about 20 minutes from my home. Photographing the Chase Falls is, as the name infers, the falls just across the Trans Canada highway from the center of the small lakeside town of Chase, British Columbia.

Spring with its warm, snow-melting temperatures sure rolled in very early this year. Gosh, who would have thought we’d experience 30+ Celsius at the beginning of June. With that warm weather I was positive I wouldn’t see high, murky, water rushing over the falls.

I arrived around 11am and took the short walk along the sandy path to the falls. And sure enough, although there was plenty of water coming over Chase falls, the creek level was low enough that I was easily able to scramble among the large rocks along the bank and found many comfortable locations to set up my tripod. Ansel Adams said, “A good photograph is knowing where to stand.”

I guess that’s right when it comes to photographing a waterfall, I leaned against a big bolder and pulled out a couple of neutral density (ND) filters so I could reduce my shutter speed by a few seconds, and slow the water down in my shot. Then began moving my tripod from place to place, in hopes of finding that “good photograph.”

Photographing waterfalls and getting that smooth water that is so popular is really easy to do, and not complicated at all. All one needs is a camera, a sturdy tripod and a neutral density filter.

I put my camera on the tripod, focus, place a ND filter in front of the lens, and release the shutter. I rarely bother with a cable release. I usually just select my camera’s self-timer. I use 4-inch by 4-inch square ND filters that are well worn and a bit marked up.

When I purchased the filters they came with a filter holder to attach to the lens front, but that’s just more stuff to carry and instead I hold them by the edge in front of my camera lens and move them up and down so anything on them won’t show up when I take the picture.

I had a nice time taking pictures and even sat for a while on one of the large, smooth boulders just enjoying the cool air and the sound of the water. I think I might go back next week to try out a fish-eye lens that came into my shop.


Searching For that First DSLR 

Film then Digital

Digital technology has been around long enough that I occasionally overlook that there still are people who have never used anything but film cameras. I recently talked to a photographer who is finally ready to discard his old film camera and wondered which DSLR he should select.

He even sent me an email saying that regarding a camera; he would “need the whole meal deal.” I admit that I am not sure what he actually meant by that. I said to him that today’s modern technology cameras offer choices that are very different from his old film camera. As readers know, he is about to take a huge, creative step as he moves to digital.

He told me he has enjoyed photographing local rodeos. So what should be my advice to an aspiring rodeo photographer? Manufacturers like Nikon, Canon, Pentax, Sony, Fuji, and many more, all make cameras that will probably work fine for sports like rodeos.

I could start by suggesting he to go online and search out sport photographer sites for recommendations. Photographing sports is very technology driven and manufacturers are aggressively marketing to those photographers. He should begin by choosing a camera that is durable, and capable of taking some abuse, sturdy enough to be bumped around, because I think that’s a pretty rough and tumble (and dusty) world he’s participating in.

Both Canon and Nikon make professional cameras specifically designed for sports and the accompanying high ISO needed for low light, interior locations, that will focus almost any lens extremely fast, and are easily capable of high quality, excellent enlargements.

For fun I read up on professional rodeo photographer, Rick Madsen, who wrote, “Remember the camera is just a tool. When a hammer is used, it is the operator who makes it strike the nail. The same concept applies to a camera. It is just a tool and it’s what the photographer does with that tool that makes the difference between a good and a mediocre image. You must take the time to learn the camera’s operation and then utilize that acquired knowledge through practice to become proficient. You have to pay your dues.”

I personally would save my money on the camera and spend it on the lens, as my real concern would be to get a quality lens. A saying I have heard over and over in the many years I have been in this medium is that, “it’s all about the glass,” referring to the lens. And from my readings, most rodeo photographers recommend 70-200mm lenses, and I also think a 70-300mmm would fit the job also.

I hope he can find a good, well priced, used camera and a couple of quality lenses for it. He will be faced with so many choices and will receive many, many well meaning recommendations from other photographers that he’ll stay awake nights wondering what he’s got himself into. Nevertheless, I know he will be excited when he finally gets that first DSLR and embarks on the exciting journey as he learns how to use it.


Selecting a Tripod


Tripod & Hat        In his book, “Backcountry Journal, Reminiscences of a Wilderness Photographer”   Dave Bohn writes, “The trouble with photographers, and anyone else attempting anything creative, and in fact doing anything, is that they get addicted…(and)…I was addicted to the tripod as a necessity for the photography of large landscapes.”

I remembered (and liked) that quote from an article I wrote in October 2013 and thought I should post it again. I can’t say that I am addicted like Mr. Bohn, but I, too, really enjoy using a tripod when I shoot landscapes.

I reread my 2013 article on tripods and decided to repost some of my discussion after talking with a friend about tripods. He is planning on getting a new one as a gift for his wife, and we were discussing what might be the best for her.

When I select a tripod I want one that extends above my head so I can use it on hills. I don’t like bending over to peer through my camera’s viewfinder. I also prefer tripod legs that can be extended out horizontally when the ground is uneven.

I don’t want a crank to raise the center column as that is just added weight, and becomes one more thing to get caught on things. I like a column lock that turns to lock and unlock so I can easily adjust it up or down.

An important feature on the tripod I select is a strong and easily available quick release on the tripod head. The tripod head is another subject completely and my advice is get one that has a reasonable size ball surface and that is lightweight.

A tripod shouldn’t be so heavy that it’s a bother to carry. Nevertheless, it must be sturdy and capable of supporting my camera without shaking. I am always amazed when a photographer uses a cheap, little tripod to hold their camera and lens that are worth well over the thousand dollars plus mark.

I am pragmatic in my approach to photography. Sometimes the conditions are fine for just pointing and shooting, but if I really care about the picture I know I will have better success getting a quality enlargement if I return to the car and get my tripod. That’s just good sense.

I know there are many modern photographers are of the belief that the difference between a blurry and a sharp enlargement is megapixels or vibration reduction features. I can’t disagree with that altogether, but I do think a good, stable tripod is just as important and in some cases more.

Using a good tripod that allows one to stand up straight, take time to analyze the scene, problem solve, compose, and contemplate is an excellent experience. In addition, it keeps the camera from moving.

I suggest buying from people that have used, or at least can discuss, the tripods they sell.  The department stores will allow you to bring it back if you aren’t satisfied, but I am sure they are not interested in paying for the damages to your camera and lens that crashed to the ground while using their bargain tripod.

In recent years more and more quality tripods have become available and are worth owning and using. All one needs to do is spend some time researching and checking reviews.

Photographers spend lots of effort selecting that DSLR and lenses for each purpose they want to use it for. My advice is to take the same amount of effort with that purchase a really good tripod.


A Rainy Day in Hope, BC – Photographing with Infrared

Wecome to Hope 1

bear crossing 1

Town clock 1

Animal totem 1

Driving thru Hope 1

After leaving the Vancouver Camera Show and Swap Meet last Sunday I decided that rather than make the long drive all the way back to Kamloops and then Pritchard, I would make a stop for the night in Hope along the way.

Hope, British Columbia, is usually just a location to make a quick pull off at a fast food restaurant, or coffee shop. as I drive between Vancouver and Kamloops.

I have always liked the appearance of the picturesque little town just off the highway along the Fraser River. That was first settled when explorer, Simon Fraser, arrived there in 1808. The Hudson’s Bay Company started a trading post in 1848.

In more recent history Hope received acclaim when it was the location for the Sylvester Stallone Rambo movie, “First Blood”, and then, “Shoot to Kill”, staring Sidney Poitier and Kirstie Alley. The area’s mountains also stood in for the Himalayas in the movie “K2″.

However, in spite of all that the main reason for my stop was I knew I’d be tired after my long day at the swap meet, and, in addition, I thought it would be fun to wander around town with my camera the next morning. I chose to bring the camera I had converted to infrared. I thought shooting infrared would bring a fresh and very different visual interpretation to the heavily forested setting.

There is a poem by Robert Burns wherein he writes, “the best laid plans of mice and men often go awry”. I thought of his prophetic words as I checked out of my motel room the next morning under a pouring rain. Disgusted with my crappy luck I stopped for a coffee and doughnut before leaving town. I was resigned to just head home. But as I sat in my car sipping on my coffee texting my wife that I was heading out, the rain lightened up and I decided that in spite of the cloudy overcast I would try my infrared camera anyway. I thought, what the heck, any photography is fun and the worst that can happen is I’ll have wet hair for the trip back.

I meandered down to the riverfront and zigzagged back through town. I discovered that at some point town residents began erecting large chain saw carvings everywhere. So I took pictures of them along with those of the city streets until the rain picked up again and my glasses got too wet to see.

The best time to shoot infrared is on sunny days, so the rainy, heavily overcast environment wasn’t all that exciting. But I was intent on the pictures by this time.

I must say that I wasn’t really successful, but there were a few images, that with some postproduction help worked out reasonably well.

The rain won this time, but I think I might go back to that scenic little town nestled in the Fraser Canyon. It’s not that far from my home and a nice easy drive, and I’ll take Linda with me. However, we’ll wait for a sunny, dry day and I definitely will try infrared again.

Infrared is such a fun change from normal digital shooting. And similar to purchasing another lens, the cost of having an old camera converted is well worth it.

Photographing Flowers by Bathroom Window Light       

Daffodil BW

This week my wife and I had our first serious walk of the year around her garden.

Everything was competing for a place in the sun and the colours were beginning with white being the most prominent. I guess that might be because the first flowers to bloom in my wife’s garden this year were her white daffodils, and there are lots. We were looking for flowers to bring inside the house, so the abundant daffodils were the natural selection.

In March of 2013 I wrote, “Photographing an Orchid in the Bathtub.” In that article I discussed how one morning, I realized that a lone blooming orchid that my wife was watering on top of an upside down plastic barrel in our bathroom tub was a photo opportunity in the making.

At that time I could see a back light beginning to come through the frosted bathroom window and the slight beginnings of a back glow on the flower. It as in the morning and I knew within an hour or so the sun would move to that side of the house and continue in a southern arc for the rest of the day.

It was with that in mind that we decided it would be fun to photograph the daffodils before Linda choose a final location to display them in the living room.

One could set up a small studio for flower photography anywhere in a house. I even have a small diffusion box especially designed for product photography. Nevertheless the soft diffuse light coming through the frosted bathroom window glass is almost perfect for flowers.

I found another plastic 5-gallon barrel, placed it up side down in the tub with the white daffodils on top, and set up a speedlight coupled with an umbrella on a lightstand to photograph the daffodils.

When I photographed that orchid it was early morning. However, this time it was late morning and a more direct light was coming through the bathroom window. So I took the outer cover off the big 5-in-1 reflector I have and it became another layer of diffusion when I placed it between the daffodils and the window.

All I had to do then was point my 135mm lens, shoot, arrange the flowers, shoot again and rearrange. When I mentioned to Linda that the flowers would look good as a black and white photo she said. “Everything is pretty much monochromatic anyway”, so it was with a final b&w image in mind that I took the picture.

Photographing Graffiti in The Tunnel   

Lighting the tunnel

Creek Tunnel

Kast

AWs

Creek tunnel North

There is a little creek that flows into Kamloops, British Columbia via a small waterfall. Petersen Creek is diverted underground for it’s journey through the city until it circulates out and spills into the South Thompson River.

There are several places along its cement banked route where Petersen Creek’s shallow flow is visible to passers-by, but it quickly runs out of sight again when it reaches a city street and is diverted underground.

One would think there isn’t much interest to anyone other than the City Works employees who make sure it isn’t plugged up when there is a larger than normal volume of water coming down from the canyon. However, at the final concrete watercourse everything changes to several block-long tunnels that are 10-12 feet high and just as wide that have gained attention from very creative graffiti artists and, of course, locals that enjoy capturing that creativity with their cameras.

It was there that I climbed down into after parking my car on the street beside the drainage tunnel entrance. I had met a resident photo enthusiast named Shannon who has been smitten with all the graffiti she was seeing on backstreet walls and boxcars that had wandered into the tunnel and she realized that street artists were painting on the walls.

I joined Shannon, and her partner Max, a few weeks ago in the dim tunnels. They and most locals were relying on their camera’s ISO ability, but after ten or fifteen feet the light was gone.

I hadn’t been in those tunnels since I first came to Kamloops back in 1974. At that time I tried going in a bit, but the water was much higher then and other than a few crude messages spray painted at the opening there wasn’t really a reason to slosh into the dark tunnel. However, this time I decided it would be fun to light up more than just one or two paintings.

I returned with four stands with a flash on each and positioned them to cross light the tunnel. Then it was easy to begin by metering the light coming in from the road and balancing the light from each flash to match that.

When I got home it was simple to clone out each flash and use Photoshop’s burn and dodge tool to smooth out the areas where the flash had outlined its light on the floor or where ever there was a different brightness.

I chose to illuminate the street artist’s work as a whole instead of just documenting one section at a time. I know when we see what someone has left on a wall or on a train’s boxcar as it passes by, that we tend to isolate one piece of graffiti art, but as I stepped into the dark winding drainage tunnel I felt more than just a cold breeze and saw more than one bright statement. To me everything – the dark winding tunnel, and the graffiti – was all part of the whole, or one ongoing work of art. And I wanted to photograph that combination of a cold, colourful, wet, chaotic, winding tunnel displaying the work of many artists.


A Photography Excursion In My Own Yard     

Showtime

Rusty Chain

Painted wheel

Lichen

Wagon wheel

Water tank

Window hinge

C.P.R.


It seems as though photographers get so hung up on traveling in search of exotic, or inspiring, locations that they forget about what is right out their own door.

I must admit that unless I have decided to take pictures of a colourful plant, or quickly capture a photo of a feral cat looking for handouts, or a deer that has hopped the fence with hungry designs on the spring buds growing in my wife’s garden, I rarely wander our yard with my camera in hand. The items we pass by every day become so familiar and commonplace that we pay little attention to them.

Last Sunday I wondered if the ten lilac bushes I planted late last fall made it through the winter. So I walked along the fence to check for spring growth and sure enough all of the new shrubs made it and I later told my wife that all the lilacs she had shipped all the way from Quebec are doing just fine. Of course with the unusually warm winter we had here in British Columbia one would expect no less.

As I walked around I spied a pile of old chain rusting on a log and realized I might be missing an opportunity for a few pictures if I didn’t get my camera. I admit I am not the most fastidious person when it comes to keeping tidy the two acres of land we live on, and because bits of things interest me I am forever picking up stuff that is apt to spend lots of time resting wherever I place them when I got home. That chain has only been sitting there for a year or two, but there might come a time when I will need that well-rusted length of chain.

So I got out my camera and mounted my wife’s treasured 70-180mm macro, grabbed my flash, and headed out. The Nikon AF 70-180mm is unique. It is the only true macro zoom lens around which allows precise framing without having to change working distance and refocus. And so, yes, that lens is special to Linda.

This photo hunt was to look for those bits and pieces similar to the chain and that’s why I chose that macro lens, so I could get in close or zero in on just a part of what I wanted to photograph.

One of my favourite photographers, Robert Mapplethorpe wrote, “With photography, you zero in; you put a lot of energy into short moments, and then you go on to the next thing.

Those words were perfect for my walk through my spring-like yard. I’d find an object or feature, focus close with the macro lens, zoom in to crop tight, release the shutter a couple times and move on.

Although I can use my flash wireless off-camera, this time I chose to connect it to the camera with a dedicated TTL cord. I decided it would be easier to hold the flash and aim the light from different angles than it would be if I had to keep moving and adjusting a stand. Instead of fussing with a flash mounted on a stand all I did was put the flash in my pocket till I needed it to photograph flaking paint, rust, moss-covered wood and all sorts of things that have found a home in our yard.

I am of the opinion that those photographers that live in a well-kept, tidy yard are missing out on such an opportunity. Just think of how much fun I had on my safari discovering great things of which to take pictures.

Of course there is the possibility that my wife will come up with an altogether different kind of safari once she sees my pictures, one that will be a lot less fun for me.


A Good Day for Infrared Photography            

Pritchard Train crossing 1a

Reflection

Log jams 1b

Salmon 2b

Bridge crossing 1a


The past few weeks have been apparent with flat and overcast skies. That’s certainly not inviting for anyone chomping at the bit to get out with a camera around Kamloops, British Columbia.

Only a short month ago the landscape was covered with glistening white snow that even on overcast days created some interest. However, that snow has melted this month leaving colourless meadows and a washed-out-looking, green forest of trees. In my opinion, the best word to describe the landscape, even with today’s sparkling sun, is grey.

I suppose many landscape photographers get creative and spend some time behind a computer manipulating that grey landscape. There are a myriad of programs designed to manipulate image files allowing black and white conversion or gritty oversaturation. But those conversions, although creative, in my opinion, don’t really give much life to the landscape.

However, for me it’s simple. I just grabbed my infrared camera and drove down to the large Thompson River that cuts through the valley on its way to Kamloops and then to the Canadian west coast.

For years I have enjoyed capturing landscapes (and cityscapes) using first, infrared film, and then for the past ten years, a camera converted to only “see” infrared light.

Infrared light is invisible to the human eye. To capture it with a modern DSLR, the camera is converted by blocking all but the infrared light from hitting the sensor.

I enjoy how infrared photography gives me a scene illuminated by that part of the colour spectrum we can’t see, with delightful images that couldn’t be captured in any other way.

Dark skies and glowing white trees are some of my favourite infrared effects. It is those fresh and exciting photographs (done with very little computer work) that separated my photography from both the monotone conversions, and the oversaturated scenic, that had been viewed on posts by other local photographers.

I like to wander along the winter beach not far from my rural home. Normally the turn-off and sparsely tree-lined beach is well used by locals with motorbikes and bicycles, walking their dogs, or launching their fishing boats. However, the winter beach on the river is empty, especially on cold days, and it’s those days that I enjoy the most. I can stroll along the narrow walkway that goes over the bridge while taking pictures of the river valley. And although there is a sign that tells walkers not to loiter or fish from the bridge, in all the years that I have been making pictures from it, no one has ever bothered me. Most of the time people smile and wave from their vehicles as the pass me.

I roam under the bridge and search the sandy riverside photographing interesting features and trash left over from winters’ storms, and, in spite of everything being shades of grey, infrared changes everything, and I have the choice in post-production to choose surreal coloured, or unique black and white images.

I’ll repeat what I wrote when discussing infrared in my article last November, “Infrared allows a photographer, and gives the viewer, a completely different feeling of a subject. Making an image with a modified camera is an exploration and a discovery that moves a photographer far from the usual”.